- December
- December 15, 2025: Admin | Collection indexes
- December 12, 2025: White Labeling | Added a custom link option for a Feedback banner for dashboards
- December 11, 2025: Chart Widgets | Personal Reports checkbox moved to common section
- December 10, 2025: Widgets header | Added option "Always visible widget buttons" to improve navigation
- December 1, 2025: Conditional Action migration | Enabled adding a longer description to event subscriptions
- December 1, 2025: Input widget | Data range hint added
- December 1, 2025: Navigation panel | System menu available for Managers
- December 1, 2025: Table widgets | Personal Reports checkbox moved to common section
- November
- November 27, 2025: Admin | Collections details
- November 25, 2025: White Labeling | Error Pages tab added
- November 24, 2025: Faceted search | Daylight Saving Time (DST) boundaries reflected
- November 24, 2025: Table Widget | Improved readability of custom column configuration
- November 3, 2025: Custom widget improvements
- October
- October 30, 2025: Personal and project-wide notifications of events
- October 22, 2025: Testing pipelines with new Python version now possible
- October 21, 2025: Changes in the building and deployment process of custom widgets
- October 20, 2025: Custom Freemarker extensions are now available for Event Subscription actions
- October 14, 2025: References are now possible in action buttons' disable on condition
- October 13, 2025: Implemented TUS protocol for resumable data upload
- October 7, 2025: Generating emails with personal reports
- September
- August
- August 28, 2025: Various improvements and bug fixes
- August 28, 2025: Successfully upgraded to MongoDB 8.0
- August 19, 2025: Tagging and labeling functionality is now moved from Conditional Actions to Pipelines
- August 14, 2025: Define, produce, and subscribe for Custom Events
- August 14, 2025: Breadcrumbs for nested dashboards
- August 8, 2025: User Actions and Status Events reporting in the Pipeline Metrics tab
- August 6, 2025: Filter widget improvement - path drop-down selection for custom conditions
- August 5, 2025: Signal Chart widget improvement - select and deselect all signals
- July
- July 28, 2025: Highlighting in menu
- July 11, 2025: Documentation extended with a new example for external data source
- July 9, 2025: Improved user experience for dashboards with grid-based layout
- July 8, 2025: Improvements in the Action Button column type in Table widget
- July 7, 2025: Decoder specification file size limit increased to 500 MB
- July 4, 2025: Custom event step introduced
- June
- June 25, 2025: Undo and redo a rearrangement is now possible for dashboards with grid-based layout
- June 23, 2025: Extended pipeline trigger options
- June 20, 2025: New menu with reprocessing job details, app console and metrics
- June 19, 2025: Pipeline metrics reporting now available
- June 18, 2025: Shared data sources by widgets on the same dashboard
- June 17, 2025: Backend sorting for data sources in Table widget
- June 16, 2025: Batch Action Hyperlink option now available in the Table widget
- June 3, 2025: Backend pagination for data sources in Table widget
- June 2, 2025: Dynamic input fields in Input widget
- May
- April
- April 30, 2025: Various improvements and bug fixes
- April 25, 2025: Defining primary and secondary action buttons in the action button column type for Table widgets
- April 24, 2025: Table Settings of the Table widget now offer sections for better navigation
- April 23, 2025: Adding multiple actions in a table widget's action button column type now possible
- April 9, 2025: Table widget configuration allows up to 50 columns
- April 4, 2025: Prefix and suffix modifiers in widget data sources
- March
- March 31, 2025: Various improvements and bug fixes
- March 31, 2025: Table widget configuration improvement
- March 28, 2025: Improved filtering of processing pipeline logs
- March 26, 2025: Improvements in the batch action button definition of the Table widget
- March 25, 2025: Changes in the log retention configuration of conditional actions
- March 20, 2025: Input widget improvements
- March 19, 2025: Icon options for action buttons
- March 13, 2025: Deleting pipeline versions now possible
- March 12, 2025: Pagination of resources in Calendar widget's Timeline view
- March 6, 2025: Improvements in reprocessing jobs
- March 5, 2025: Input history metadata is now editable
- February
- February 28, 2025: Various improvements and bug fixes
- February 25, 2025: Widgets are now collapsible
- February 14, 2025: Improved rearranging of widgets on dashboards with grid-based layout
- February 13, 2025: Filter sharing button made optional
- February 12, 2025: Easier sharing of filter settings
- February 4, 2025: Device management features
- February 3, 2025: Widget Export service improved with a configurable load timeout parameter
- January
- January 31, 2025: Improvements and bug fixes
- January 24, 2025: Filter widget improvements
- January 15, 2025: Billing Month and Termination Day changed
- January 15, 2025: Easy access to hidden filter widgets
- January 15, 2025: Custom widgets can now be developed and shared across Bosch IoT Insights projects
- January 10, 2025: Tab widget now supports data sources and dynamic tab titles
- January 8, 2025: Copy-pasting of custom properties of devices
December
December 15, 2025: Admin | Collection indexes
When you select the name of a collection you can now choose between the Details and Indexes views. Indexes view provides more information about the existing indexes of a collection.
In MongoDB, indexes provide efficiency while executing queries . If you are repeatedly sending queries on the same fields, create an index on those fields to improve performance for the respective queries.
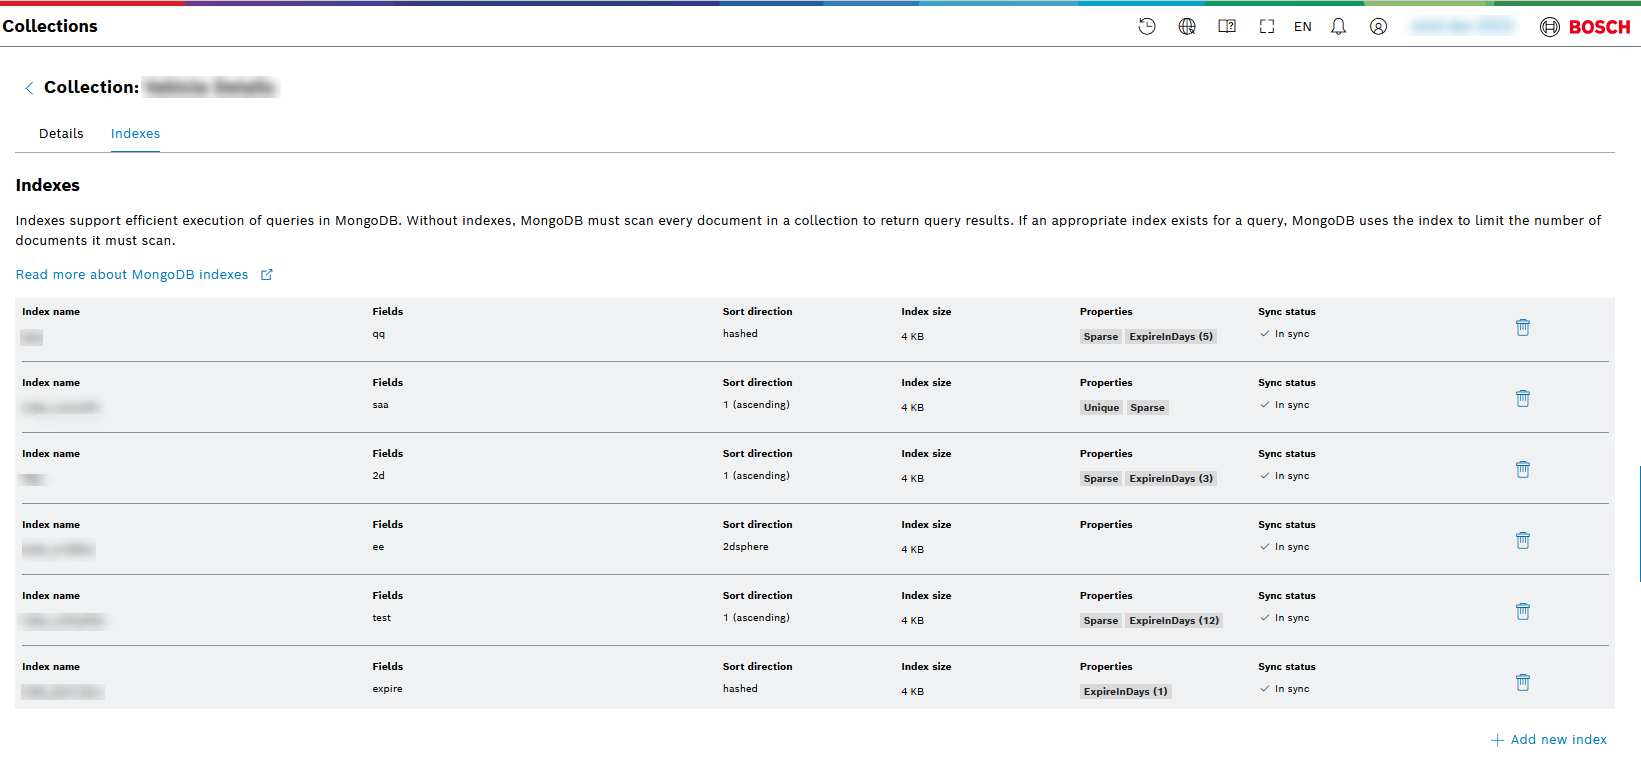
Find more information in Collections how-to guide.
December 12, 2025: White Labeling | Added a custom link option for a Feedback banner for dashboards
You can now configure a custom feedback link for your dashboards. This link will be used in the feedback button displayed on your project dashboards. Leave the field empty to disable the feedback button on your dashboard.
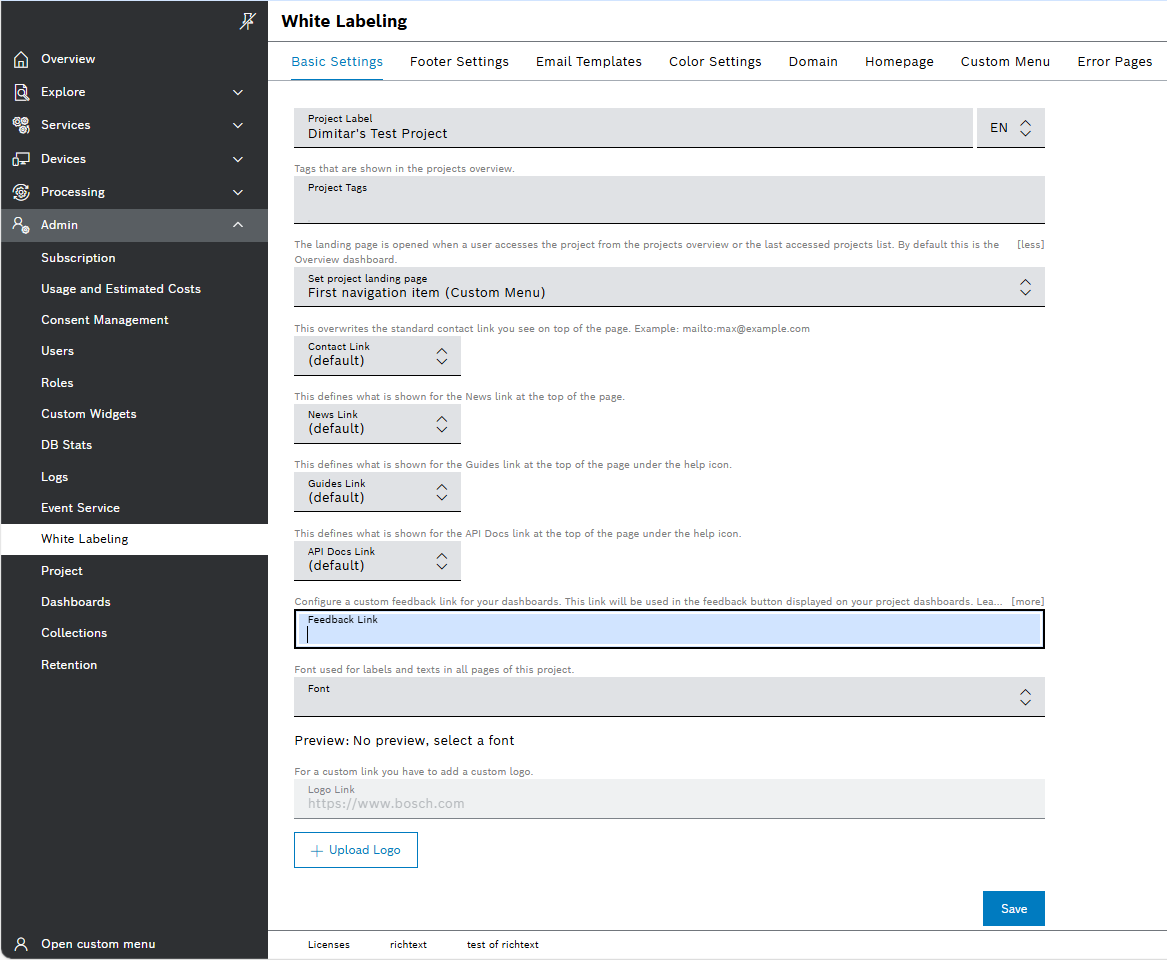
Learn more about White Labeling from White Labeling how-to guide.
December 11, 2025: Chart Widgets | Personal Reports checkbox moved to common section
Following our goal to increase the availability of the personal reports, we moved the Enable reporting checkbox from the Chart Settings to a more common section as General Settings:

For more information about Personal reporting, refer to Personal Reports.
December 10, 2025: Widgets header | Added option "Always visible widget buttons" to improve navigation
In the General settings of all types of widgets, a new option is added to let you choose which buttons to always stay visible in the widget header: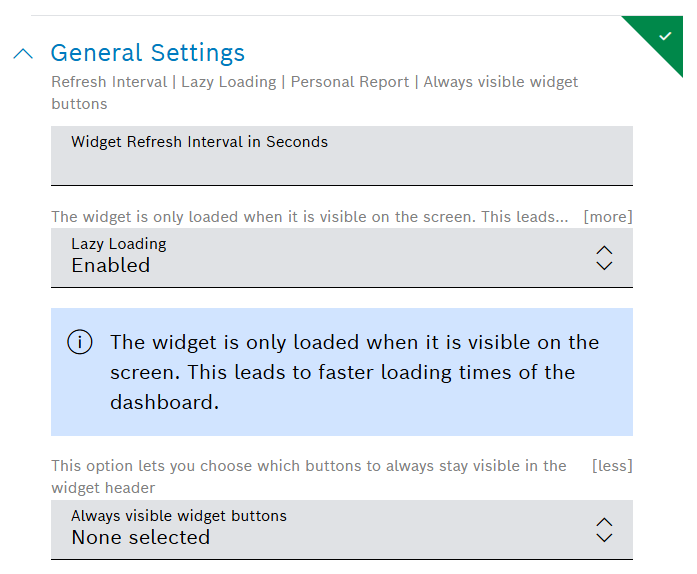
You can choose all or some of the available buttons, namely Edit Widget, Rearrange, Refresh Diagram, Maximize, Remove, Download JSON, Download CSV, and Add to Personal Report: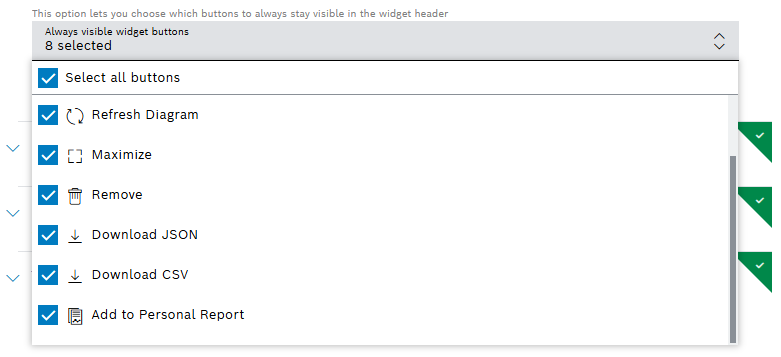
As a result, instead of being accessible from the context menu, their icons will be always visible in the widgets header:

To learn more about widget, refer to Working with widgets how-to guide.
December 1, 2025: Conditional Action migration | Enabled adding a longer description to event subscriptions
The new Event Service view makes it now possible to have a description field for other than system and custom event types:
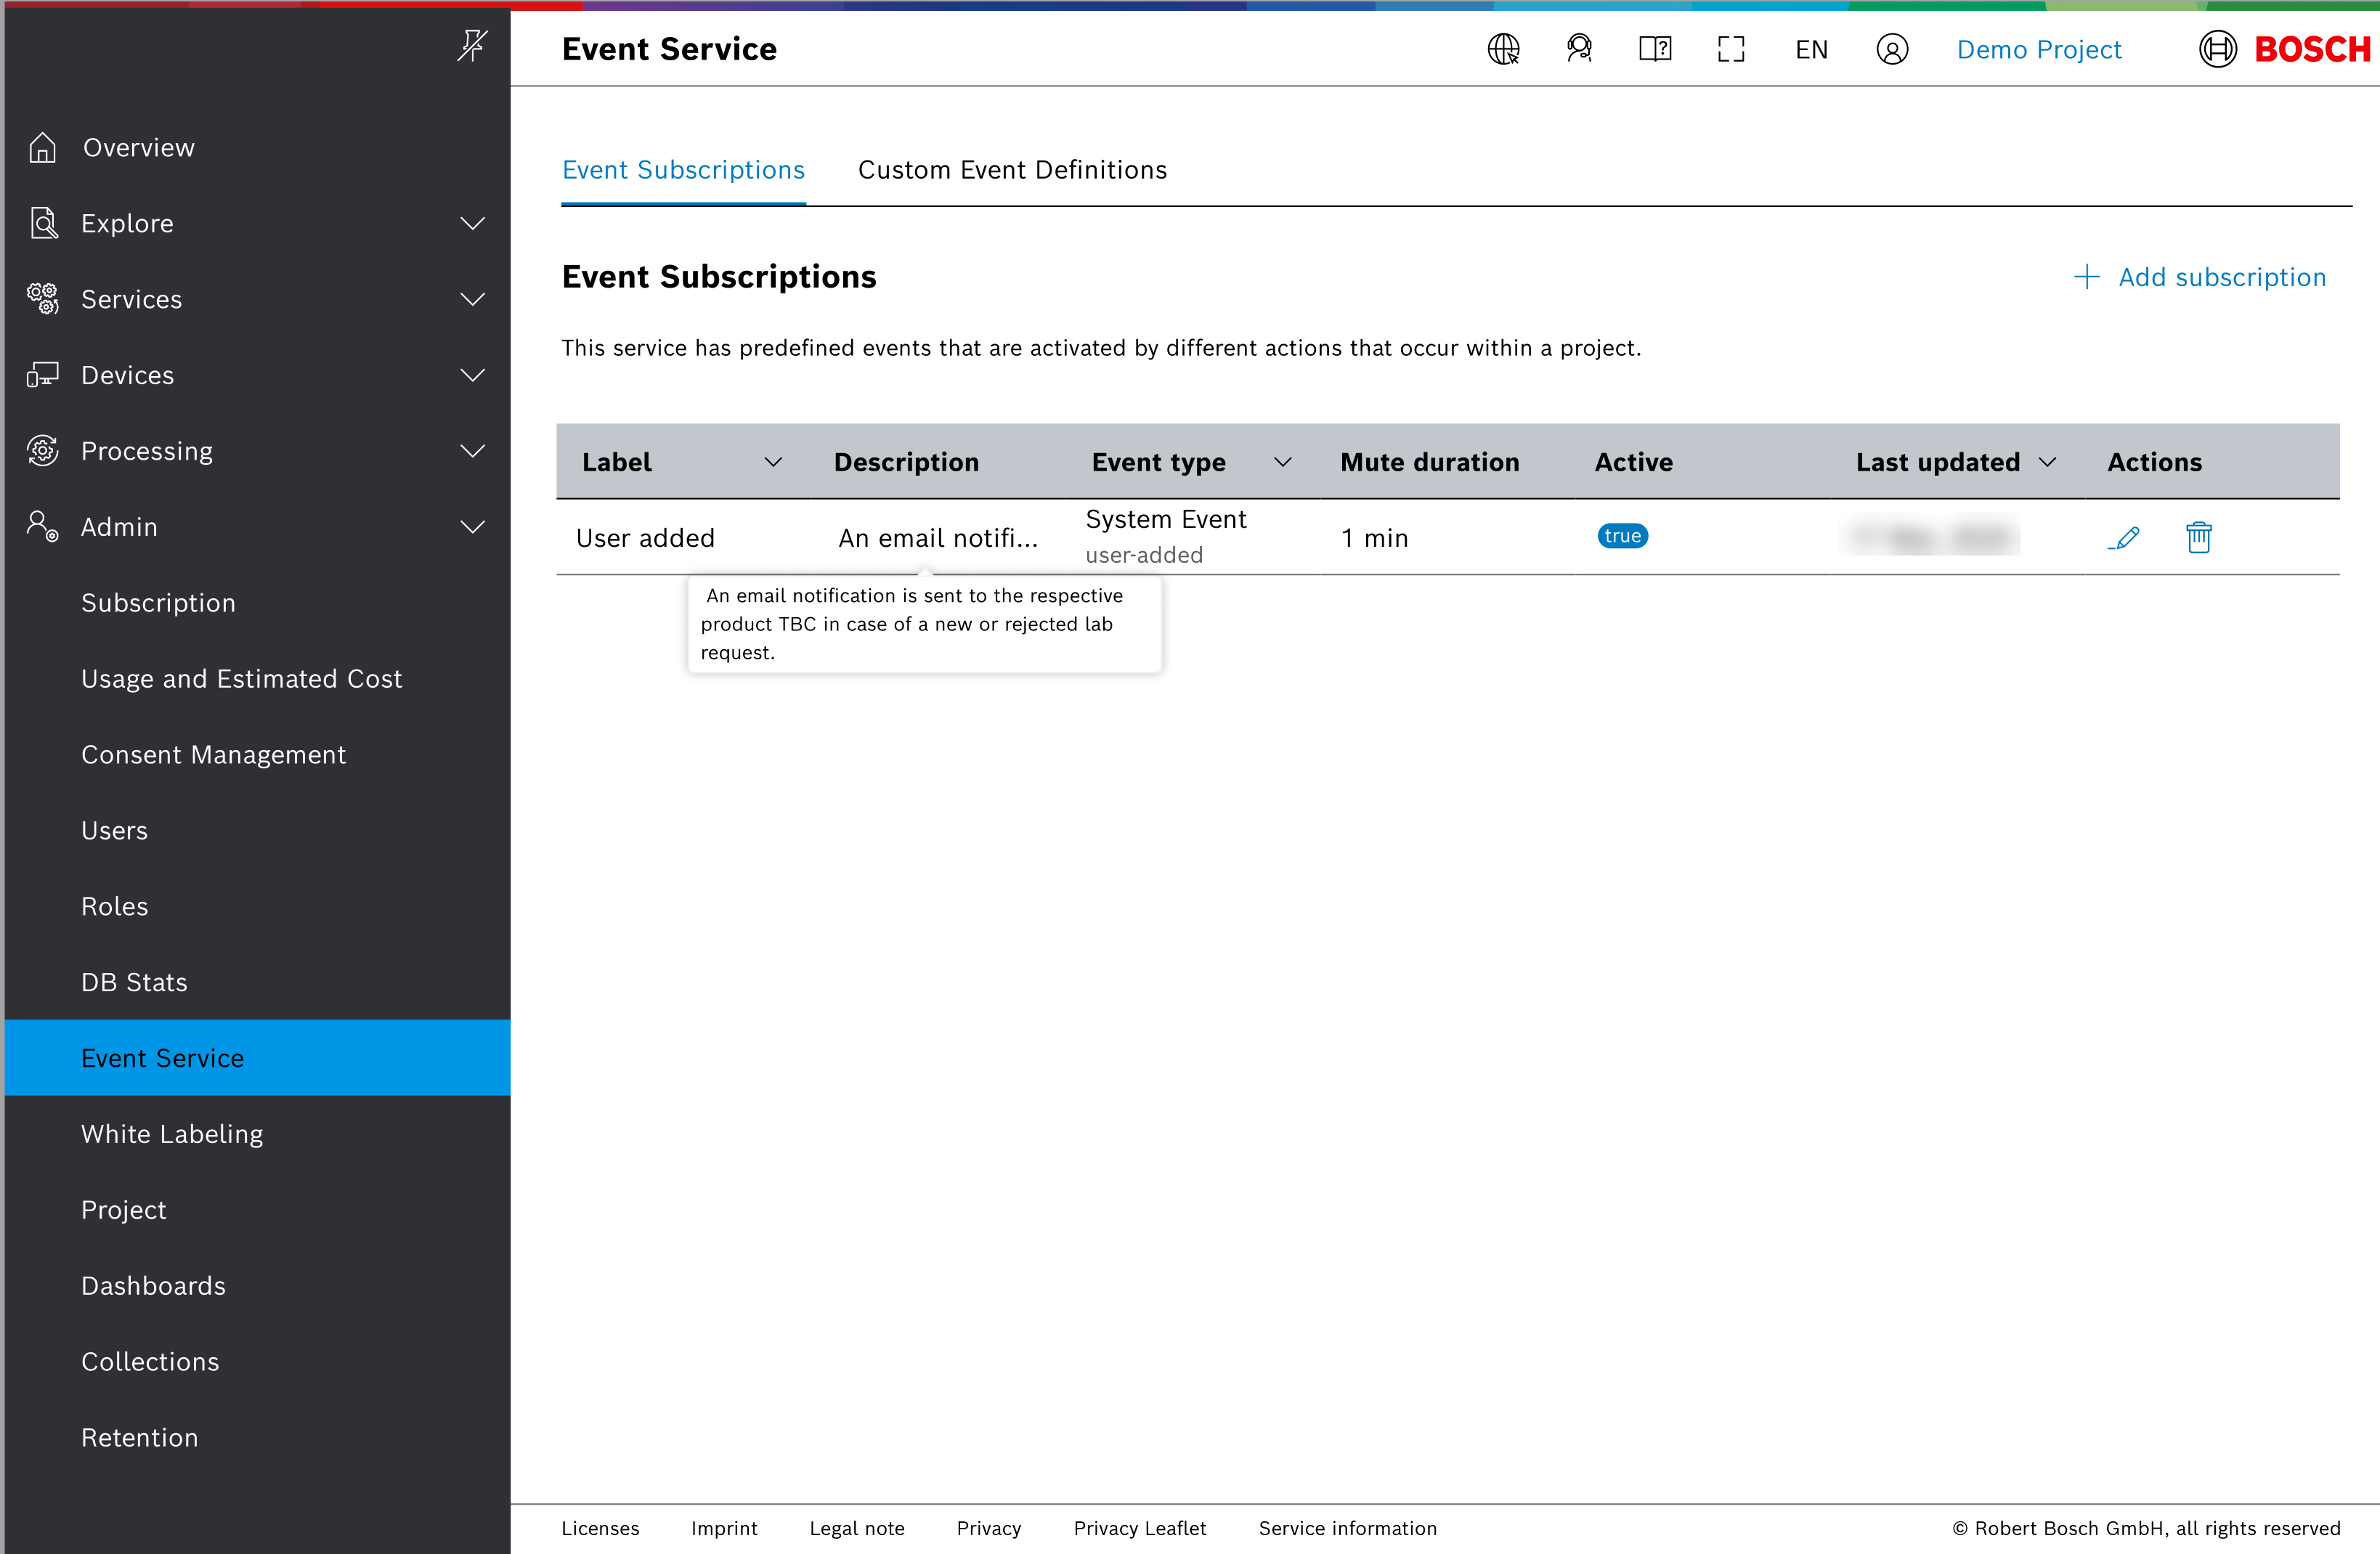
For System events, the description is predefined by the system, and can be modified if needed.
For details, refer to the Adding a subscription topic in Event Service how-to guide.
December 1, 2025: Input widget | Data range hint added
As the data format given out of the Input widget for a date range differs from the one of the Filter widget, we added a hint in the Input widget configuration. The hint describes how to configure a query template based on the Date range (dateRange) input field, making it clear that you have to configure the parameter with data type “TIMESTAMP” and parameter type “LIST”, since the output of that field will be generated in the format of [“from date”, “to date”].
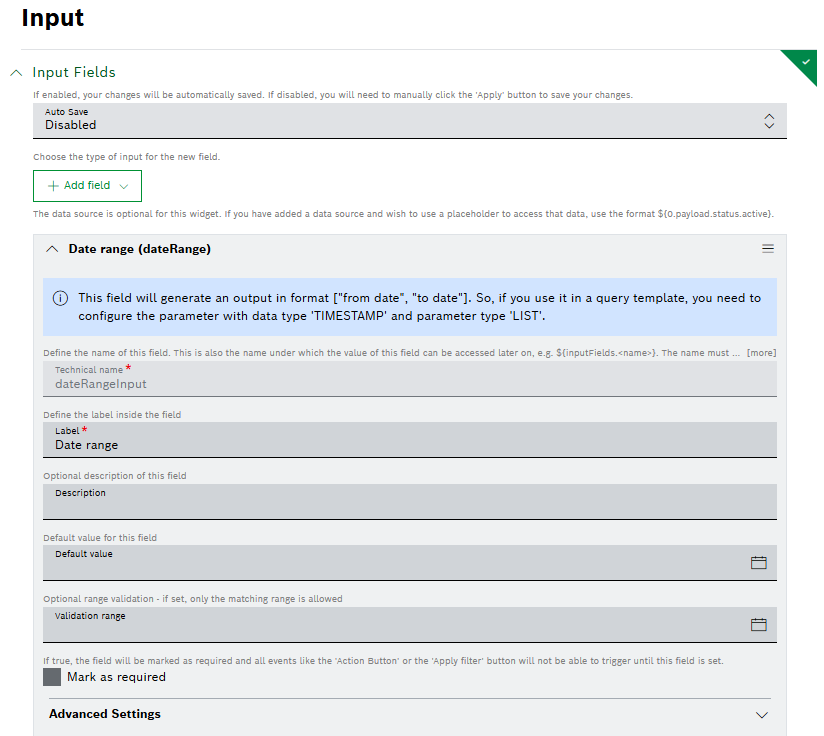
For more information about the Input widget, refer to Input widget.
December 1, 2025: Navigation panel | System menu available for Managers
The navigation panel now allows Project Managers to switch to the system menu using the Open system menu option at the bottom of the navigation panel:

December 1, 2025: Table widgets | Personal Reports checkbox moved to common section
As our goal for the future is to increase the availability of the personal reports, we moved the Enable reporting checkbox from the Table Settings to a more general section as General Settings:
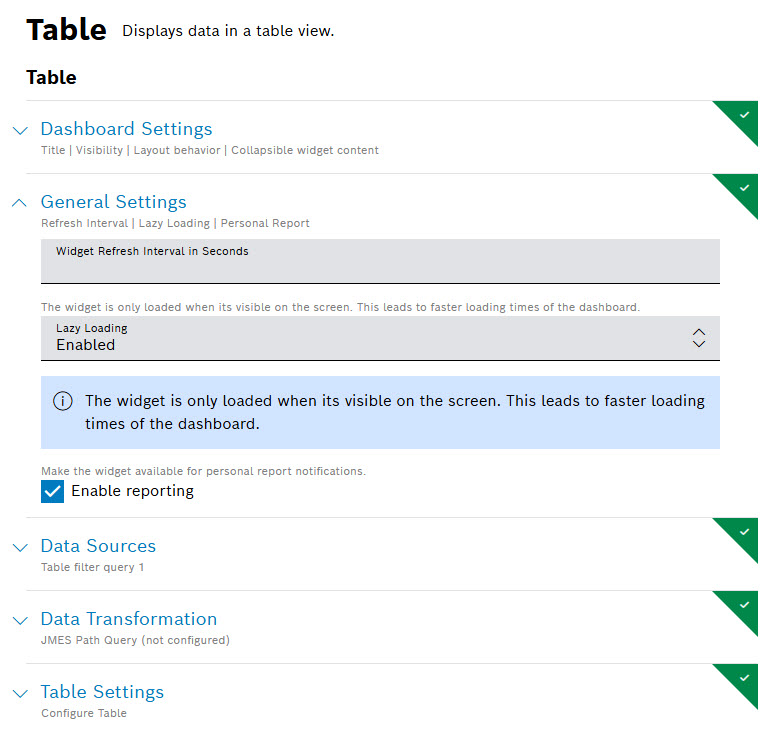
For more information about Personal reporting, refer to Personal Reports.
November
November 27, 2025: Admin | Collections details
The Collections menu displays all collections grouped in three tables according to their categories of Custom data, History & Logs, and System internal along with their name, description, type, and action.
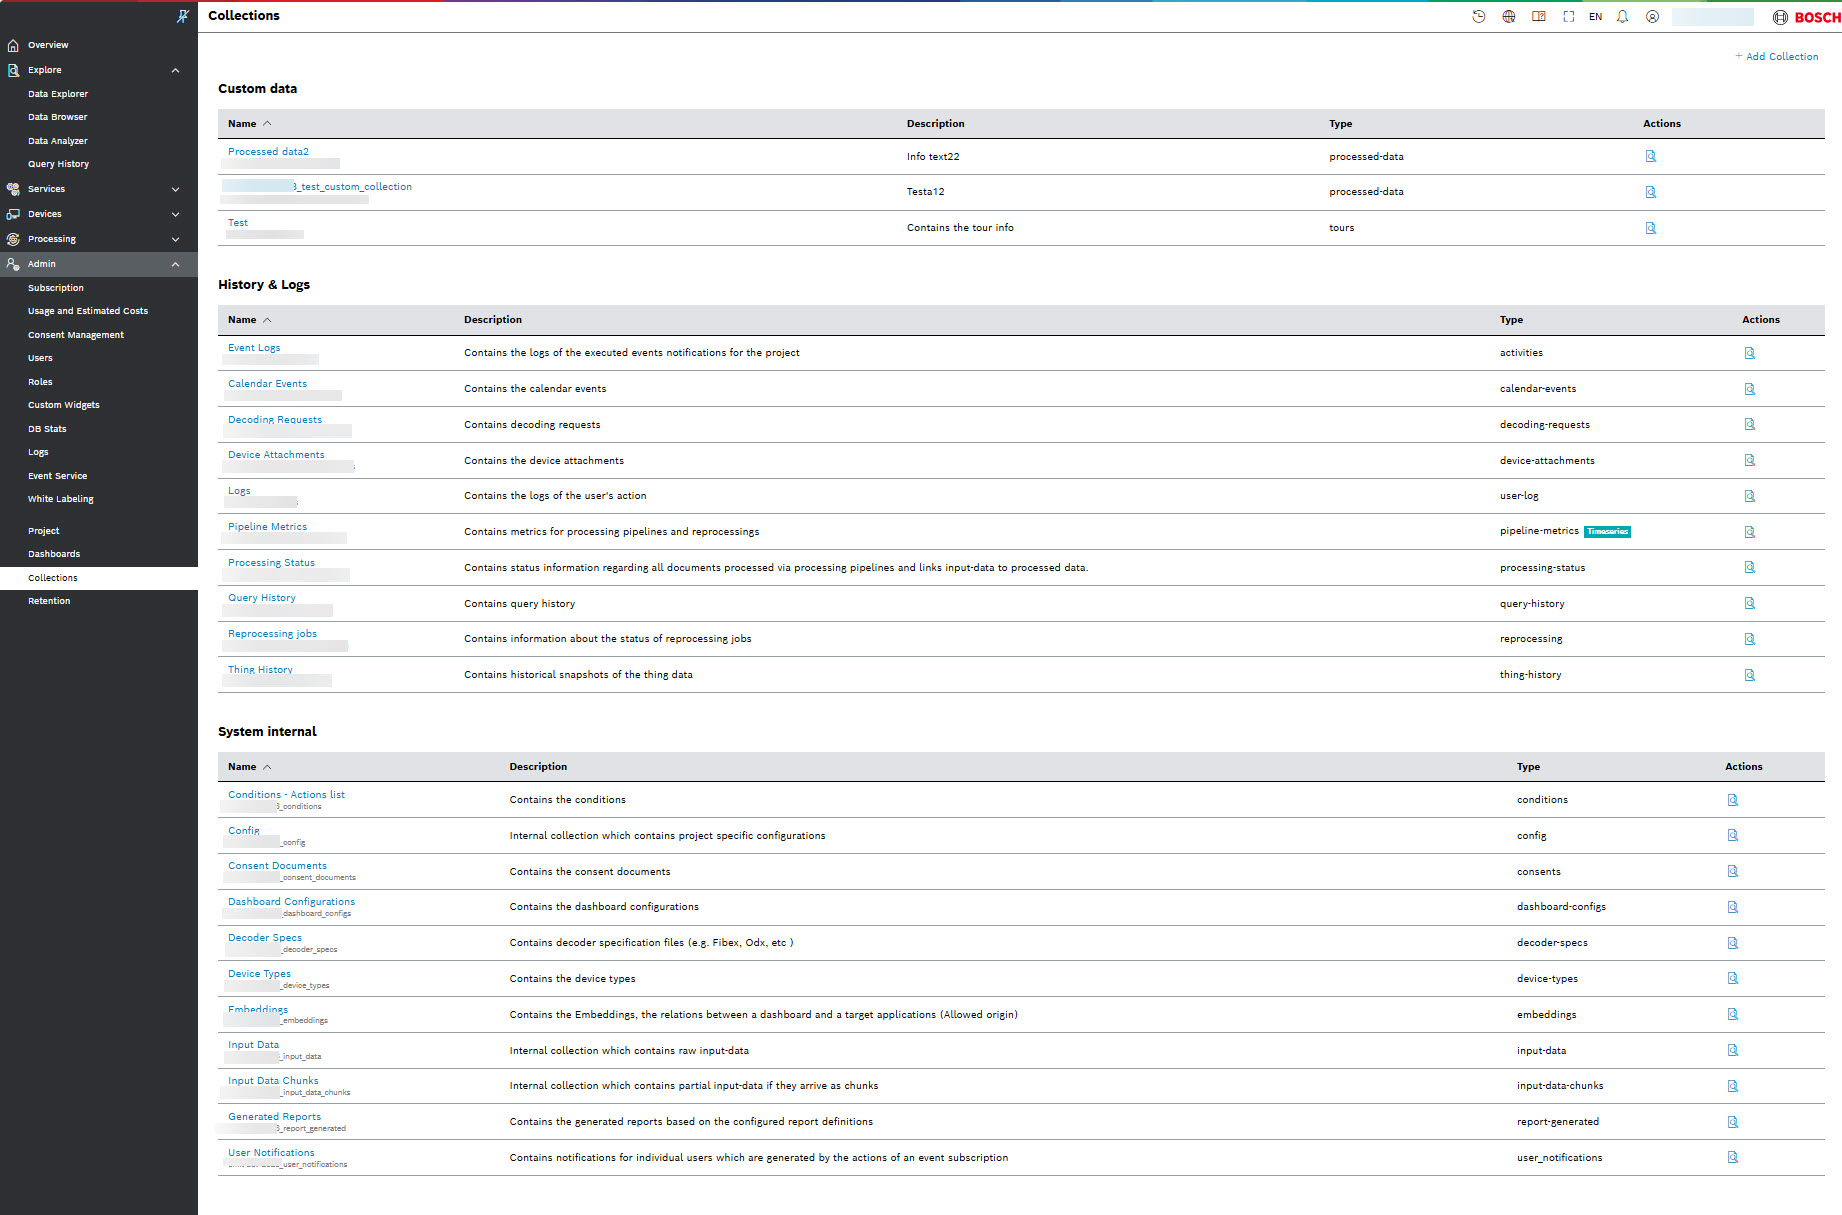
Selecting the name of a collection, displays the Details of the collection, including the Statistics about the number of the Documents, Data size, Total index size, and Storage Size:
For more information, refer to Collections how-to guide.
November 25, 2025: White Labeling | Error Pages tab added
A new Error Pages tab provides two types of access denied pages for your users to reflect the supported use cases of Project Access Denied and Dashboard Access Denied pages:
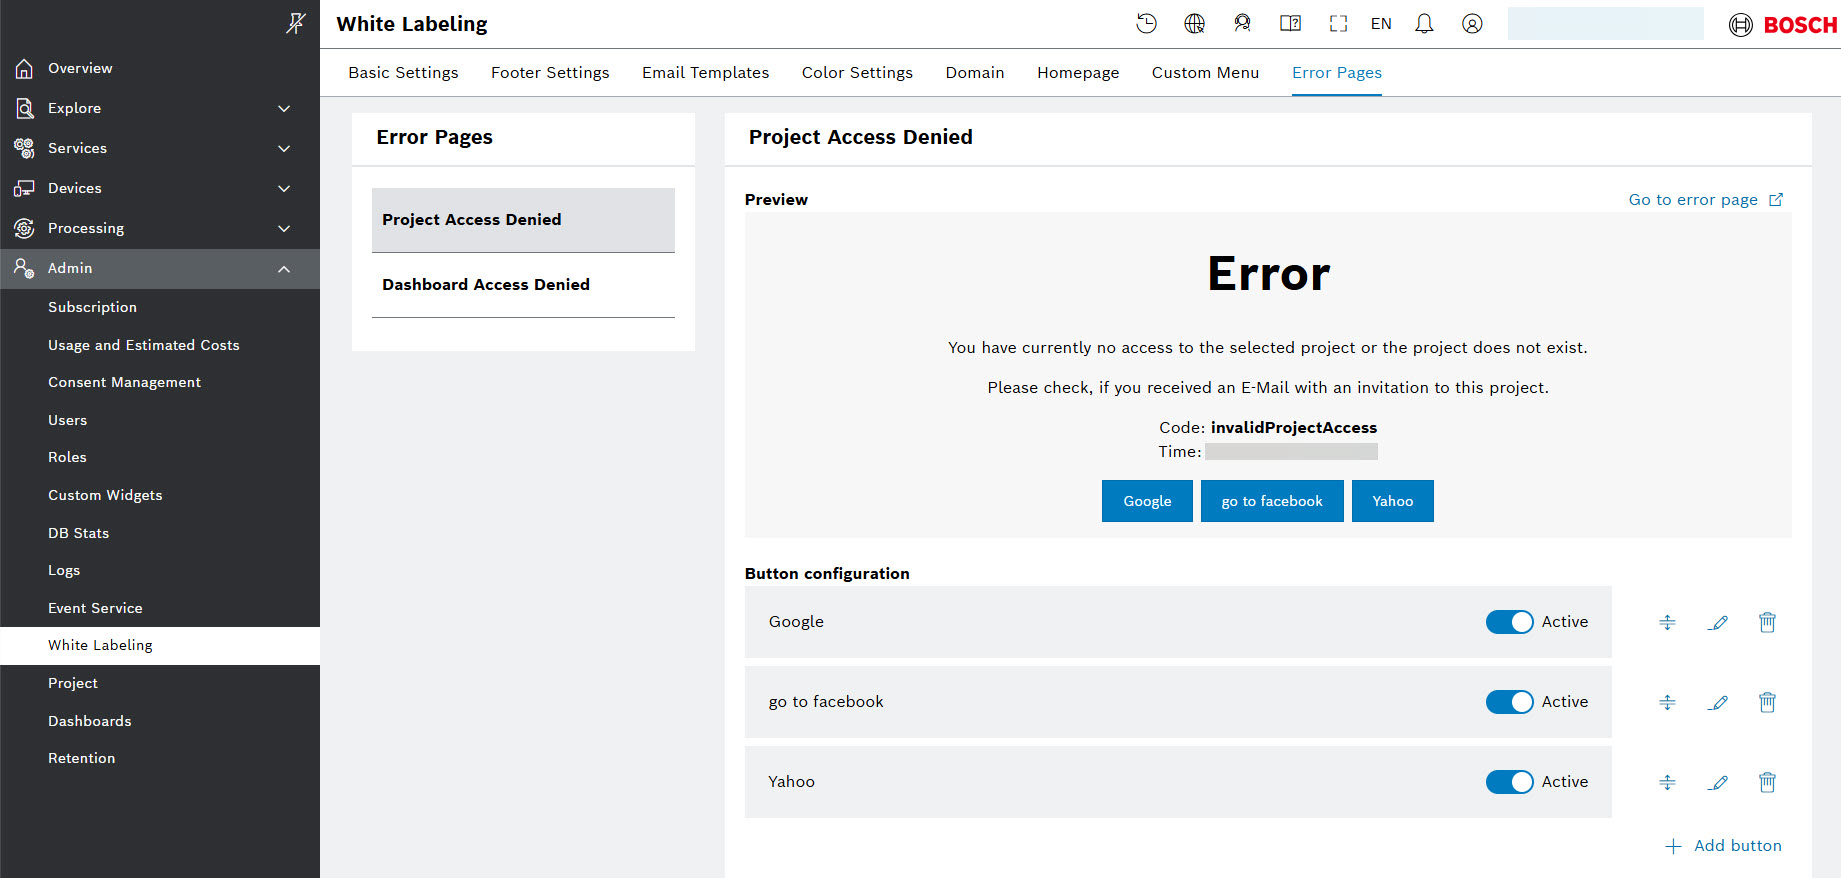
In the new Error pages system tab, you can provide a project-specific links on the access denied pages for your users, so that they have the option to notify administrators or be redirected (e.g., via a link) to a relevant page for further assistance. This also helps the users understand the reason for the access restriction they see.
For more details on how to create, activate, edit, move, and delete the preconfigured link buttons, refer to Error pages how-to guide.
November 24, 2025: Faceted search | Daylight Saving Time (DST) boundaries reflected
A new _timezone parameter is provided to facet query. This ensures correct date grouping across DST boundaries.
Add the new parameter _timezonet manually together with the rest of the parameters, namely timeRange, flats, value, and _callers while you create your facet search query template. For details, refer to Create a facet search query topic from Configuring the facet search tutorial. The parameters should look like this:

Find more information about faceted search in the following parts of the documentation:
- User guide > Filter widget
- Tutorials > Configuring the faceted search
- User guide > Examples > Query templates: Faceted search
If you are new to query templates, you may also find useful the following related topics:
- User guide > Creating a query template
- Developer guide > Query templates
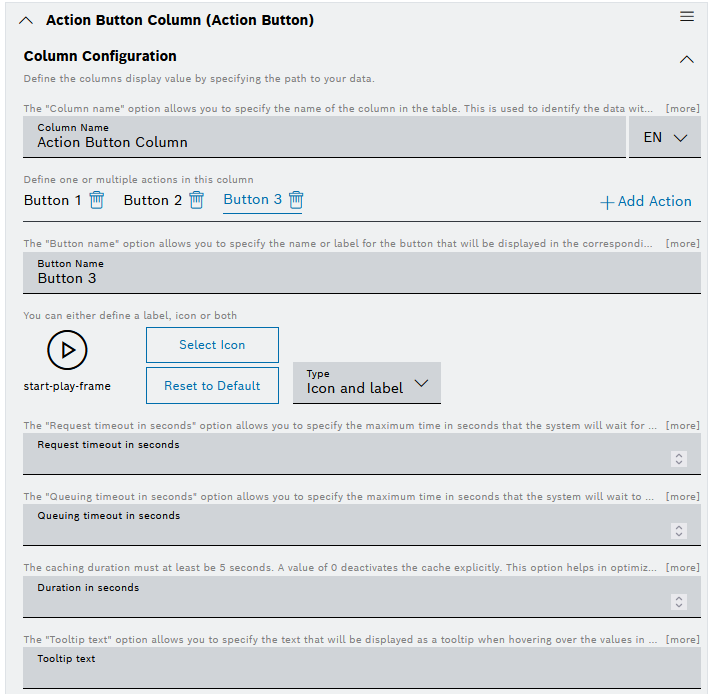
November 24, 2025: Table Widget | Improved readability of custom column configuration
The custom column configuration has been redesigned so that the different sections are easier to distinguish. Additionally, the Action tabs are better aligned.
To learn more about the Table Widget, refer to the Table Widget topic in the User guide.
November 3, 2025: Custom widget improvements
We have introduced two improvements in custom widget:
- A cleanup workflow for feature branch deployments, as described at Cleaning up feature branch deployments
- Support for the latest versions of ESLint, see https://eslint.org/.
October
October 30, 2025: Personal and project-wide notifications of events
It is now possible to configure your own personal notifications of generated events, such as various categories of already defined system events and custom events. This can be done in the new UI menu under Services, namely Event Notifications. In it, you just have to activate the checkbox of the event of interest, and can further configure the notification message through its edit icon on the right.
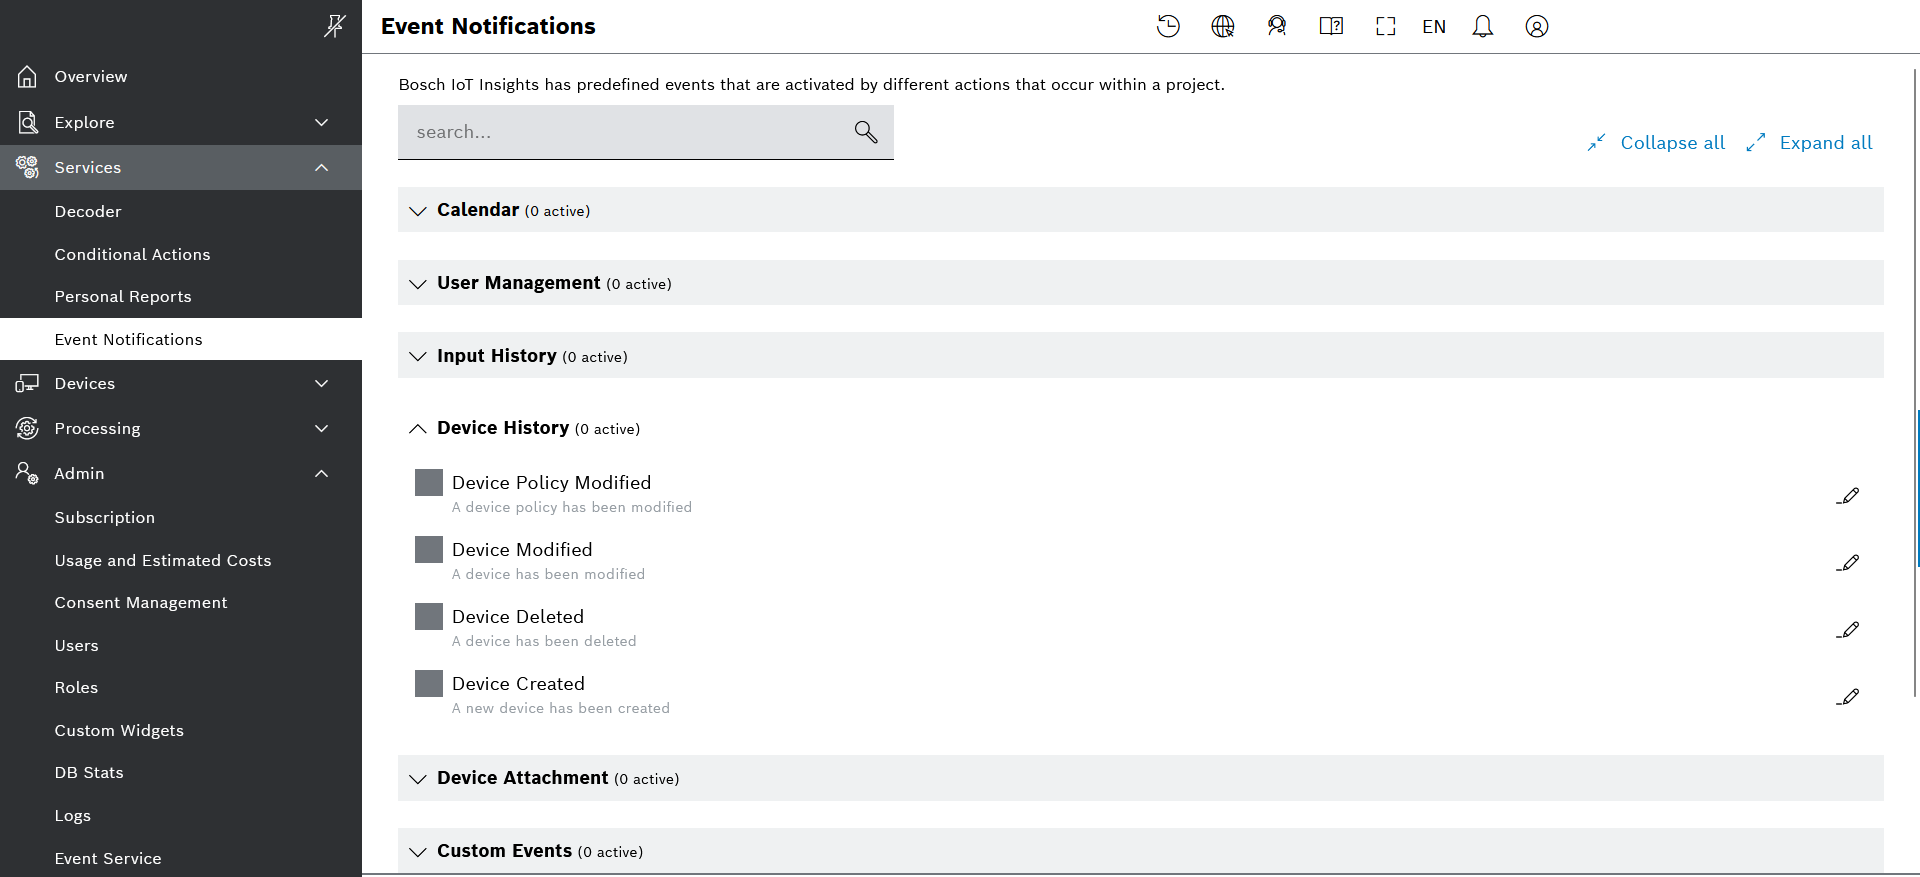
In addition, project admins can configure project-wide notifications for such events, so that these will be received by specific users and/or roles in the project. This configuration can be done in the Admin > Event Service menu, as part of the event subscription configuration editor and the dedicated action called Project notification.
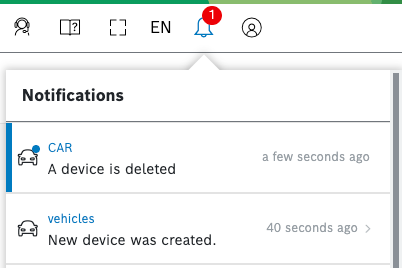
Once configured, the new notifications along with a link to the notification history will be available through the notification bell icon in the UI header bar and in its respective menu.
Find out more in our User guide at:
October 22, 2025: Testing pipelines with new Python version now possible
As formerly announced, see Announcements, we are going to upgrade the Python version from 3.9 to 3.13 on November 5, 2025.
Now you have the opportunity to test your affected pipelines with the new Python version before the actual upgrade and verify if the output is as expected.
To do that, follow these steps:
- Go to your pipeline of interest and stop it if running.
- In the App Settings tab, go to the new field called Pipeline Image Version.
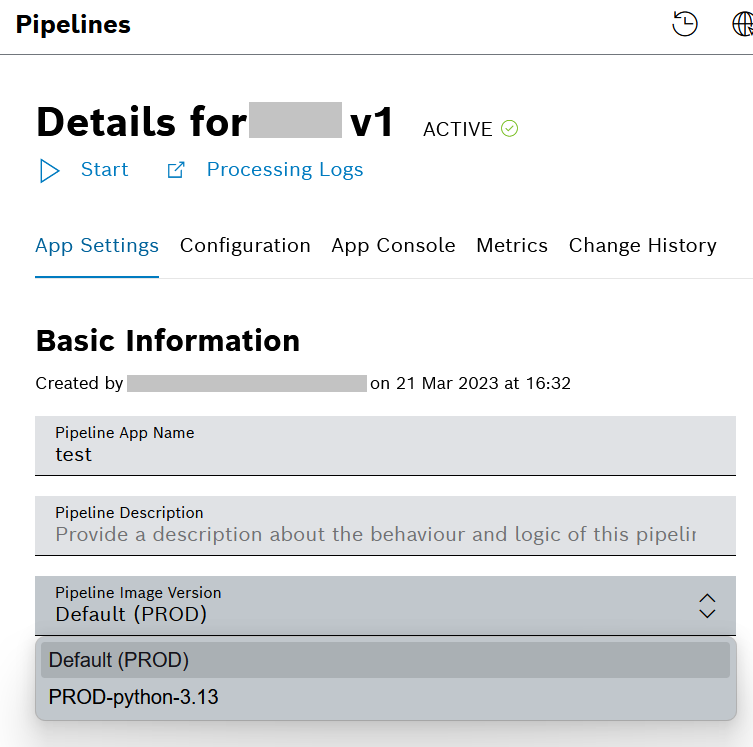
- Use the drop down list to switch to the new version Python 3.13.
- Click the Save button to save the changes.
- Run the pipeline again and a few reprocessing jobs if needed.
- You may also check the App Console tab for further information.
- Verify the output of the processing.
- If needed, revert back to the Default version, again from the Pipeline Image Version field.
Please, be aware that after the actual upgrade on November 5, the default version will be changed to Python 3.13, but the older version 3.9 will still be available in this drop-down list for a grace period of one month. After that, version 3.9 will no longer be available.
See also Examples > Pipelines: Configuring the custom step.
October 21, 2025: Changes in the building and deployment process of custom widgets
It is now possible to build, deploy, and share your custom widgets from a non-main branch.
In addition, the build workflow now allows you to configure the allowed projects. Formerly, these were configured in the insights-manifest.yaml file.
Check the new code examples at:
For further information about custom widgets, refer to Custom widgets.
October 20, 2025: Custom Freemarker extensions are now available for Event Subscription actions
When defining the action templates for your event subscriptions, you can already use the following custom Freemarker extensions:
Extension | Description | How to use |
|---|---|---|
| Serializes the entire payload to JSON format. |
|
| If the provided |
|
For details, refer to Event Service > Action examples.
October 14, 2025: References are now possible in action buttons' disable on condition
We have enriched the Disable on condition feature of the Action button widget and the Table widget respectively.
Now you can choose the value type, namely a simple value or a reference to the user context, data source, filter widget or input widget.

Find out more in our User guide at:
October 13, 2025: Implemented TUS protocol for resumable data upload
To address specific use cases where there might be interruptions in the data upload process, e.g. due to unstable internet connection or other, we have now implemented TUS (also spelled tus), an open protocol for resumable uploads.
It allows clients to upload data in chunks sized between 1 MB and 100 MB, which is not only convenient for the client but also reduces the load on the system and improves the overall efficiency of the upload process.
With one resumable upload, you can upload maximum 50 GB of data.
The resumable upload can be configured through our HTTP Data Recorder Service API and its dedicated endpoints, namely POST, PATCH, HEAD, and OPTIONS.
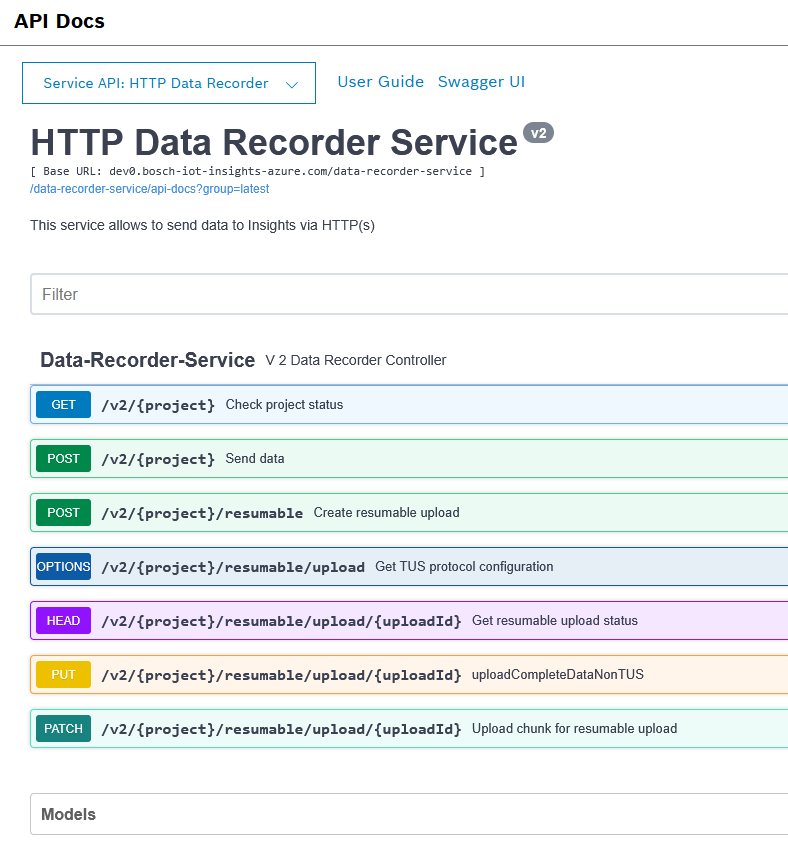
Find out more at Data Recorder Service.
Resources:
For details about the TUS protocol, refer to https://tus.io/.
For already implemented clients which you can directly use, refer to https://tus.io/implementations.
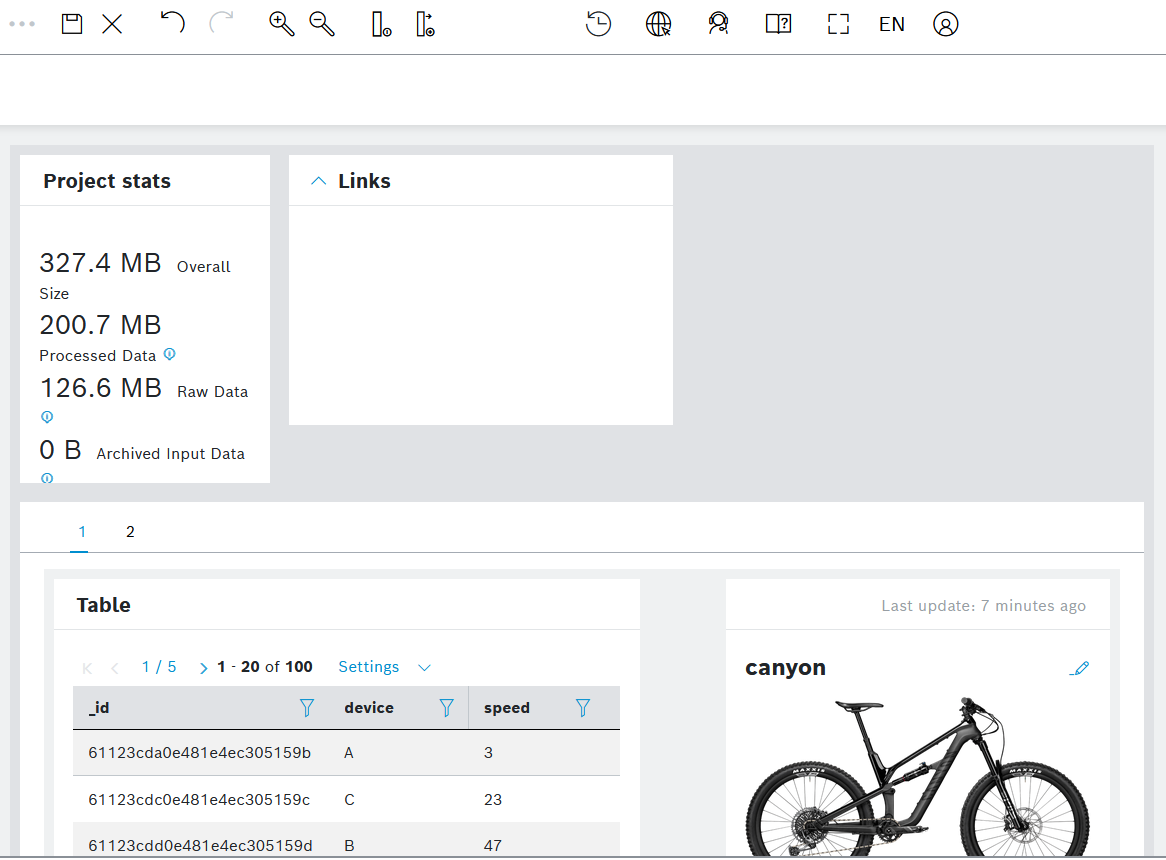
October 7, 2025: Generating emails with personal reports
It is now possible to generate personal reports on different topics with a scheduled frequency, as well as to receive notifications by email with quick links to the reports themselves.
For that, we have introduced a new UI menu under Services, namely Personal Reports.
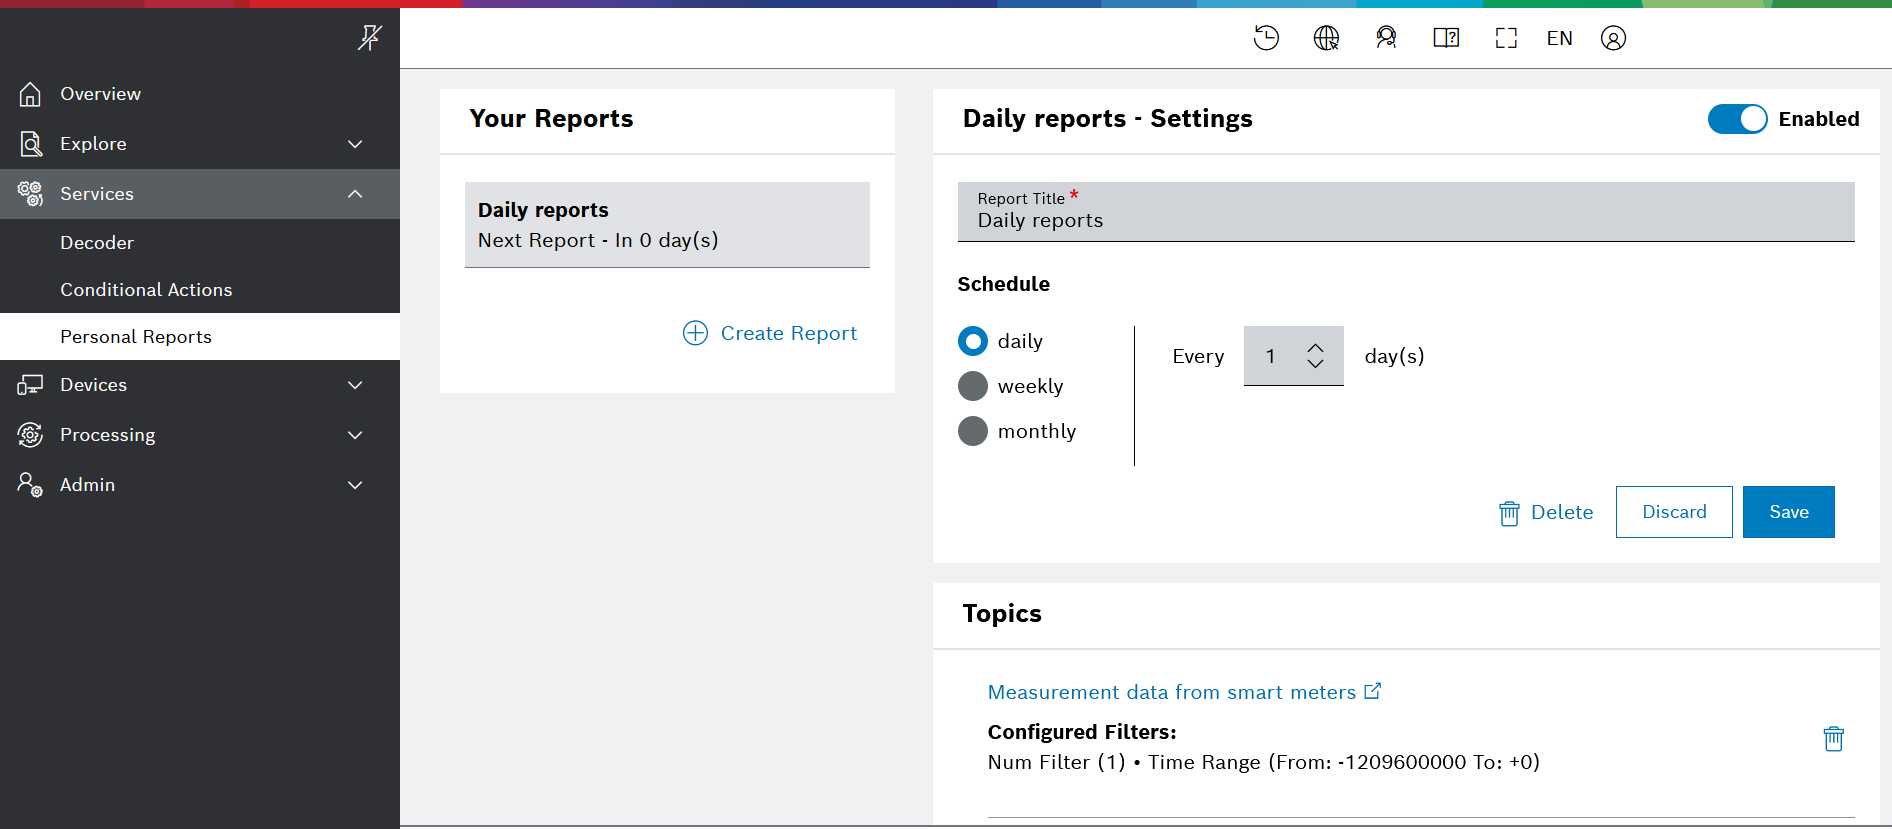
Such reports are only visible to the user who created them in the first place and show filtered data from a dashboard with a filter widget and a table widget.
The email notification about the generated reports would look as follows:
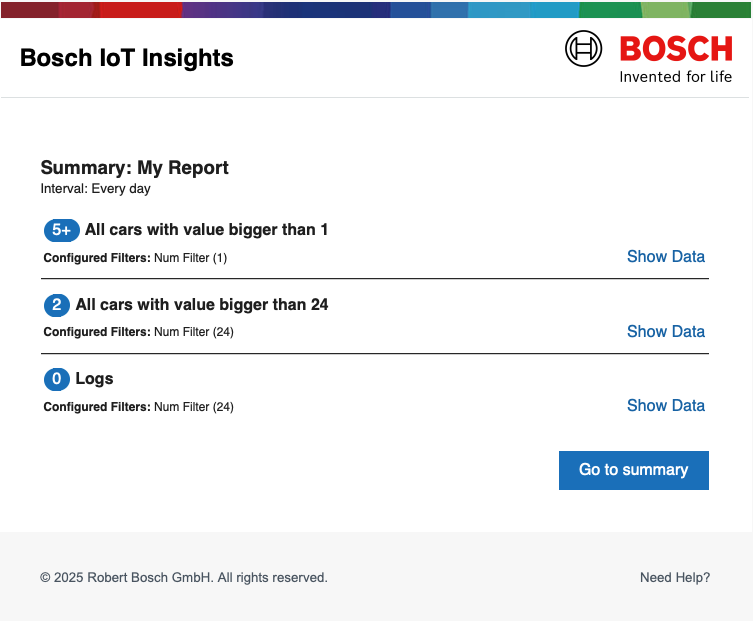
How to enable and generate such reports is described in Personal reports.
September
September 30, 2025: Various improvements and bug fixes
Throughout the month, along with the already reported new features and improvements, we have also made the following:
Bug fixes
- INS-8746 - Navigation links cannot be opened in another tab
September 17, 2025: New fleet monitoring tutorial now available
We have enriched the Tutorials section of our documentation with a new tutorial dedicated to one of the most popular use cases of Bosch IoT Insights, namely fleet monitoring.
It describes all the steps that are typically encountered in such scenarios - from the device representation in the system and the data ingestion process, through the query template and pipeline settings, to the data visualization on a dashboard. The benefit is that you can find the major information in one place, instead of going through separate relevant parts of the User Guide.

Go ahead and check it at Monitoring your fleet.
September 4, 2025: Filter widget enriched with faceted search
The filter widget is now enriched with a faceted search functionality to provide an improved overall user experience and to ensure faster decision-making.
With faceted search, you can find values in relation to each other and see the number of matching results for each of the filters, even for those which are not currently selected.
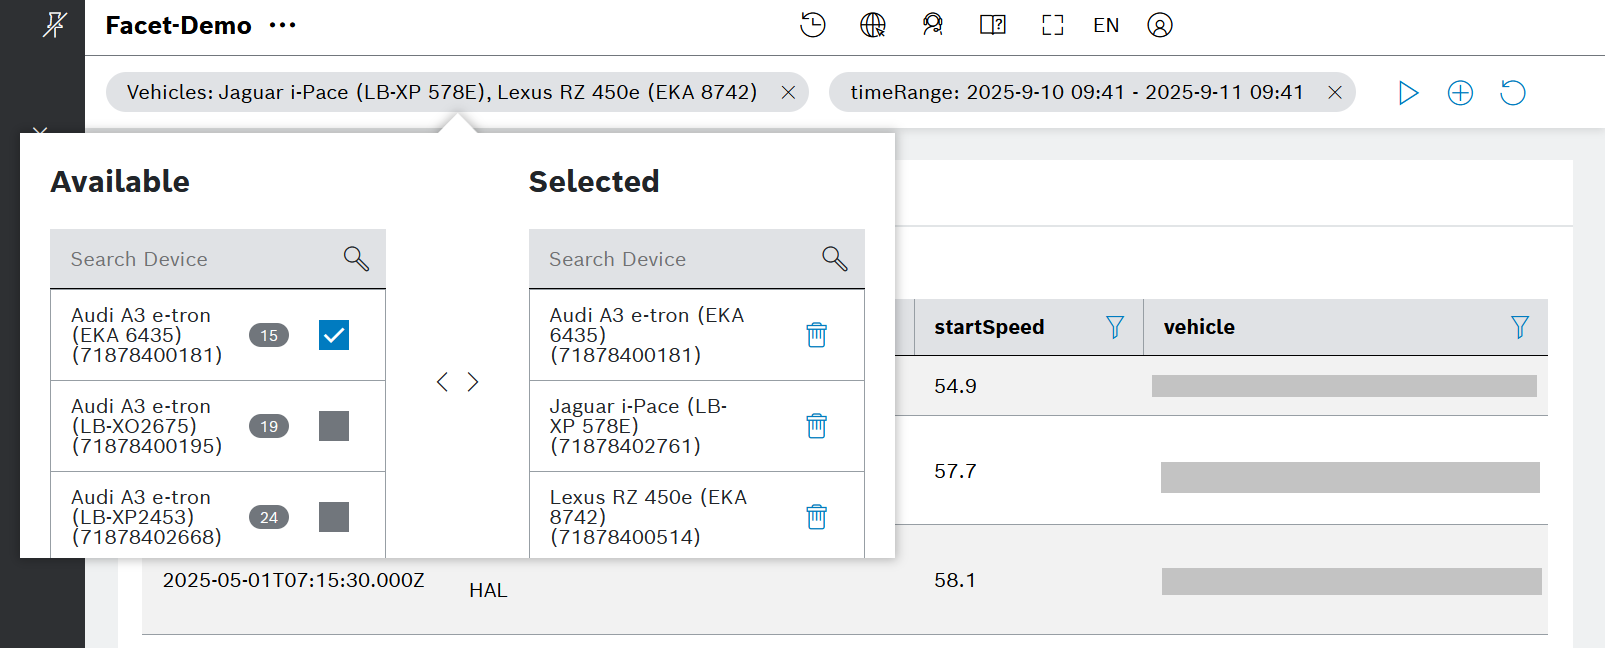
Setting up a faceted search involves a number of steps, such as:
- Creating a proper facet search-related query template with parameters, stages, and callers
Such a query template will only return the available filters and the number of matching results. For comparison, a regular query template will return the results themselves.
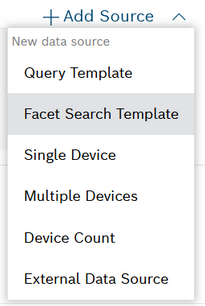
- Using this query template in the filter widget as a data source of the dedicated category, namely Facet Search Template
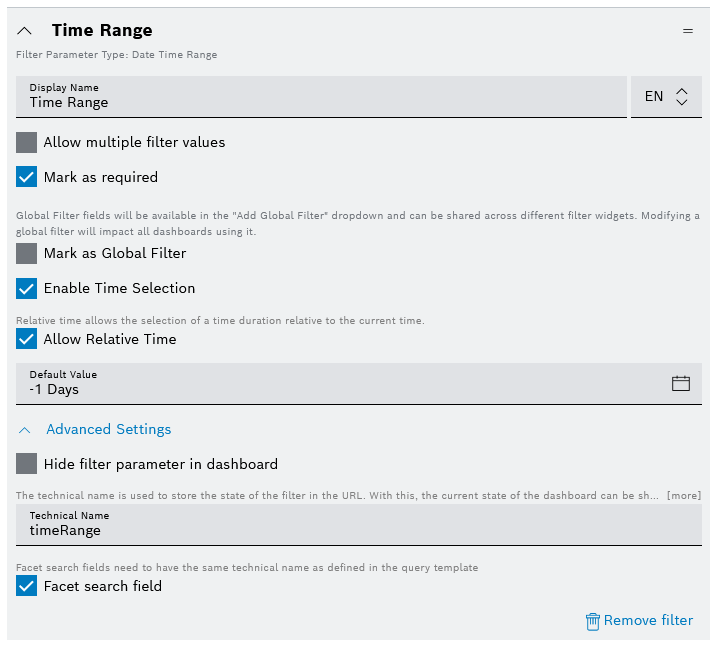
- Creating general filters in the filter widget and marking them as a Facet search field (see the last field on the screenshot below)
- Creating the relevant other widgets on the same dashboard and linking their data source parameters to the references from the filter widget
Find more information about faceted search in the following parts of the documentation:
- User guide > Filter widget
- Tutorials > Configuring the faceted search
- User guide > Examples > Query templates: Faceted search
If you are new to query templates, you may also find useful the following related topics:
- User guide > Creating a query template
- Developer guide > Query templates
August
August 28, 2025: Various improvements and bug fixes
Throughout the month, along with the already reported new features and improvements, we have also made the following:
Improvements
- INS-8700 added support for the $unionWith aggregation operation in the MongoDB Query Service
August 28, 2025: Successfully upgraded to MongoDB 8.0
We have successfully upgraded MongoDB from 7.0 to 8.0, along with the relevant drivers. By that, Bosch IoT Insights customers can benefit from the latest database features and drivers.
If you have not done this so far, please check the following:
In case your pipelines include custom processing steps, please make sure that your drivers are compatible with MongoDB 8.0:
- For custom steps with Java code, you can refer to: https://www.mongodb.com/docs/drivers/java/sync/current/reference/compatibility/
- For custom steps with Python code, you can refer to: https://www.mongodb.com/docs/languages/python/pymongo-driver/current/reference/compatibility/
For further information on pipeline custom steps, refer to Configuring a pipeline.
August 19, 2025: Tagging and labeling functionality is now moved from Conditional Actions to Pipelines
Until now, the tagging and labeling functionality was part of the Conditional Actions, which you can find in the Services menu. However, this has changed.
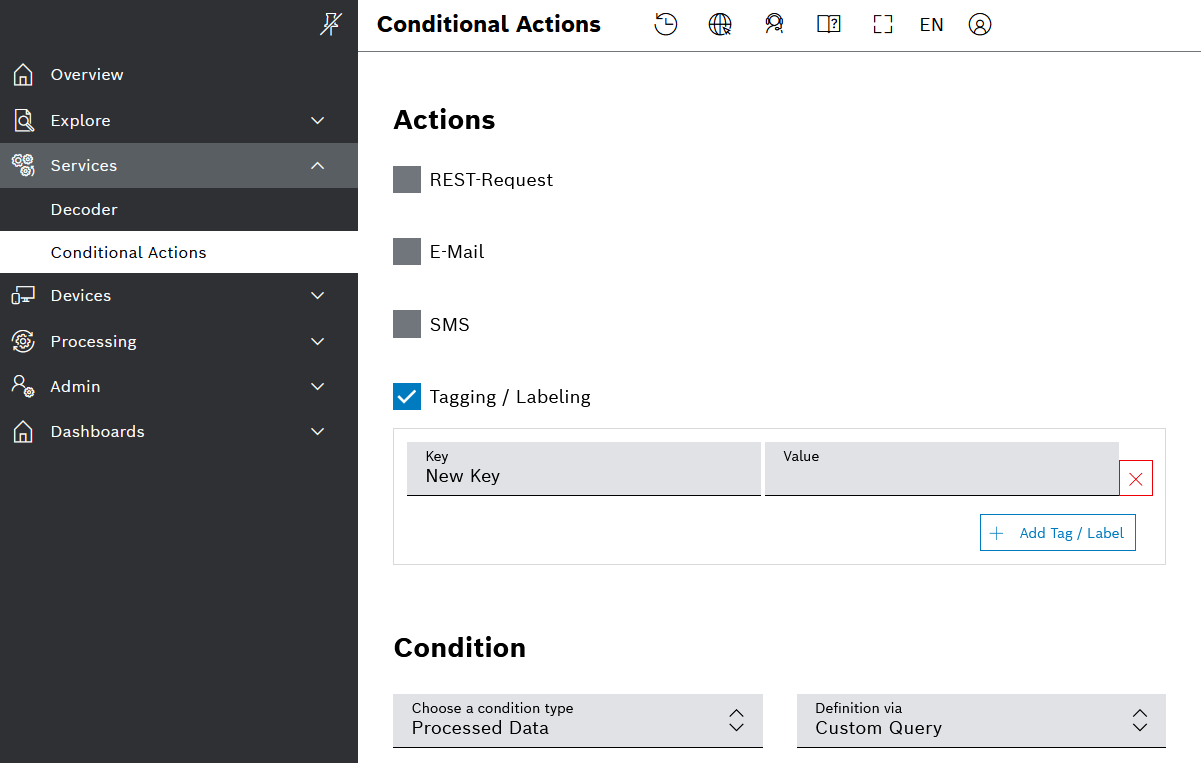
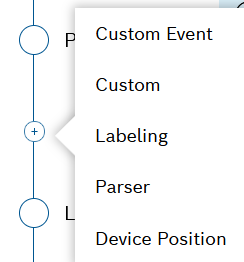
From now on, you can achieve the same effect by adding a dedicated Labeling step within your relevant processing pipeline.
With the Labeling step you can define a condition query in order to match documents and apply labels to them. The labels will be set in the documents' meta data.
For details, refer to Configuring a pipeline.
August 14, 2025: Define, produce, and subscribe for Custom Events
It is now possible to define, produce and subscribe for Custom Events.
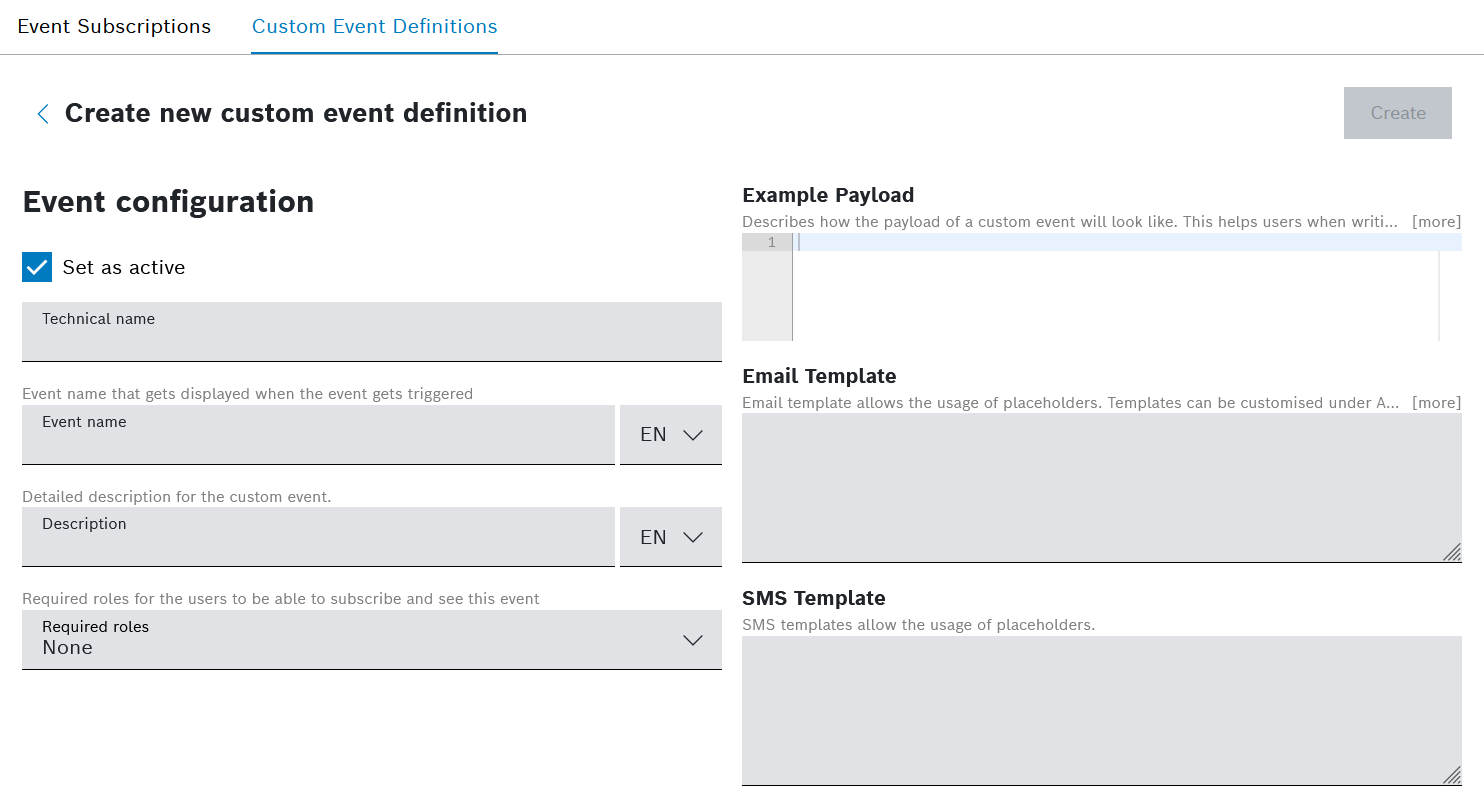
To learn how to define and subscribe for such events, please refer to Event Service.
To learn how to produce such events, please refer to Configuring a pipeline.
August 14, 2025: Breadcrumbs for nested dashboards
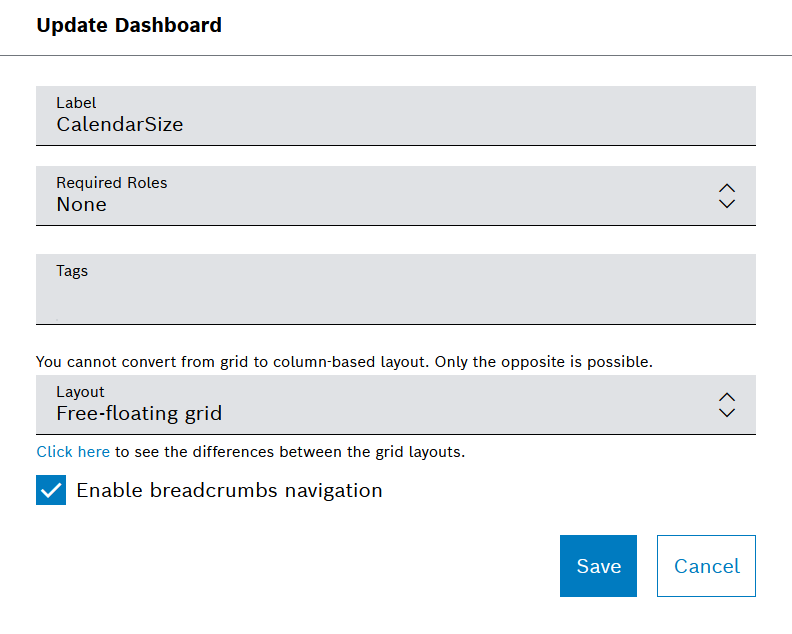
We have further improved the user experience with nested dashboards by providing an optional breadcrumb navigation which shows the different nested levels.
With such a navigation, you can easily return to the level of interest. You can activate it through the dedicated checkbox in the edit/update dashboard dialog.
For details, refer to Dashboards.
August 8, 2025: User Actions and Status Events reporting in the Pipeline Metrics tab
To help users with troubleshooting and to ensure better user experience, we have enriched the information provided in the Metrics tab of a pipeline.
In particular, we now offer a list of Status Events where you can see details about the occurred infrastructure-level events.
Besides that, we are now showing visually on the usage charts when a status event or a user action has occurred, along with event/action details and the possibility to filter out the view.
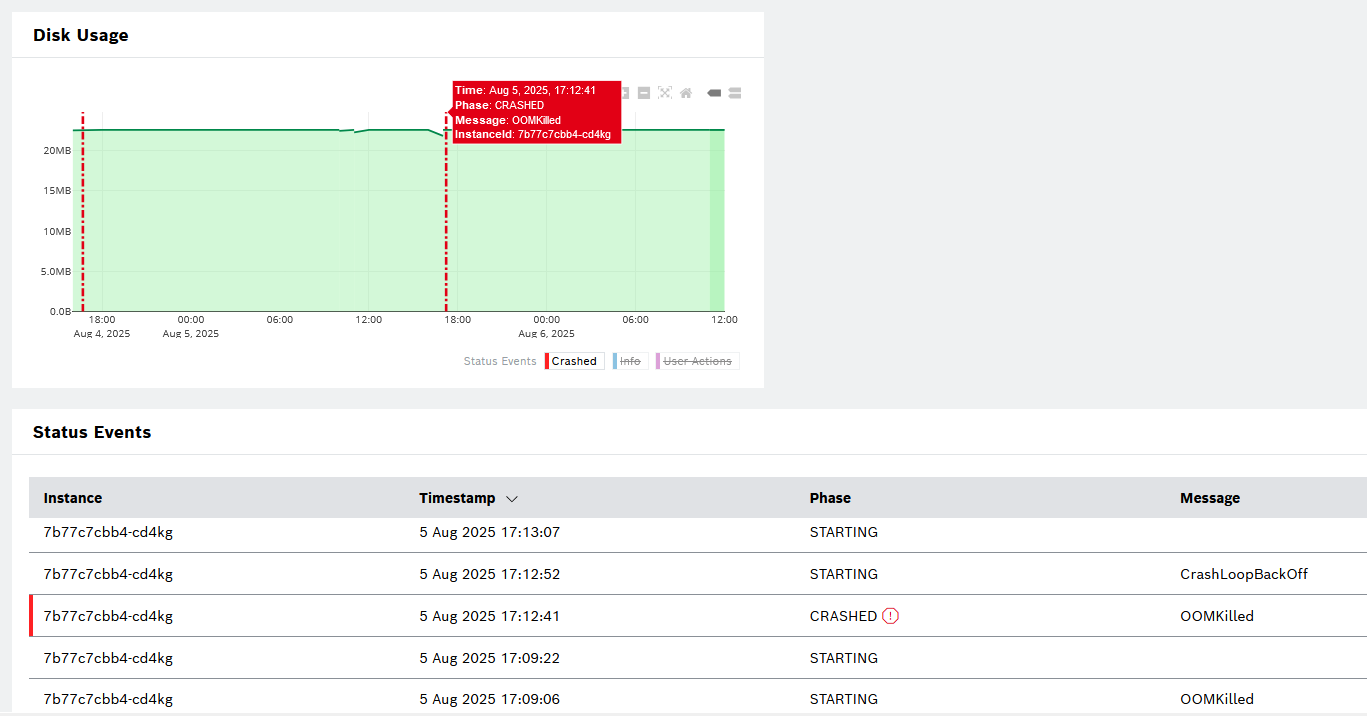
Find out more in Viewing the pipeline metrics.
August 6, 2025: Filter widget improvement - path drop-down selection for custom conditions
The current improvement applies to the Filter widget's General Filter type of Query Condition. In particular, we are now offering a drop-down list of the available paths within the chosen data source.
With that, it should be now much easier to create a custom condition.
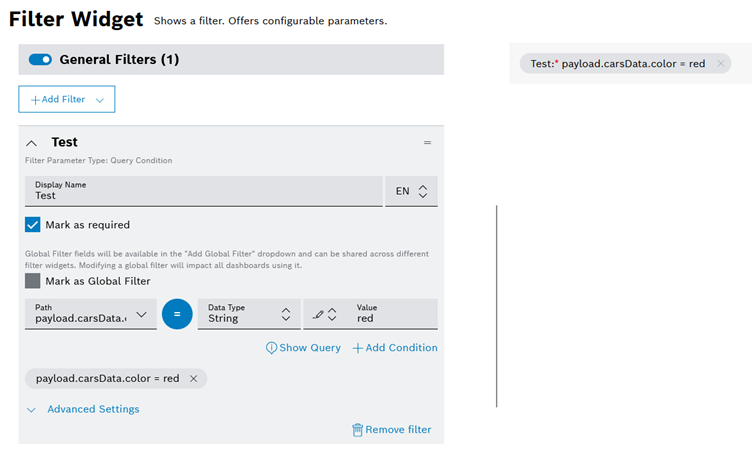
For details, refer to Filter widget.
August 5, 2025: Signal Chart widget improvement - select and deselect all signals
For a configured Signal Chart widget, the preselected signals are displayed in a table under the chart itself. By expanding the Select Signals menu, you can see and select additional signals, and respectively deselect such.
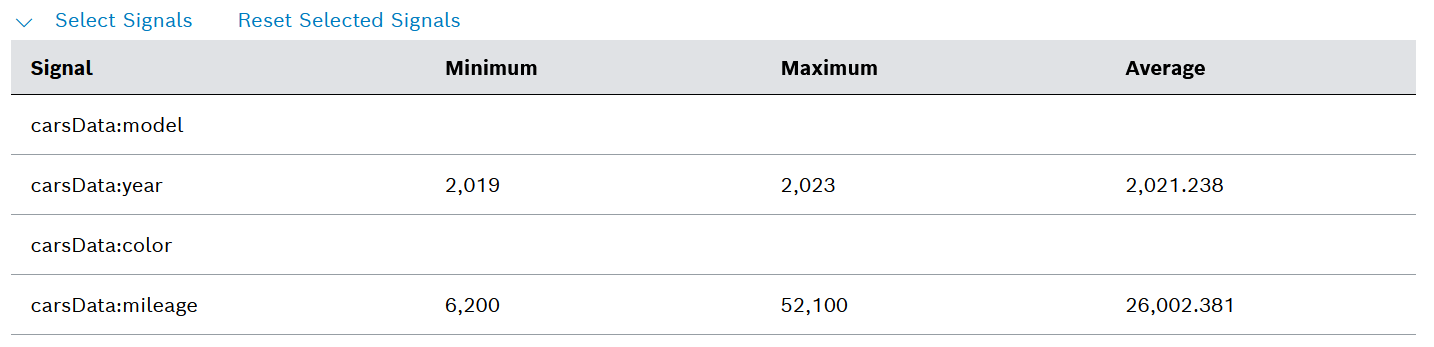
With the current improvement, it is now possible to select and deselect all of the available signals at once by using the checkbox on the left of the Signal column name.

For details, refer to Signal Chart widget.
July
July 28, 2025: Highlighting in menu
We have extended the dashboard URL routing logic and it is now possible to provide highlighting in menu up to three levels of depth.
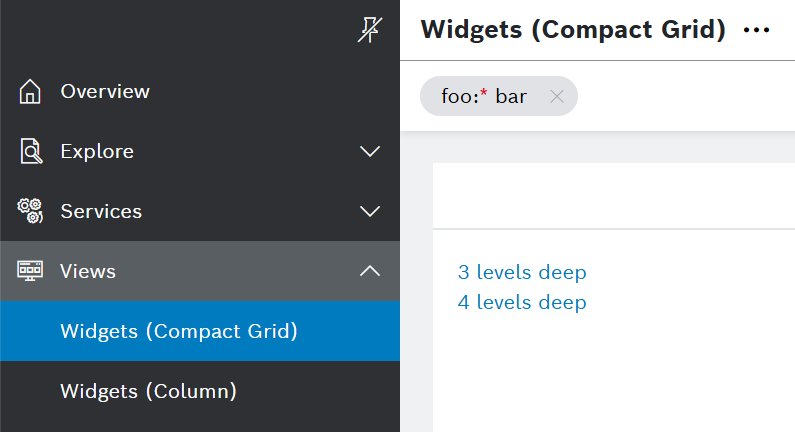
For details, refer to Nesting a dashboard section of Dashboards.
July 11, 2025: Documentation extended with a new example for external data source
We have extended the Examples section of the documentation with a new example showing how to display data from one Bosch IoT Insights project into another Bosch IoT Insights project. This topic may be useful for project Admins with multiple projects with different purposes.
Find out the new example here: External data source: Use the API of another project.
July 9, 2025: Improved user experience for dashboards with grid-based layout
With this improvement, we have made the rearranging of widgets on your grid-based dashboards much more consistent, intuitive, and predictable.
It is now also possible to drag and drop dashboard widgets directly into and out of a tab of a Tab widget on the same dashboard.
The grid itself is no longer displayed, however, it is still applied in the background.
Along with that, several layout issues have been resolved.
Find out more details in Arranging widgets in the grid-based layout, as well as in Tab widget.
July 8, 2025: Improvements in the Action Button column type in Table widget
With this improvement, we now provide the opportunity to choose between two different button types within an Action Button column of the Table widget.
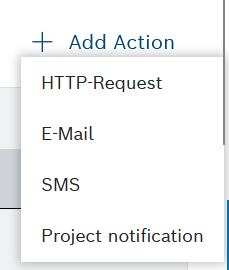
In particular, these are the REST Request button and the Hyperlink button. These options are available through the ![]() Add Action dropdown menu.
Add Action dropdown menu.
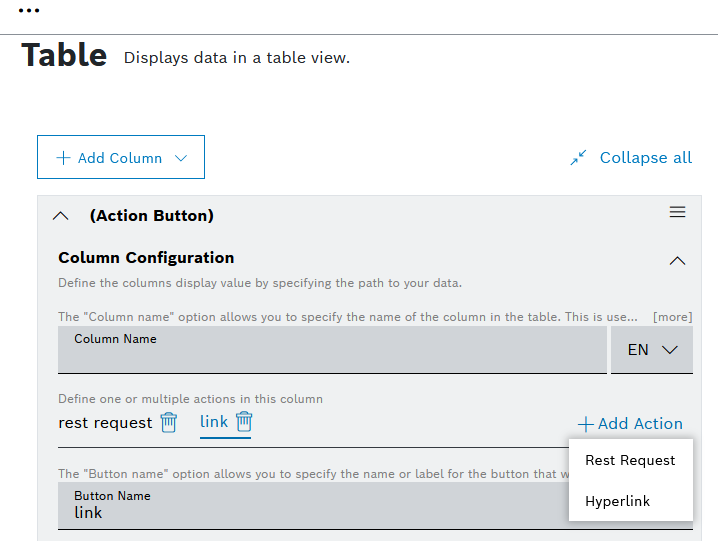
For details, refer to Configuring the Table Settings.
July 7, 2025: Decoder specification file size limit increased to 500 MB
Previously, the file size limit for decoder specifications was 15 MB and the specifications were saved in MongoDB.
From now on, the limit is already 500 MB and the specifications are stored in the object storage, which is billed as raw storage. This enables the users to use larger decoder specifications to decode binary data.
For details, refer to Decoder.
July 4, 2025: Custom event step introduced
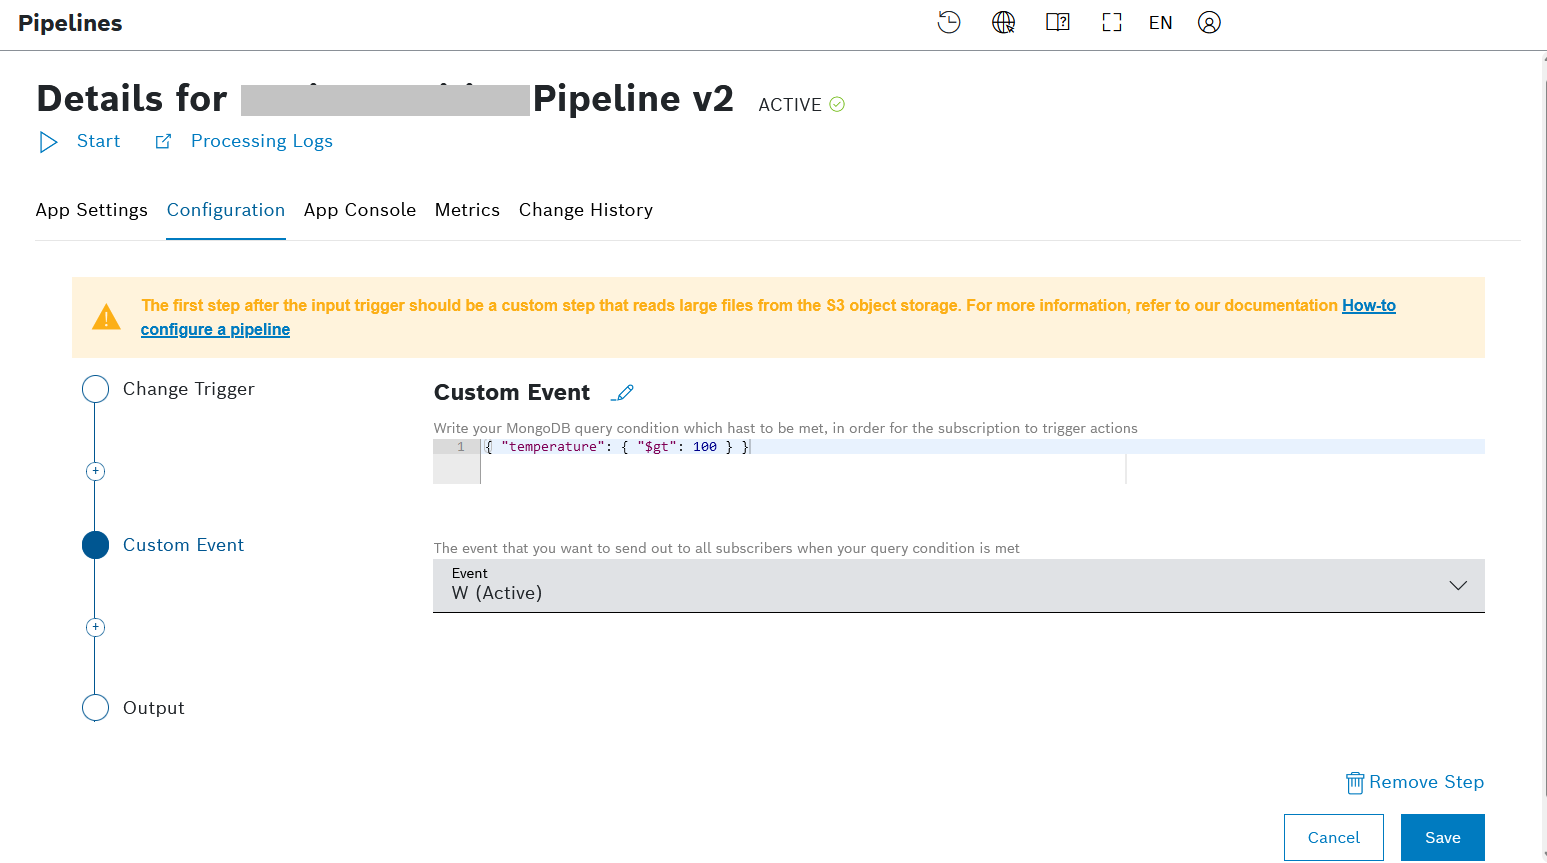
A new event step lets the sfde admin dynamically define a custom event to be triggered by the pipeline.
The custom event step allows you to register and create events based on a simple condition – query on the step payload.
If this condition is met, the custom event is generated and the payload of the step is used as event payload.
The pipeline step calls the condition checker. The condition checker sends a custom event to the event service, which executes the actions.
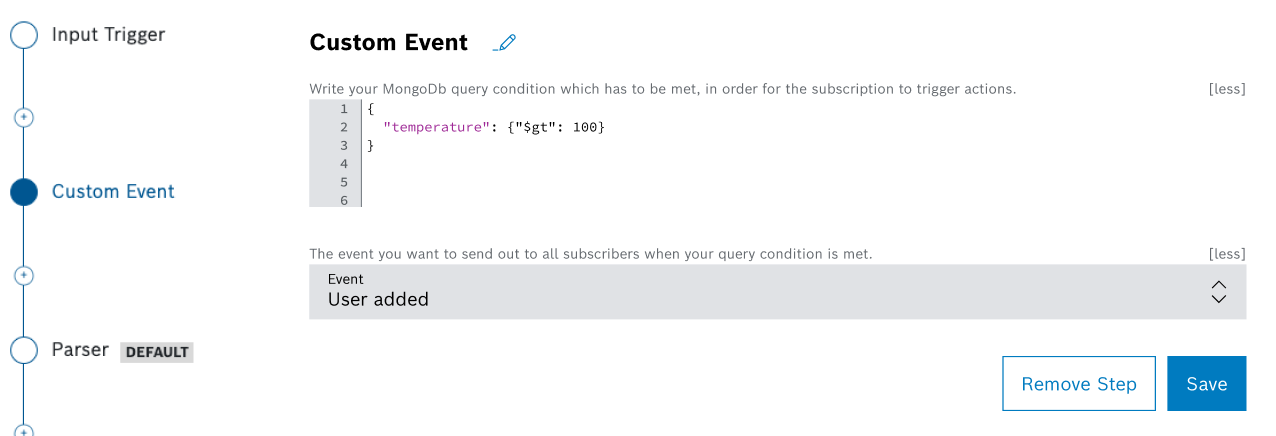
For details, refer to Configuring a pipeline.
June
June 25, 2025: Undo and redo a rearrangement is now possible for dashboards with grid-based layout
We have recently introduced an undo and redo functionality for the rearrangement of widgets on dashboards with grid-based layout.
This is possible through the dedicated icons in the dashboard header, after the rearrange option has been activated.
The icons will then become active after you have moved a widget on the dashboard.
For details, refer to Arranging widgets in the grid-based layout.
June 23, 2025: Extended pipeline trigger options
It is now possible to customize a pipeline's trigger and select a specific collection of input history entries on which the trigger should be applied. Further, you can select the trigger event type, as well as the event format.
All these options are available with the new trigger type, namely the Change trigger.
For comparison, the standard Input data trigger applies to the entire input history of the project.
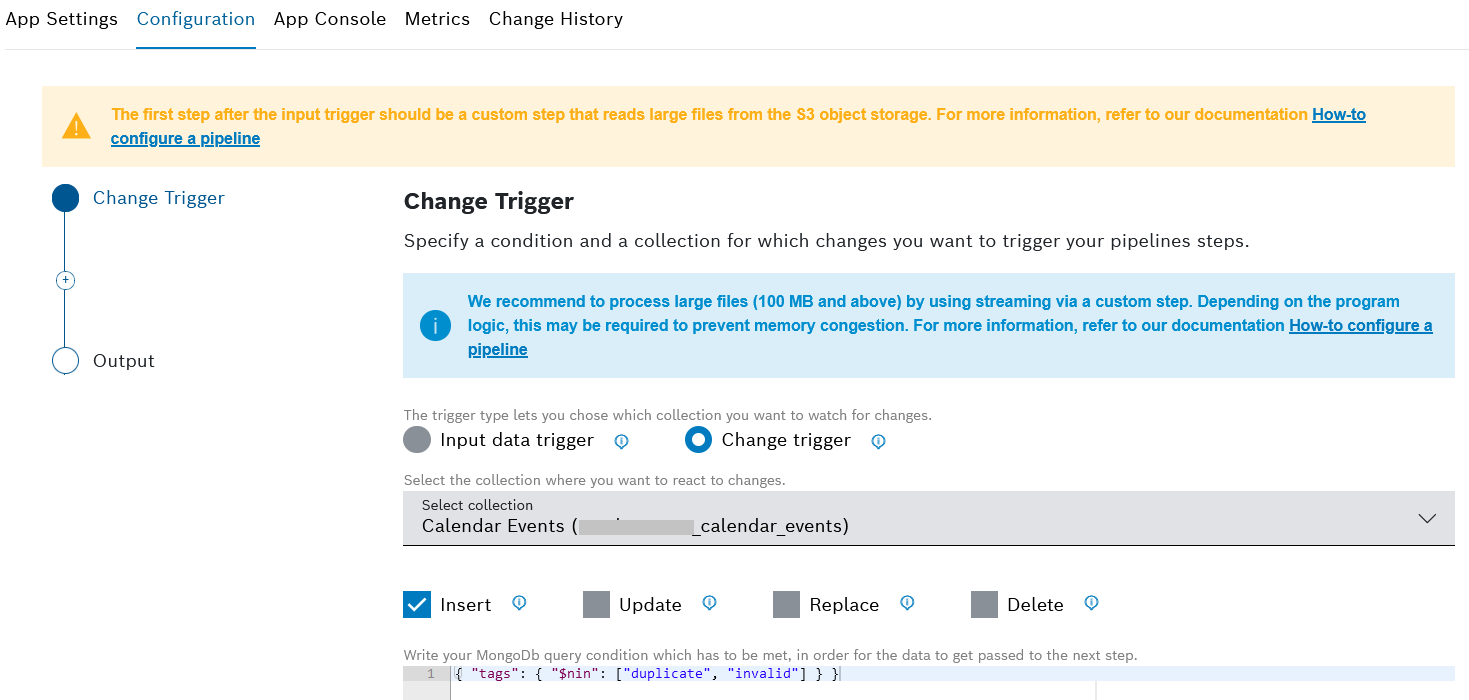
Please, be aware that currently this feature is only available for users with the SFDE admin role.
Find out more details in Configuring a pipeline.
June 20, 2025: New menu with reprocessing job details, app console and metrics
So far only limited details per reprocessing job were displayed, when the respective row from the list of reprocessing jobs was expanded.
We have now introduced a dedicated menu with further details per reprocessing job.
The menu is available through the dedicated icon ![]() in the Actions column on the list of reprocessing jobs.
in the Actions column on the list of reprocessing jobs.
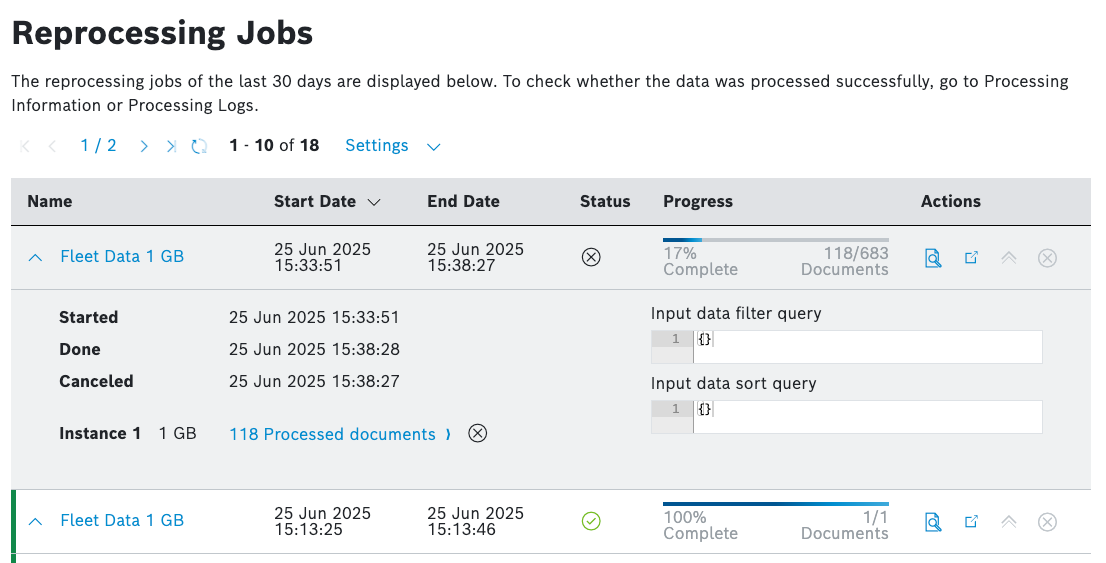
The new menu offers an Overview, an App Console and a Metrics reporting.
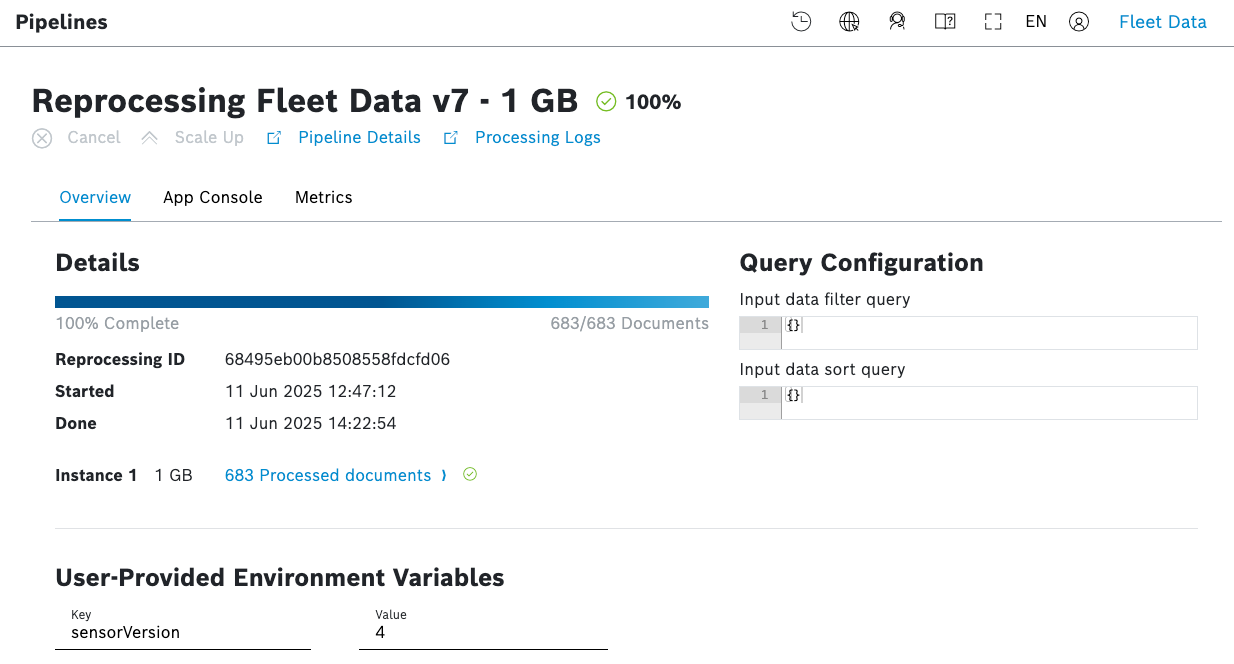
In the Metrics tab, you can monitor the resource consumption by the reprocessing job over a selected period of time, similar to the metrics reporting per pipeline.
For details, refer to Managing reprocessing jobs.
June 19, 2025: Pipeline metrics reporting now available
We have introduced a new Metrics tab in the pipeline details menu, which now reports the resource consumption by every pipeline individually, for a selected period of time. This allows users to optimize their processes and to ensure that they have enough available resources.
The report includes the following categories:
- CPU Usage %
- Memory Usage
- Disk Usage
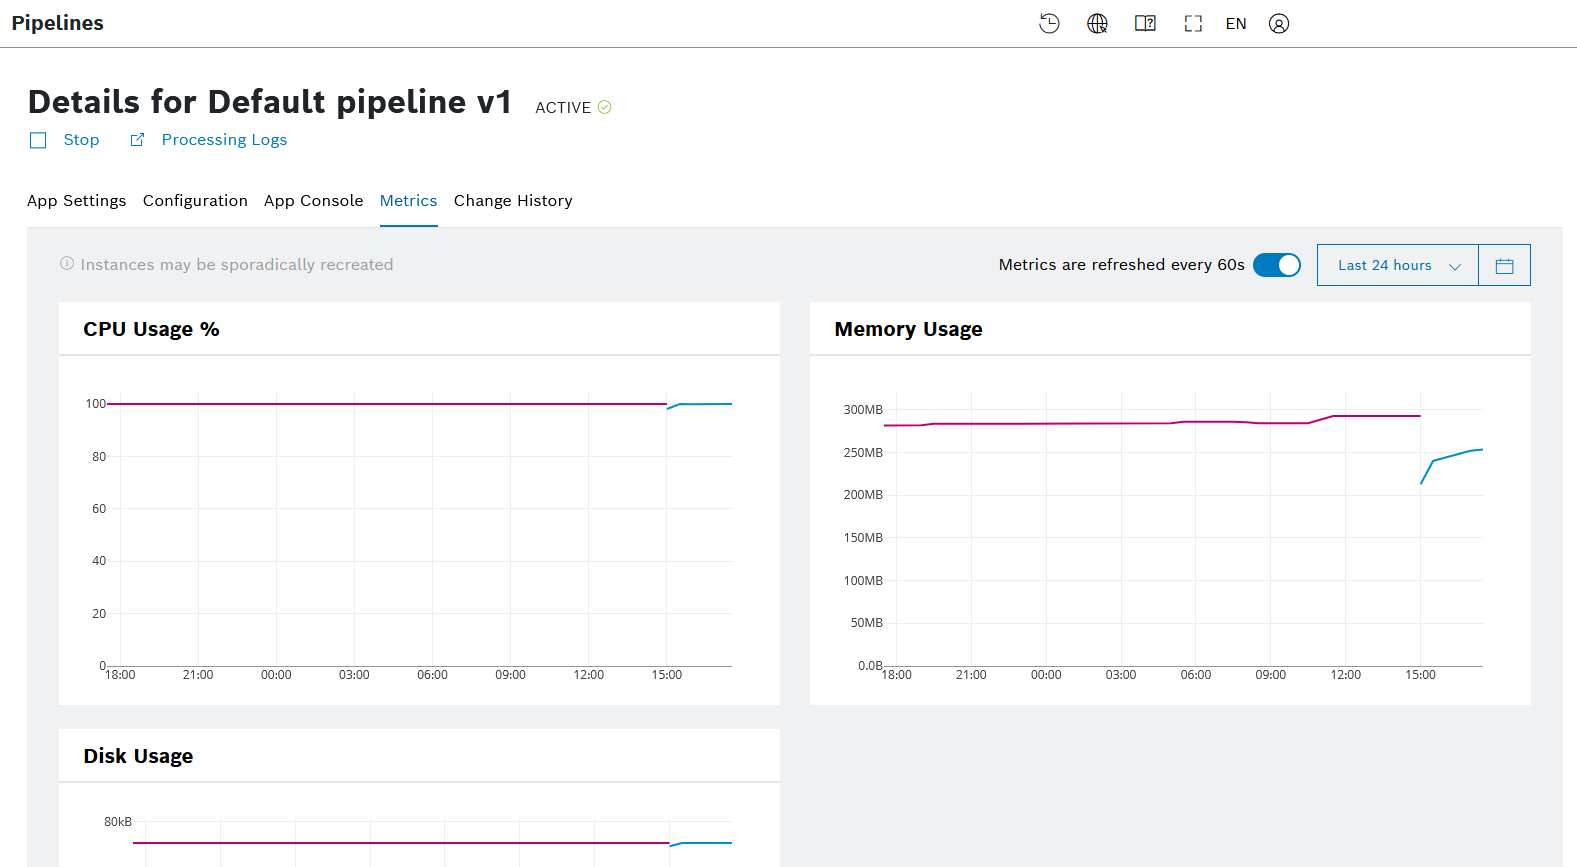
For details, refer to Viewing the pipeline metrics.
June 18, 2025: Shared data sources by widgets on the same dashboard
We have introduced the shared data source functionality for widgets on the same dashboard.
In particular, it means that when there are multiple widgets on the same dashboard, each widget can reuse the data source of the other widgets. The available data sources from other widgets are grouped in a separate group called Existing data source which appears when you click the ![]() Add Source option.
Add Source option.
To avoid conflicts, the data source labels are now configurable through the edit icon ![]() and every data source must have a unique label within the dashboard. The fact that the data source is shared is indicated by the link icon
and every data source must have a unique label within the dashboard. The fact that the data source is shared is indicated by the link icon ![]() next to its label.
next to its label.
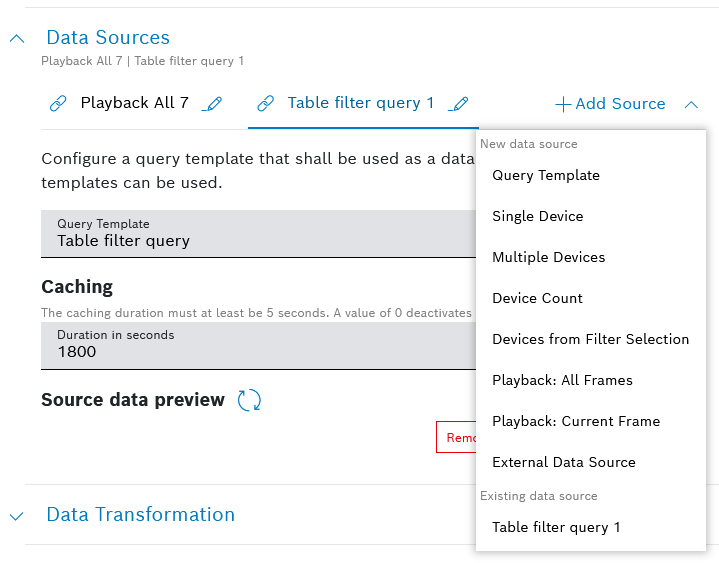
The shared data sources optimize the process, lead to faster loading times, and reduce the number of requests to the backend when a data source is called.
Find out more in the user guide for the respective widgets, for example the Tree widget.
June 17, 2025: Backend sorting for data sources in Table widget
To ensure an improved sorting of large result sets in the Table widget, we have introduced the option for backend sorting, which applies to the data source types of External Data Source and Query Template.
When this feature is activated, a backend request is triggered every time when the column name is clicked and thus sorted.
To use the feature, you need to check the box for Enable sorting for data source in the respective data source configuration section.
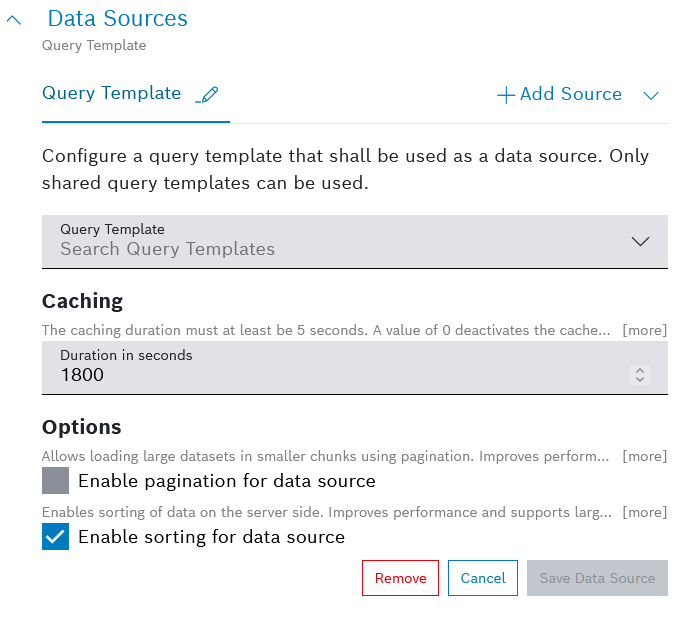
In addition, you need to:
- define a Technical sorting name for the respective custom columns that will be sorted in this way, and
- define several parameters in the query template or add placeholders in the external data source URL respectively.
These are:
sortField- defines a technical, editable sorting name of the column's data source propertysortDirection- defines the sorting direction with accepted values ofasc,desc,""sortDirectionNumber- defines the sorting direction as a number, with accepted values of1,-1,0sortDirectionSign- defines the sorting direction as a sign, with accepted values of+,-,""
For further details, refer to Table widget and Configuring the Table Settings.
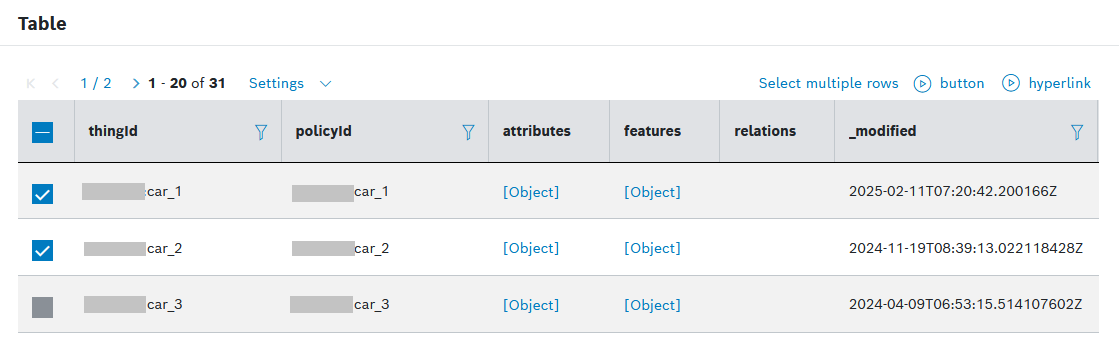
June 16, 2025: Batch Action Hyperlink option now available in the Table widget
The Batch Processing configuration of the Table widget now offers an additional option, namely the Add Batch Action Hyperlink.
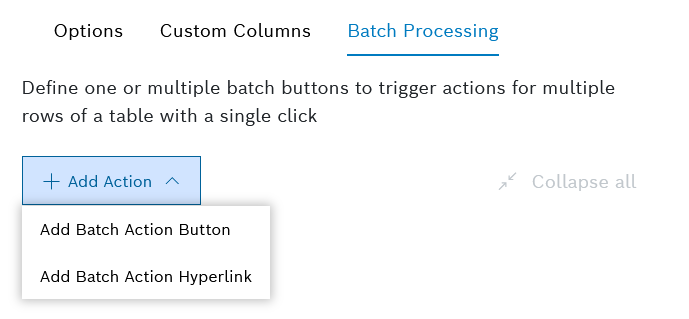
Generally, when a batch action is added to a Table widget, you can select rows from the table on the dashboard and then execute the configured action on all selected rows with a single click.
For comparison, when clicked:
- the Batch Action Button type will execute a REST request for the selected rows with parameters from the selected rows, whereas
- the Batch Action Hyperlink type will redirect to other URLs and will report the respective values there, for example, as a comma separated list of ids in the url itself.
For further details, refer to Configuring the Table Settings.
June 3, 2025: Backend pagination for data sources in Table widget
To improve loading times, we have introduced a new configuration option within the Table widget, namely the Pagination for data source, which is applicable to the data source types of Query Template and External Data Source.
When enabled, this feature allows the loading of large datasets in smaller chunks using backend pagination. This improves performance and supports data sources with size limits.
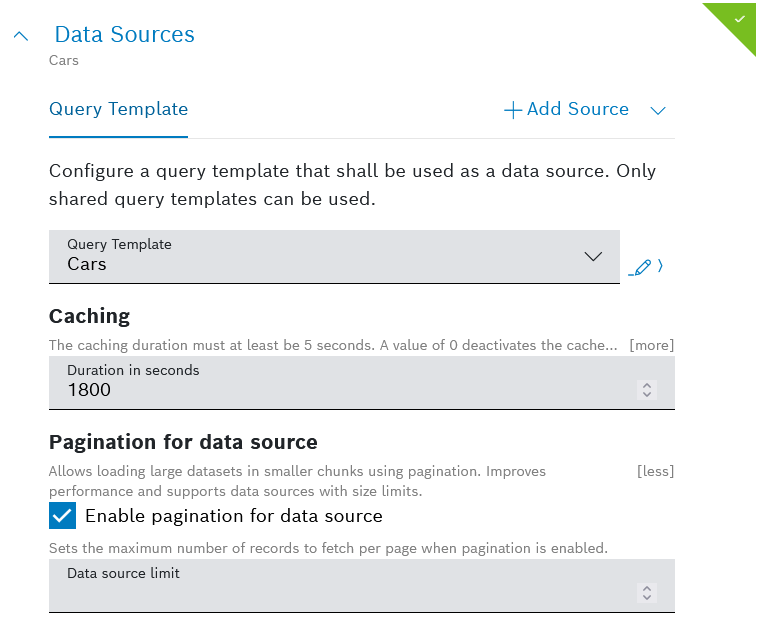
In the Data source limit field, you can set a limit that is sent to the backend.
This differs from the Entries per page option in the Table Settings pane, which defines the frontend limit of actually displayed rows to the user.
In order for the backend pagination to function properly, you need to define several parameters in the query template or add placeholders in the external data source URL respectively.
In particular, these are the pageSize parameter, and either pageNumber or pageOffset.
For details, refer to Table widget.
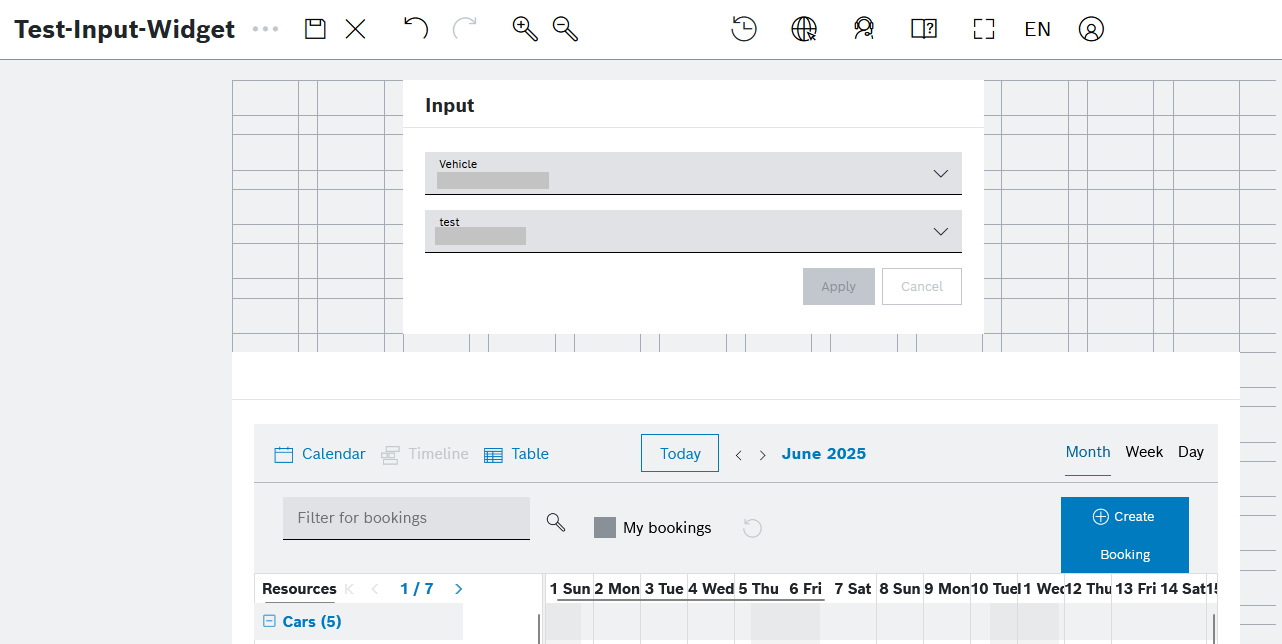
June 2, 2025: Dynamic input fields in Input widget
Within the Input widget's Advanced Settings, we have added a new configuration option, namely the Hide on specific condition toggle.
With this new feature, you can already define a condition which will control whether the particular input field will be displayed or not.

If the property is equal to the given value or if no value is found for the property, then the field will be hidden.
For further details, refer to Input widget.
May
May 20, 2025: New Event Service feature added
Within the Admin menu, we have added a new Event Service sub-menu, which allows you to subscribe for any of the predefined system events.
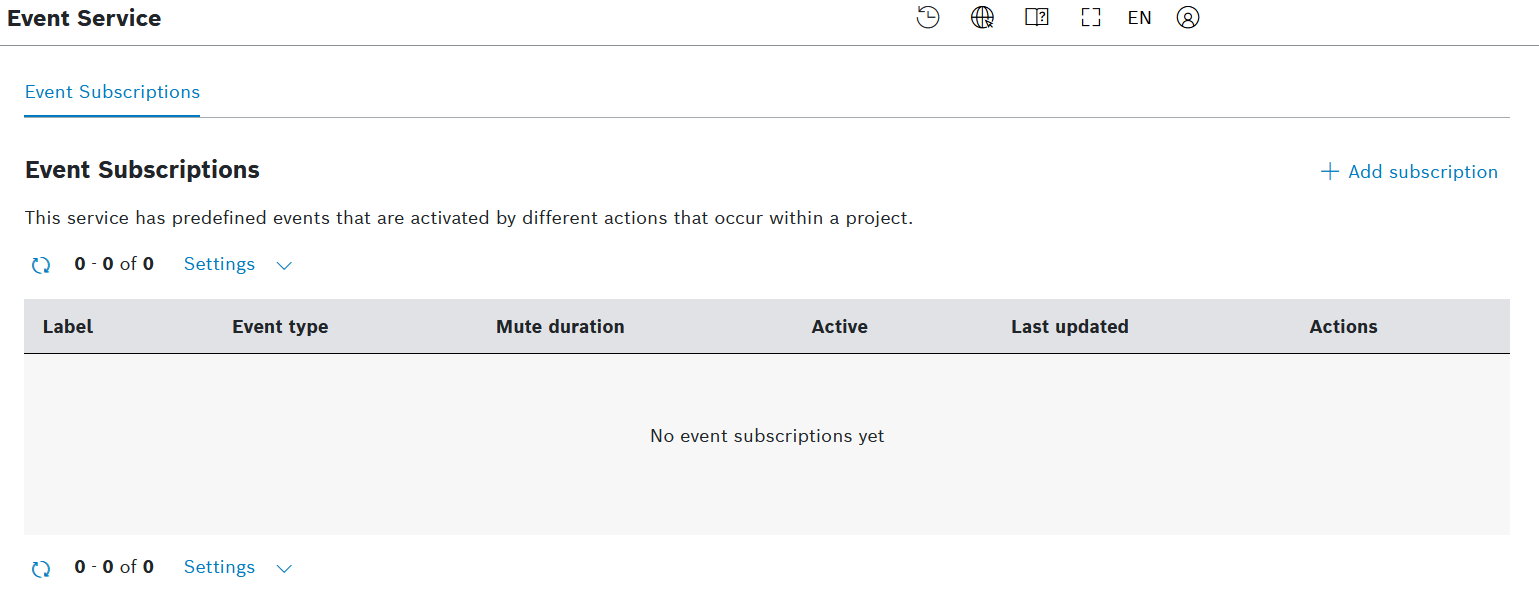
By clicking + Add subscription and selecting the System Event option, you will navigate to the event subscription configuration editor.
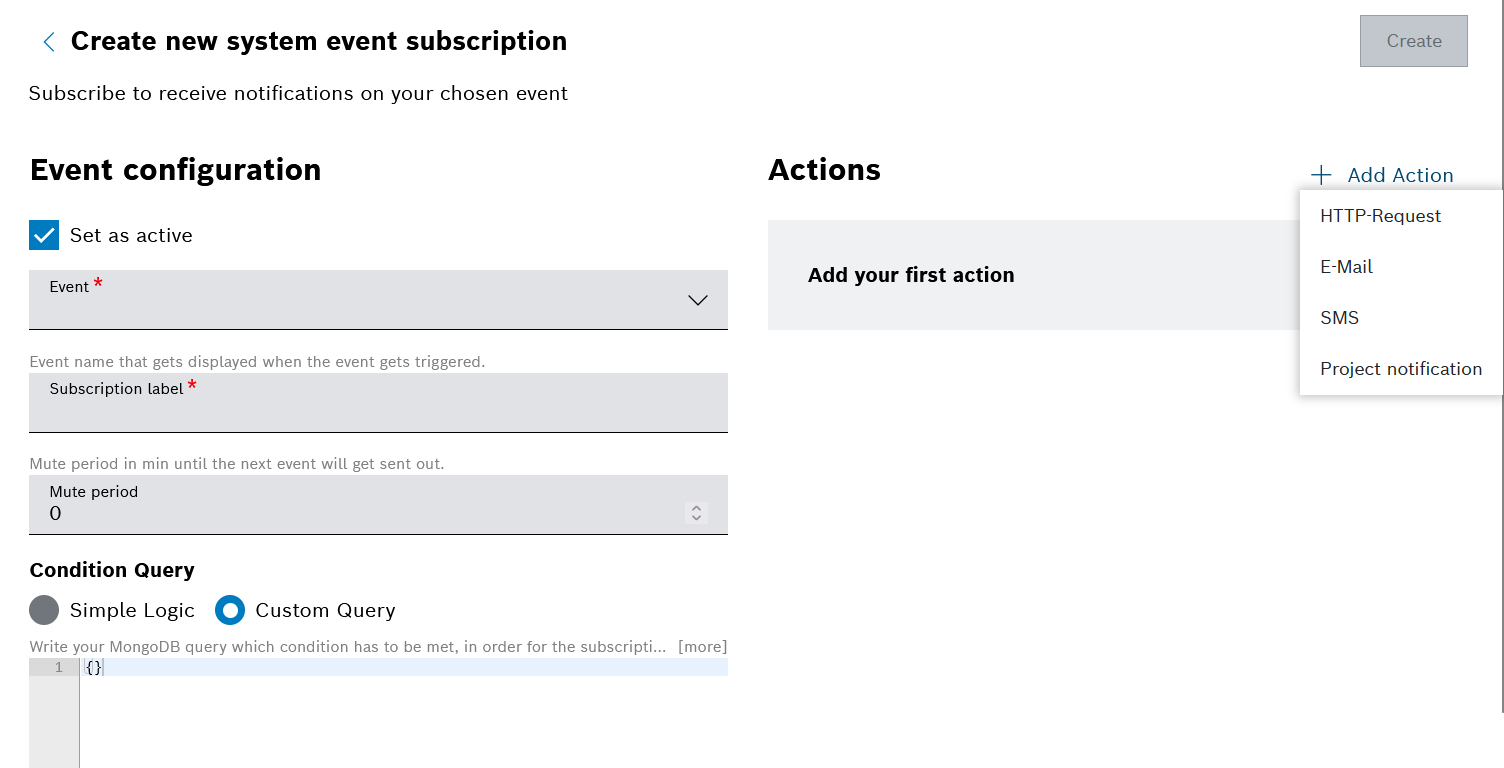
You can define a mute period to avoid too many notifications, and you can further filter the received events through a condition query.
For every event subscription, you need to define at least one action, choosing among HTTP-Request, E-Mail, and SMS.
For details, see Event Service.
May 12, 2025: Direct early reinstatement of archived files now possible
We have introduced the opportunity for project admins and higher roles to define which other roles in the project will be allowed to reinstate archived files. This includes also reinstating early, before expiry of the regular 90-day period of no access to the archived files. Formerly, this was only possible via extended support.
A further convenience is that the project admin can choose to enable the reinstate "on access" feature. In such a case, the users with the respective roles will be able to directly preview and download the respective archived files without having to reinstate them first. The reinstating will happen automatically in the background.

Such early access to archived files will generate additional costs for the project, therefore a warning dialog is added for every archiving and reinstating action.
The costs will be reported as a separate metric in Usage and Estimated Costs, namely Early Reinstation of Data.
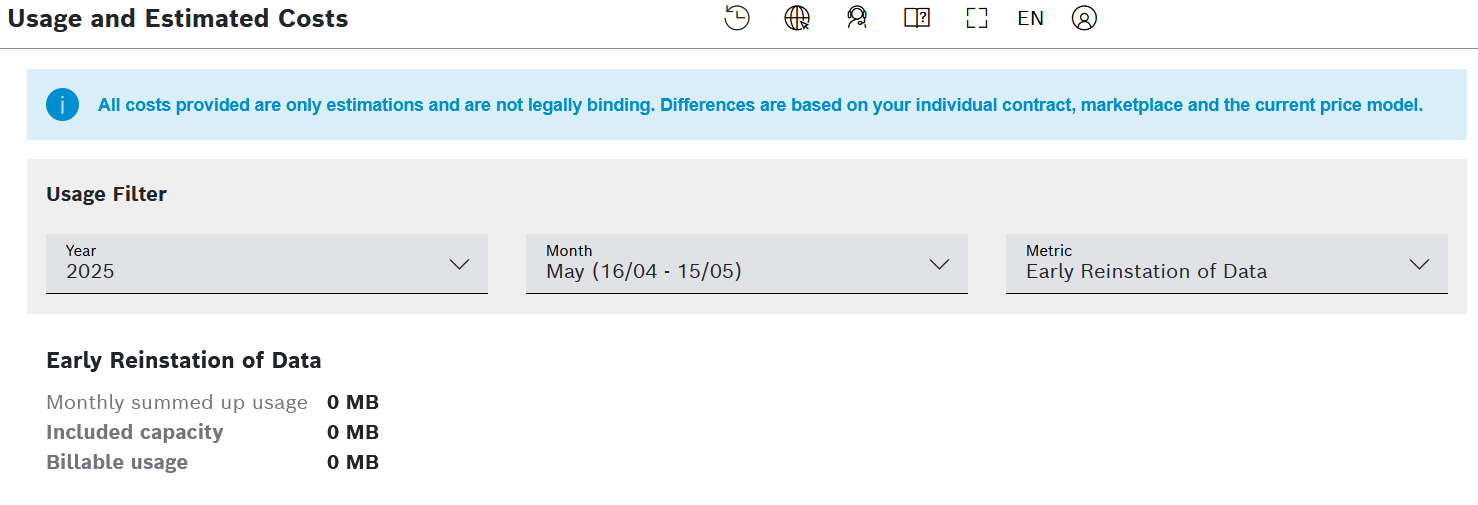
For details, refer to Archiving.
April
April 30, 2025: Various improvements and bug fixes
Throughout the month, along with the already reported new features and improvements, we have also made the following:
Bug fixes
- INS-8131 - Table Widget loses sorting with bottom pagination
April 25, 2025: Defining primary and secondary action buttons in the action button column type for Table widgets
We have recently introduced the opportunity to add multiple action buttons within an action button column of a Table widget. Now we have made a further improvement by which you can define which of these action buttons are primary (default option), and which of them are secondary. Primary actions are displayed directly in the table, whereas secondary actions are hidden in a context menu.
To define that, use the Action Type field for each defined action button.
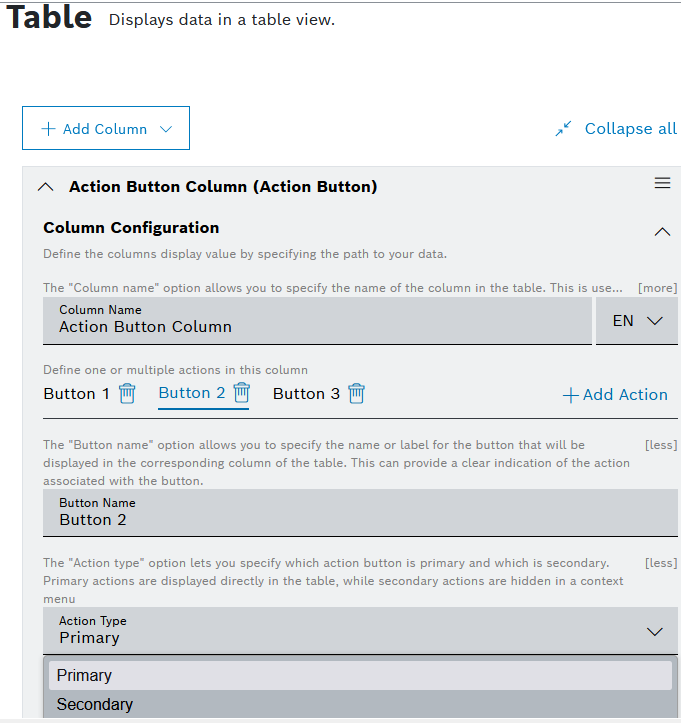
For details, refer to Configuring the Table Settings.
April 24, 2025: Table Settings of the Table widget now offer sections for better navigation
The Table Settings part of the Table widget configuration editor is now organized in distinct sections which can be expanded and collapsed for ease of navigation.
This layout concerns in particular the Custom Columns tab and the Batch Processing tab.
The screenshot below shows the sections available for the Action Button column type.
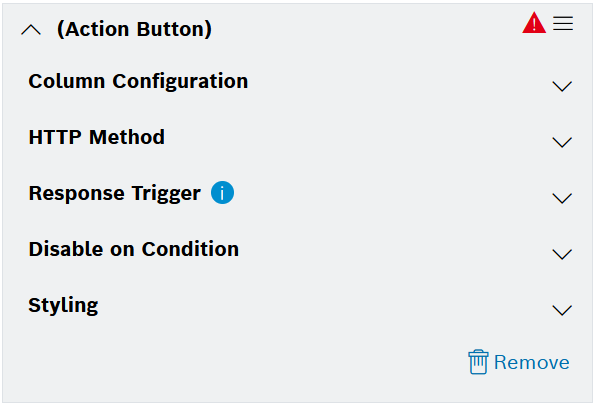
For details, refer to Configuring the Table Settings.
April 23, 2025: Adding multiple actions in a table widget's action button column type now possible
We have extended the Table widget's functionality to allow the definition of multiple actions within the same column whose type is Action Button.
You can use the dedicated ![]() Add Action option under the language menu in order to define the relevant action(s). The so added actions will be placed next to each other in the column.
Add Action option under the language menu in order to define the relevant action(s). The so added actions will be placed next to each other in the column.
In addition, if such an action button column is selected in the Clickable row configuration option, the first defined action button in the column will be executed.
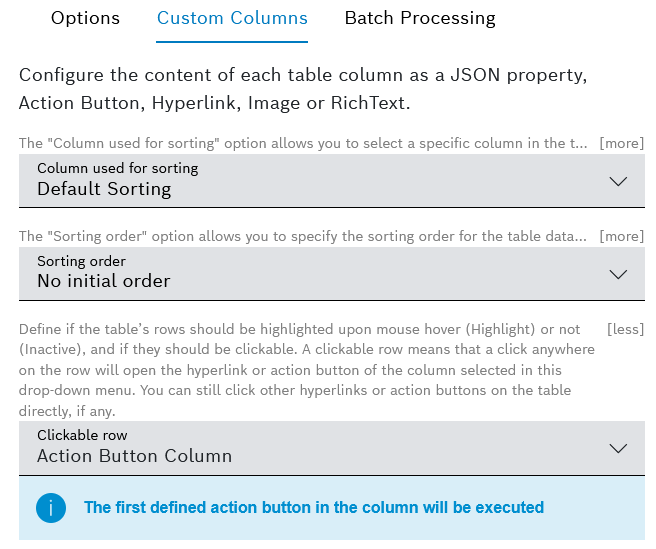
For details, refer to Configuring the Table Settings.
April 9, 2025: Table widget configuration allows up to 50 columns
For users with Admin role, we have increased the maximum number of columns that can be added to a Table widget, from the former 25 to 50.
With this improvement, Admin users will be able to better customize the displayed data according to the specific needs and preferences.
When more than 25 columns are added, it may take more time for the table to be displayed depending on the number of custom columns in general and the number of custom columns as rich text in particular.

For details, refer to Table widget.
April 4, 2025: Prefix and suffix modifiers in widget data sources
We have added the following new modifiers in the widget data source configuration options:
prefix:Allows to dynamically add parameters to a value, by means of a prefix, e.g.${parameter2 | prefix: '&qp1='}. This modifier can also be used as part of an external data source. Undefined parameters will not resolve as "undefined" but will be omitted.suffix: Allows to dynamically add parameters to a value, by means of a suffix, e.g.${parameter2 | suffix: '&_qp1'}. This modifier can also be used as part of an external data source. Undefined parameters will not resolve as "undefined" but will be omitted.
Here is an example of how you can apply a prefix in the Request URL of an External Data Source:
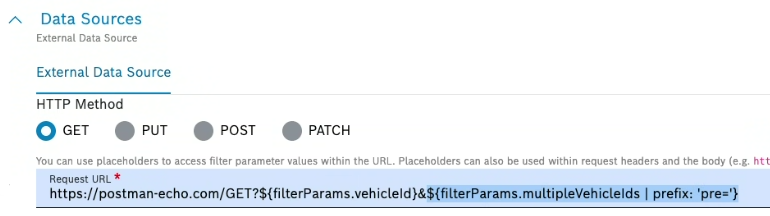
For an additional usage example, refer to a widget guide, e.g. Tree widget.
March
March 31, 2025: Various improvements and bug fixes
Throughout the month, along with the already reported new features and improvements, we have also made the following:
Improvements
- INS-6571 - BE: Thing History - Set TTL on detecting UNTRACKED changes
- INS-6912 - Migration script to set TTL on existing UNTRACKED entires
March 31, 2025: Table widget configuration improvement
The Table Settings section of the Table widget's configuration editor now provides three tabs for easier navigation and less scrolling through the available configuration options.
In particular, these are Options, Columns, and Batch Processing.

For details, refer to Table widget.
March 28, 2025: Improved filtering of processing pipeline logs
It is now possible to define a more fine-grained time frame for the processing pipeline logs that you wish to download and we no longer apply the former hourly splitting of the data. The logs are now delivered within the same text file for the entire selected period.
We have also introduced the option to include or exclude logs from reprocessing jobs. If logs from reprocessing jobs are included, you can further specify the job ID in which you are interested.
With this improvement, you can easily receive only those logs in which you are interested within one text file and thus analyze problems more efficiently.

For details, refer to Viewing the App Console and Pipeline Logs.
March 26, 2025: Improvements in the batch action button definition of the Table widget
It is now possible to refer directly to entries from the widget's data source when you are defining the Request URL of a batch action button in the Table widget. Formerly, you could only refer to objects from the table itself.
For this improvement, we have introduced a new field in the Batch action button definition section of the widget's configuration editor, namely the Path to the action data context field.
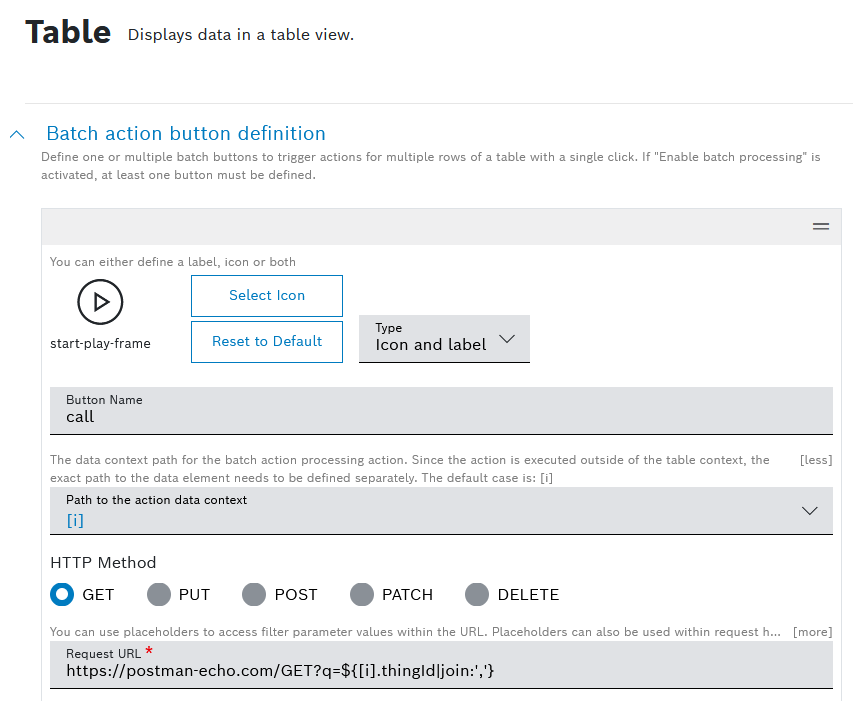
For details, refer to Table widget.
March 25, 2025: Changes in the log retention configuration of conditional actions
The log retention times for conditional actions can no longer be configured per conditional action individually.
Instead, a common log retention time is now applied for all conditional actions within the project. The default value is 30 days, and can be adjusted in the dedicated Event Logs collection in the System section of the Retention menu.
Through the Event Logs collection, you can also check the logs for the respective conditional actions.
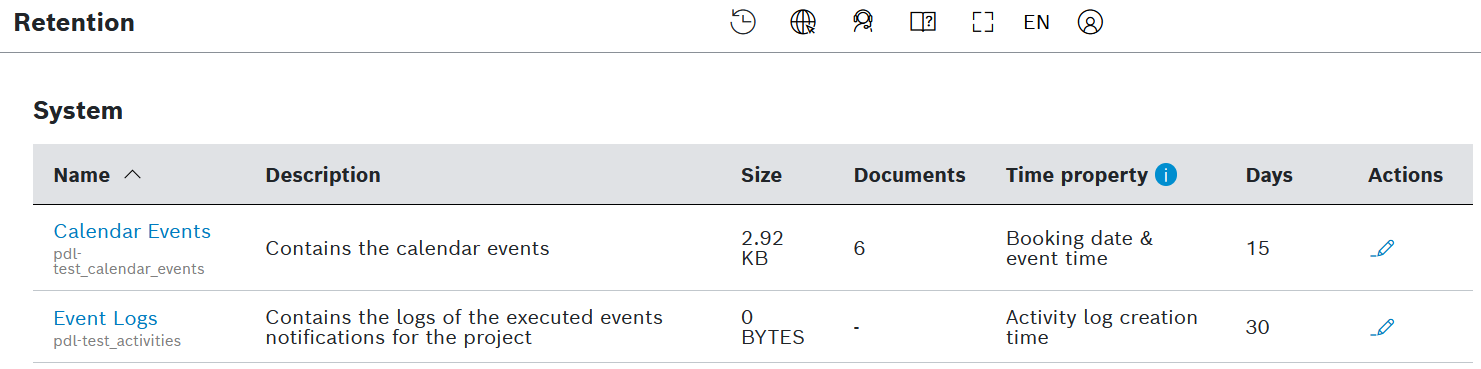
The Retention menu no longer provides a dedicated section for conditional actions.
For details, refer to Conditional actions and Retention.
March 20, 2025: Input widget improvements
It is now possible to add up to four input fields on the same row of an Input widget.
For that, we have introduced a new field in Input fields section of the widget's configurator, called Relative width. With its four available options, you can choose whether there can be only one input field per row, or respectively two, three, or four input fields per row.
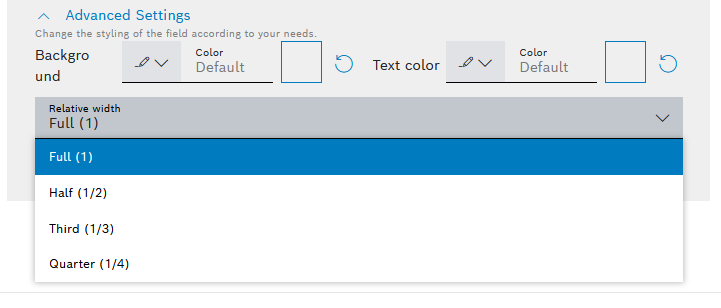
For details, refer to Input widget.
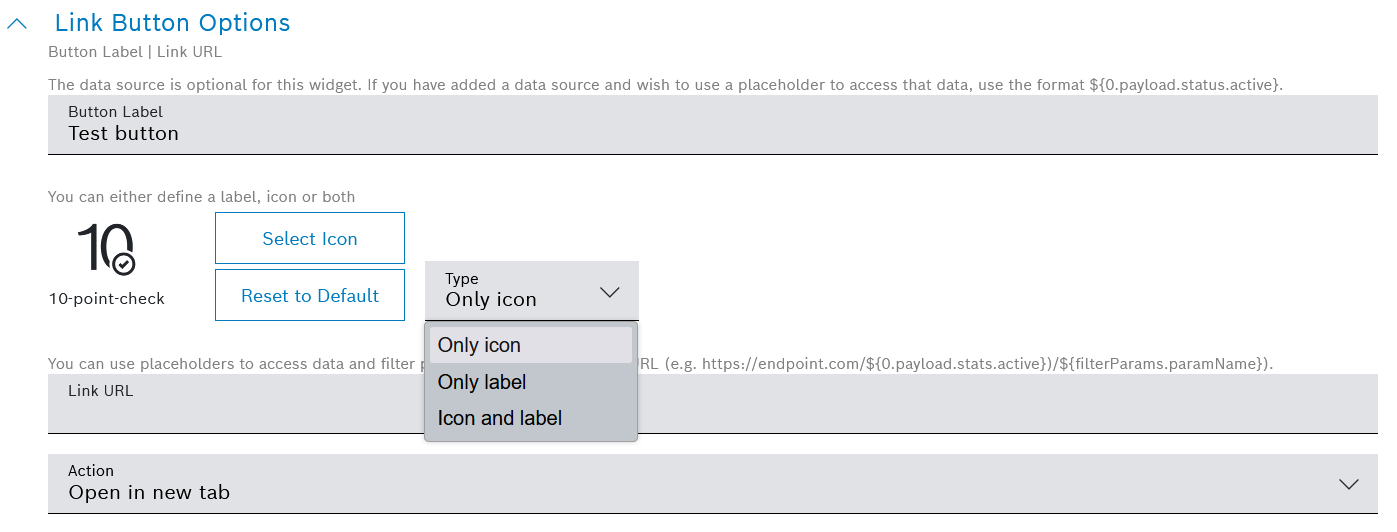
March 19, 2025: Icon options for action buttons
The Action button widget, as well as the action button options within the Table widget, now offer the possibility to select an icon and to configure how this icon will be displayed on the button.
If the icon is displayed, it will be in the same color as the defined text color for the button's label.
This applies both to:
- Rest Request Buttons and Link Buttons in the Action button widget, and to
- Batch action button definition and Custom column definition in the Table widget.
For details, refer to Action button widget and Table widget.
March 13, 2025: Deleting pipeline versions now possible
It is now possible to delete older pipeline versions that you no longer need. You cannot delete the latest pipeline version though.
For details, refer to Managing pipeline versions.
March 12, 2025: Pagination of resources in Calendar widget's Timeline view
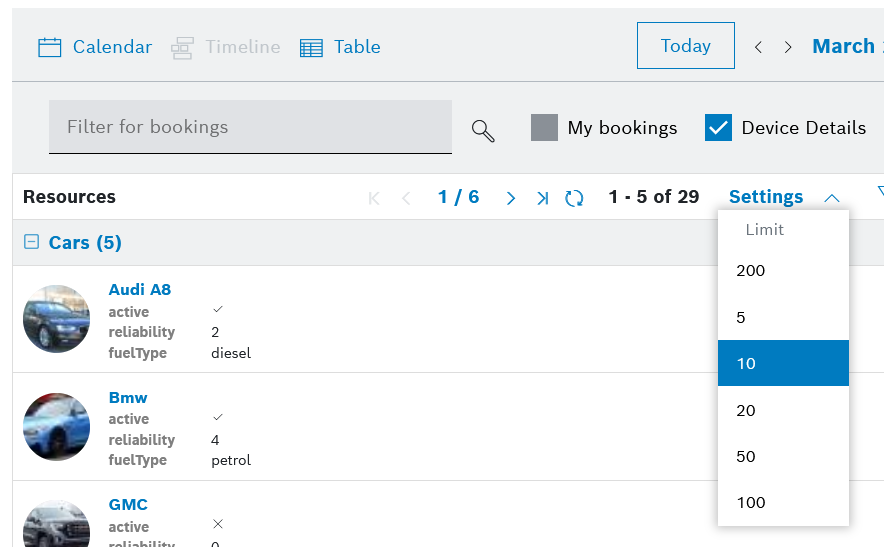
The newly introduced pagination in the Calendar's Timeline display mode makes it possible to see all resources, grouped in pages. The default and maximum number of resources per page is 200.
This value can be adjusted in the widget's configuration editor, in the Timeline pagination limit field.
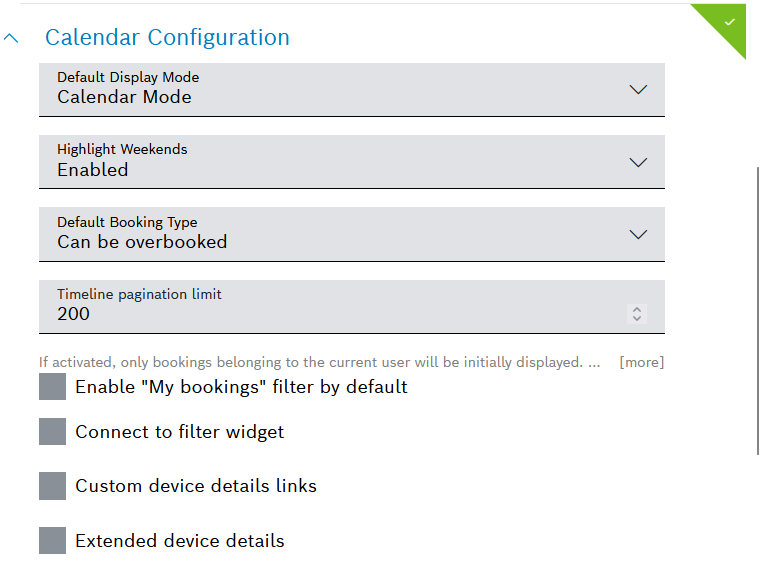
The so configured value appears at the top of the Settings menu in the Timeline view. When you choose another value from the Settings menu, it will be saved in your local storage.
For details, refer to Calendar widget.
March 6, 2025: Improvements in reprocessing jobs
For reprocessing jobs, we are now displaying all results from the last 30 days, instead of only the last 4. The icons showing the reprocessing job status have also been updated recently.
We have also improved the layout and the amount of information displayed.
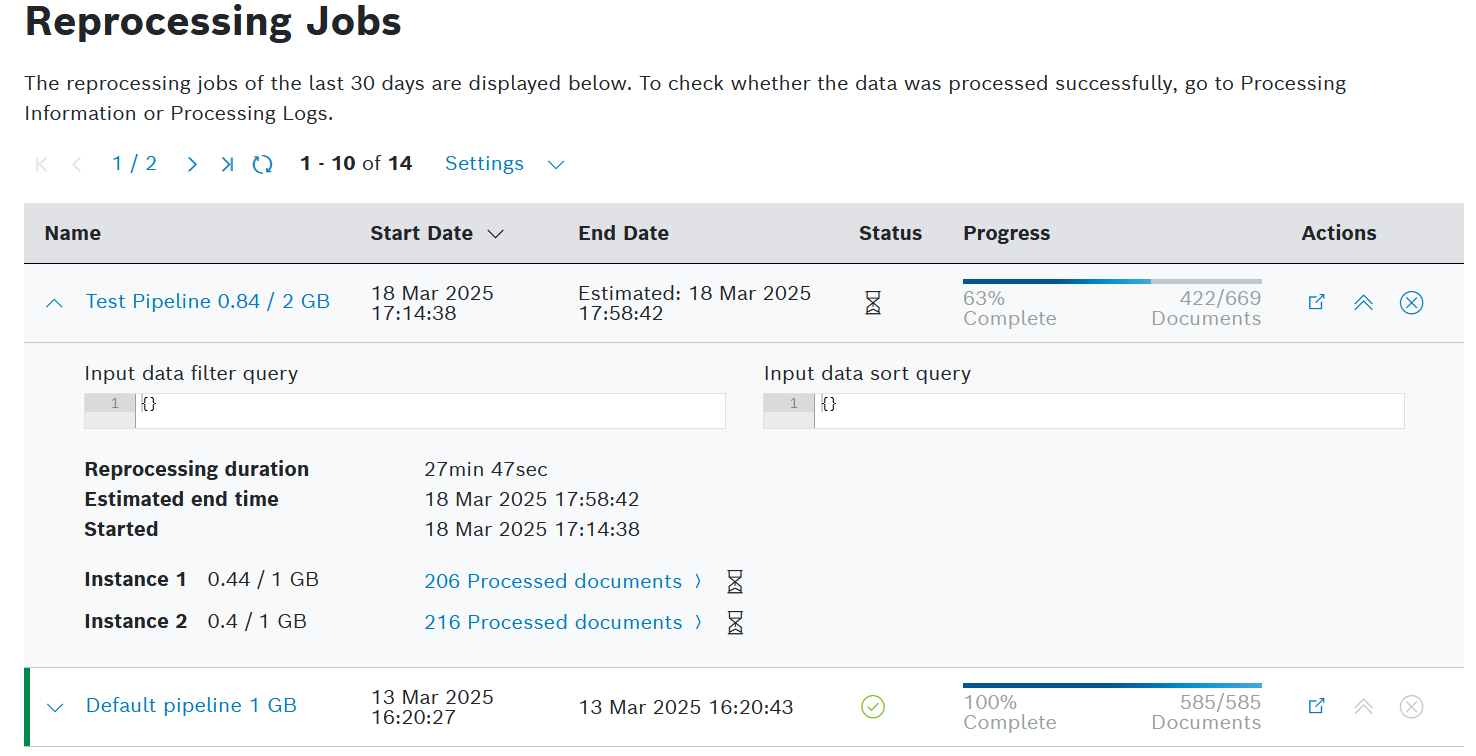
Find out details in Reprocessing the input history and Managing reprocessing jobs.
March 5, 2025: Input history metadata is now editable
It is already possible to edit the metadata of an input history entry even after the initial file upload. This applies both to the Predefined Metadata entries and to Custom Metadata, except for the protected fileName attribute.
This functionality is useful in case you forgot to add important metadata when uploading the file to be processed, or if you want to adjust or enrich its metadata later on.
An update of the metadata may or may not trigger a reprocessing job, depending on the configuration of the respective processing pipeline. By default, the automatic reprocessing of the input file upon metadata update is disabled.
To reach the Edit Metadata dialog, go to the respective input history entry and click the ![]() edit icon on its row.
edit icon on its row.
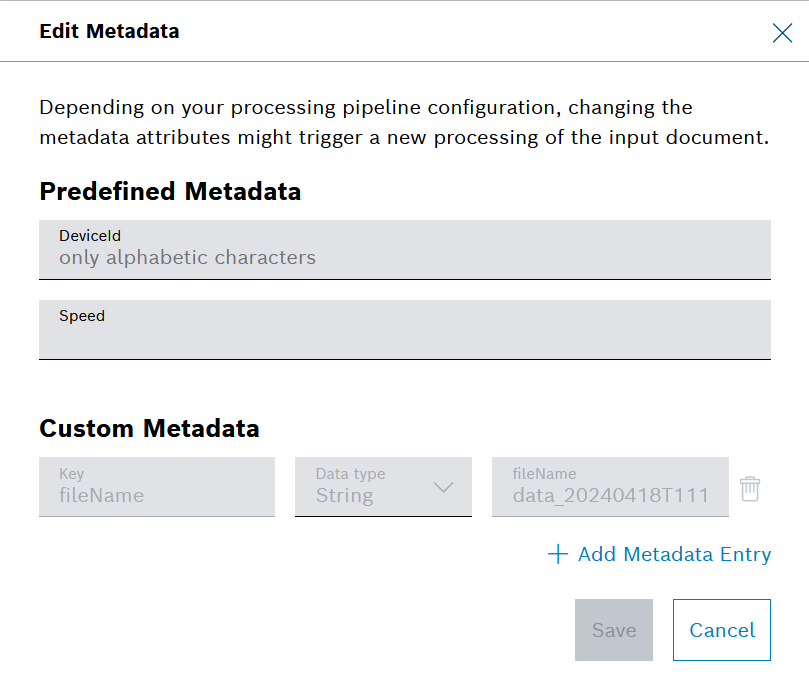
In addition, we have added a Data type selector for custom metadata entries.
For details, refer to Input History and Configuring a pipeline.
February
February 28, 2025: Various improvements and bug fixes
Throughout the month, along with the already reported new features and improvements, we have also made the following:
Improvements
- INS-3529 - Collection selection boxes should be sorted
Bug fixes
- INS-5845 - Support Dates and Timeranges before 1.1.1970
- INS-6176 - Decoder uploads / deletes should be logged because they are billed
- INS-4601 - Device History - Changing thing attributes will generate history entries, even it not intended
February 25, 2025: Widgets are now collapsible
You can now save space on your dashboards with the new Collapsible widget content option in the widget configuration editor, which allows you to collapse and expand widgets on the dashboard.

The option applies to all widgets added to dashboards with grid-based layout, except for Filter widgets, Playback widgets, Tab widgets (including all of their tabs), and Action button widgets.
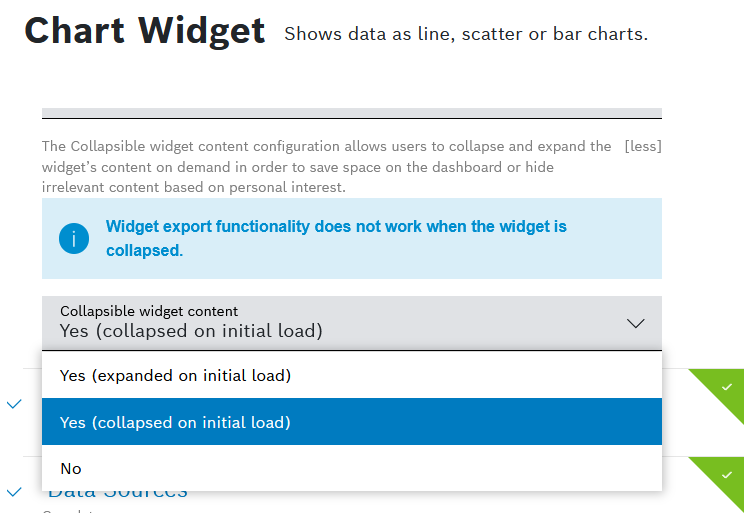
The expanded or collapsed state is stored in the local storage and thus the next time you open the dashboard your widget will be displayed as you last used it.
Keep in mind that if a widget is collapsed on the dashboard, it cannot be exported and for that it would have to be expanded again.
For details concerning the specific widgets, refer to Working with widgets.
February 14, 2025: Improved rearranging of widgets on dashboards with grid-based layout
We have introduced new zoom in and zoom out options in the rearrangement of dashboards with grid-based layout, both compact and free-floating.

This is especially convenient for dashboards with many widgets, as the zoom out gives you immediately an overview of the entire dashboard and eliminates the need for scrolling back and forth.
In addition, we have also applied automatic zoom out when the Rearrange option is activated for certain dashboards, depending on their size.
The new zooming options are available also when you rearrange widgets in the separate tabs of a tab widget.
For details about the grid-based layout and how to rearrange the widgets on such dashboards, see Arranging widgets in the grid-based layout.
February 13, 2025: Filter sharing button made optional
The recently introduced![]() Share filter url icon in the Filter widget's header bar is now made optional, i.e. it can already be activated for filter widgets individually.
Share filter url icon in the Filter widget's header bar is now made optional, i.e. it can already be activated for filter widgets individually.
For that, a new Share button available field is introduced in the General Settings of the Filter widget configuration editor. Its default value is No, both for existing and for newly created widgets.

Before you activate the sharing button, please consider the following warning: Activating the share button will allow others to see the project members. Please verify compliance with your project's data privacy before proceeding.
For details, refer to Filter widget and General widgets > Additional functions of filter widgets.
February 12, 2025: Easier sharing of filter settings
Dashboard filters affect the data displayed on the dashboard. You can now easily share your filter, as well as the entire dashboard on which this filter is added, with other project members.
However, these users will need the same rights as yours, otherwise they may see different content or no content at all.
To share the filter and the respective dashboard, click the ![]() Share filter url icon in the widget's header bar.
Share filter url icon in the widget's header bar.
![]()
Details about this functionality are described in General widgets > Additional functions of filter widgets.
To learn more about filter widgets, refer to Filter widget.
February 4, 2025: Device management features
The former Service API: IoT Things is now renamed to Service API: Device Management. All API paths remain the same.
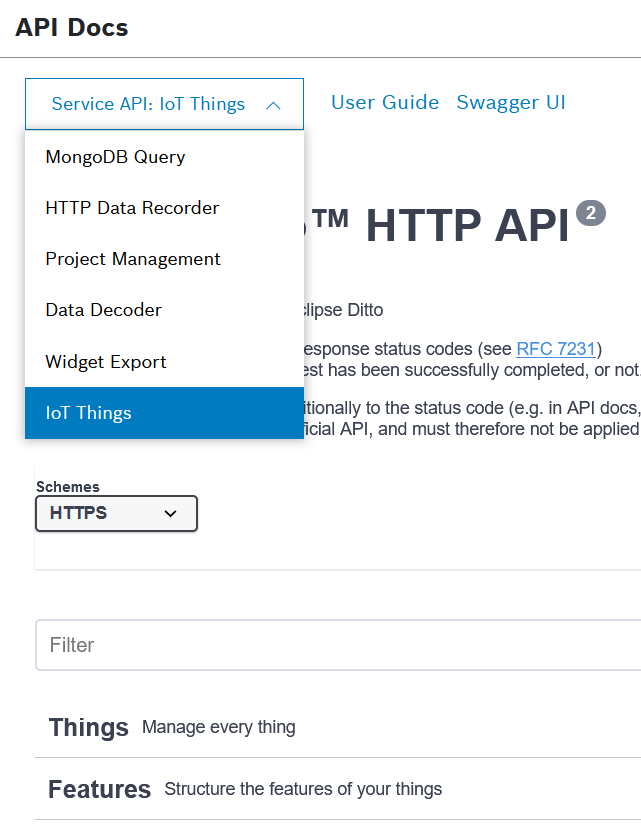
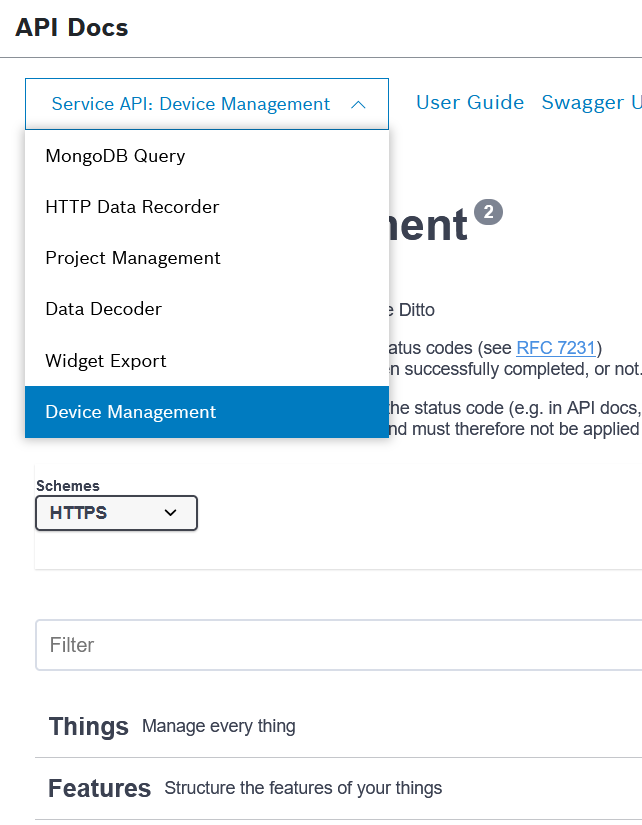
On that occasion, several notions have also been renamed without affecting the functionalities behind them. For example, the former Master Data Management has been renamed to Device Management, Master Data History is now Device History, and so on.
For details, refer to API references.
February 3, 2025: Widget Export service improved with a configurable load timeout parameter
The Widget Export service provides a convenient way to export images out of your widgets, for example in order to integrate them in offline reports.
The service is now further enhanced with the configurable loadTimeout parameter, whose default value is 30 seconds. This parameter allows you to manage the timeout in case your widget contains a lot of data and the export involves a long-running query. Thus, you will avoid the situation of generating images with no data or missing data due to early timeout.
The screenshot below shows the Export info dialog with the loadTimeout parameter, which can be accessed on the UI for chart and map widgets. For all the other widgets this parameter can be configured through the API.
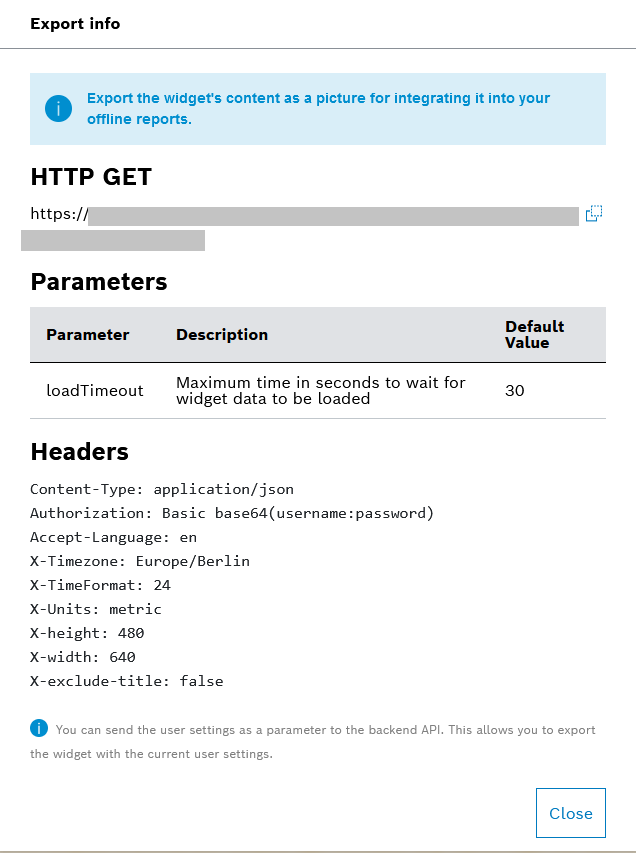
For details, refer to Widget Export.
January
January 31, 2025: Improvements and bug fixes
Throughout the month, along with the already reported new features and improvements, we have also made the following:
Improvements
- INS-6982 - Cleanup - IoT Suite binding API users should be treated as normal technical users
January 24, 2025: Filter widget improvements
The Filter Panel widget is now renamed to Filter widget.
In addition, the widget offers a new configuration option in its General Settings. In particular, the new Display mode drop-down allows you to choose whether the filter should always stay on top of the dashboard, regardless of your scrolling, or should be displayed as a regular widget.
As the name suggests, the Sticky option will make the widget stick to the top of the dashboard. When that is the case, the widget's title will be hidden, along with the widget's Lasts updated property next to the title.
The Draggable option on the other hand allows the widget to behave like any other widget.
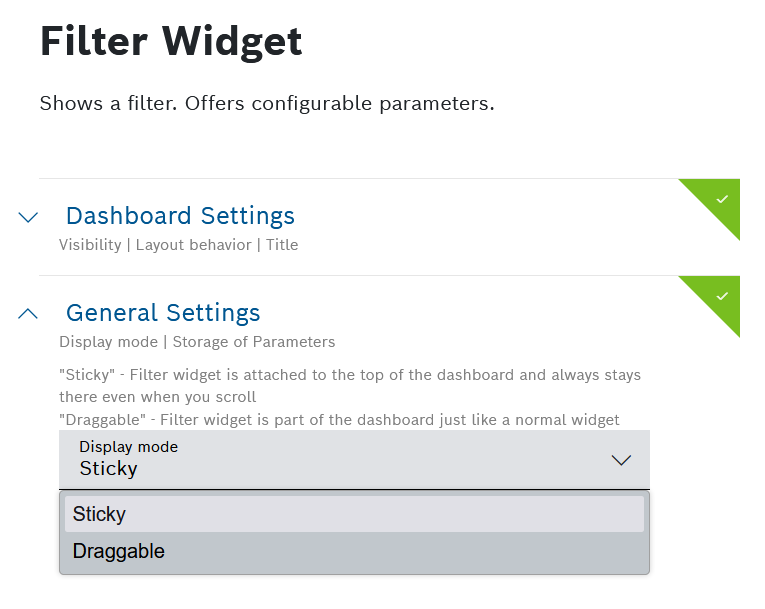
Find out more in Filter widget.
January 15, 2025: Billing Month and Termination Day changed
Since 2025, the start and end day of the billing month have changed as described in the table below.
Billing Month | Selector in UI | |
|---|---|---|
Year 2024 | From 21st of previous month to 20th of selected month |
|
January 2025 | From 21st of December 2024 to 15th of January 2025 |
|
Starting February 2025 | From 16th of previous month to 15th of selected month |
|
Since the termination date of a subscription depends on the billing month this has also changed: the day is now the 15th instead of 20th as described in Subscription Management.
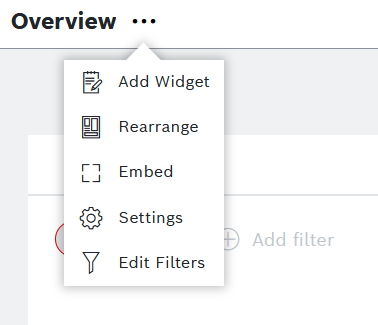
January 15, 2025: Easy access to hidden filter widgets
Filter widgets, both visible and hidden on the dashboard, can now be edited more easily through the new ![]() Edit Filters option.
Edit Filters option.
This option is available on the dashboard actions menu only when the dashboard already has a filter widget. By clicking this option, you will navigate directly to the filter widget's configuration editor.
For comparison, in the past you had to use the rearrange widgets option and then navigate to the filter widget.
For details, refer to Filter Panel widget and Editing a widget.
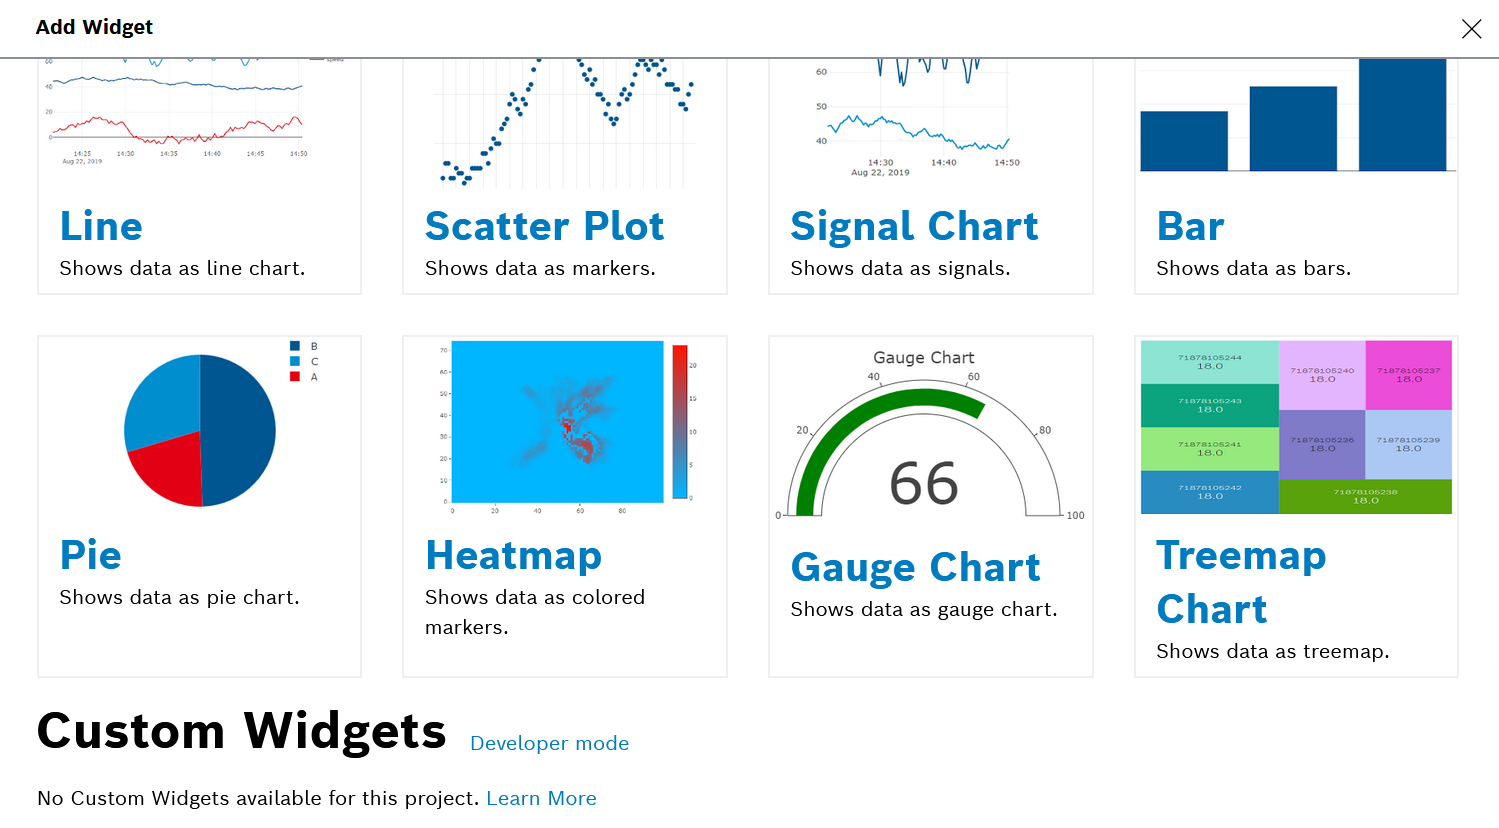
January 15, 2025: Custom widgets can now be developed and shared across Bosch IoT Insights projects
There are plenty of available widgets in Bosch IoT Insights. Despite that, there are use cases which cannot be well-served through these widgets.
For such situations, Bosch IoT Insights now offers the possibility to its paid plan customers to develop, build, and deploy their own custom widgets, and also share them with other projects. The widgets can be developed as so called "web components" in any suitable development framework and language, e.g. Angular, JavaScript, etc.
To allow an easy start with this new feature, we provide a demo repository containing an example on how to do this. This repository can be shared with the authorized custom widget developers. It contains the required configurations, a few templates which can be easily copied and adjusted, as well as the build and deploy workflows.
Once an own custom widget is deployed, the Custom Widgets will appear as a third group in the Add Widget dialog, after the General Widgets and Chart Widgets.
The new feature is documented from the perspective of the different roles involved in the process - a Bosch IoT Insights project admin, a custom widget developer, and a custom widget reviewer.
To learn how to use the Custom Widgets UI menu, refer to Custom Widgets in the User guide.
For more in-depth technical information, refer to Custom Widgets in the Developer guide.
See also an introduction to Web Components.
January 10, 2025: Tab widget now supports data sources and dynamic tab titles
The widget configurator is now enriched with the well-known sections of General Settings, Data Sources and Data Transformation, which are present in several other widgets already.
In addition to the title of the widget itself, now the titles of the separate tabs can also include dynamic data source references, filter widget references, as well as user context references.
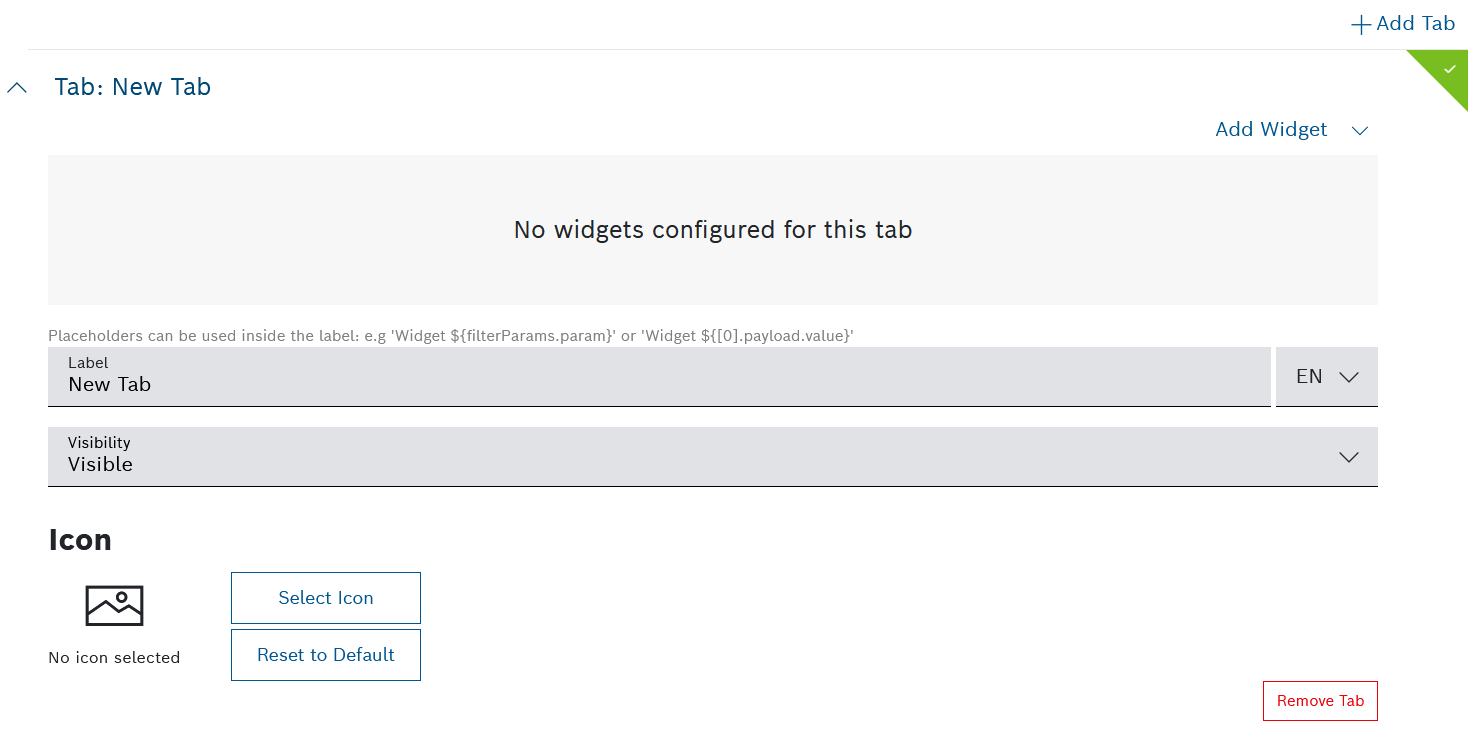
For details, refer to Tab widget.
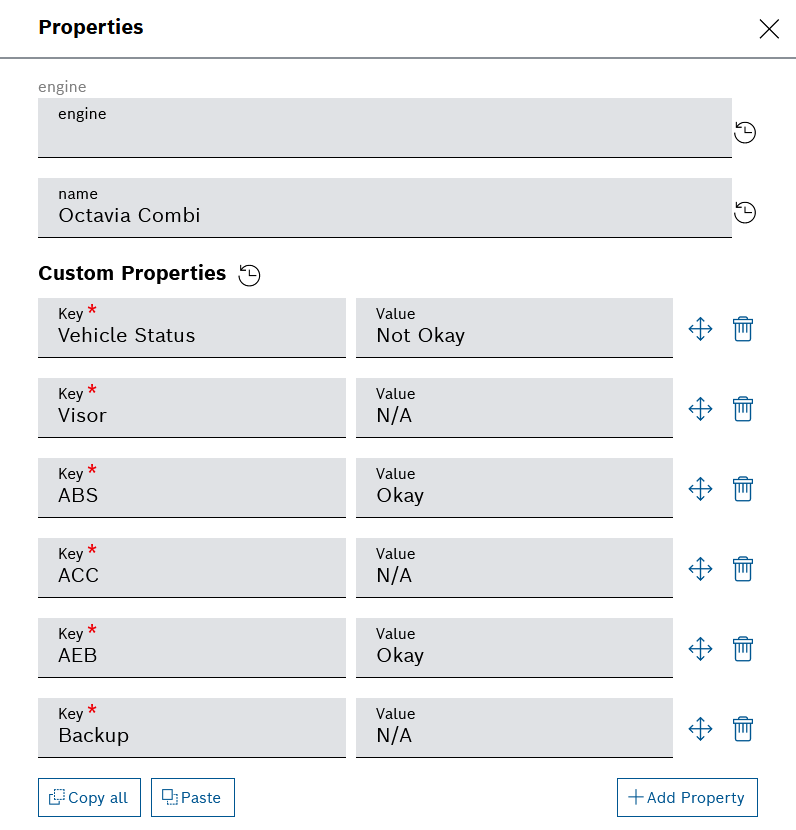
January 8, 2025: Copy-pasting of custom properties of devices
With the new improvement, custom device properties can now be easily copied and pasted through the dedicated buttons.
The Copy all button allows you to copy all custom properties of a certain device and then paste them with the proper table formatting, for example in Excel or Notepad.
The Paste button allows you to paste a set of properties which were already copied, for example from another source like Excel or Notepad. By that, you can add multiple new custom properties to a device at once. You simply need to click on any key or value field, and then click the Paste button, or use the keyboard combinations from the button's tooltip.
For details, refer to 2025.