After you have created a pipeline, you can start with its configuration.
Refer to Managing pipeline versions.
This chapter details the following topics:
- Prerequisites
- Changing the basic information
- Configuring processes and instances
- Adding environment variables
- Configuring the pipeline steps
Prerequisites
- To execute the following actions, you have to be assigned to the Admin role.
- The Pipeline App has the status STOPPED unless otherwise stated.
Changing the basic information
You can change the Pipeline App Name and/or Pipeline Description in the Basic Information pane of App Settings.
Proceed as follows
- Enter a new name in the Pipeline App Name field.
- Enter a new description in the Pipeline Description field.
- Click Save.
→ The name and/or description of the Pipeline App has been changed.
→ A new pipeline version has been automatically created. Refer to Managing pipeline versions.
Configuring processes and instances
The table in the Processes and Instances pane lists the individual instances together with their CPU, Memory Usage, and Disk Usage. If an instance is currently not running, the corresponding columns display the ![]() icon.
icon.
The table displays also the Global Processing Timeout in minutes, as well as the Multithreaded Processing status, along with the number of threads.
You can scale your Pipeline App by creating instances if it requires more memory or computation power. You can either increase the amount of instances that should run or order more memory per instance.
Increasing the instances and memory usage affects your account. Check the service plans and our pricing model for detailed information. The pricing can be found in the marketplace where you booked your service plan.
You can also configure the global processing timeout value and choose between single threaded or multithreaded processing.
Prerequisites
For updating the number of instances, memory usage and disk limit (points 2, 3 and 4 below), the Pipeline App must have the status STARTED.
Proceed as follows
- Click the Settings icon
 in the Processes and Instances pane to scale the Pipeline App and to configure Advanced Settings.
→ The Scale Pipeline App dialog is displayed.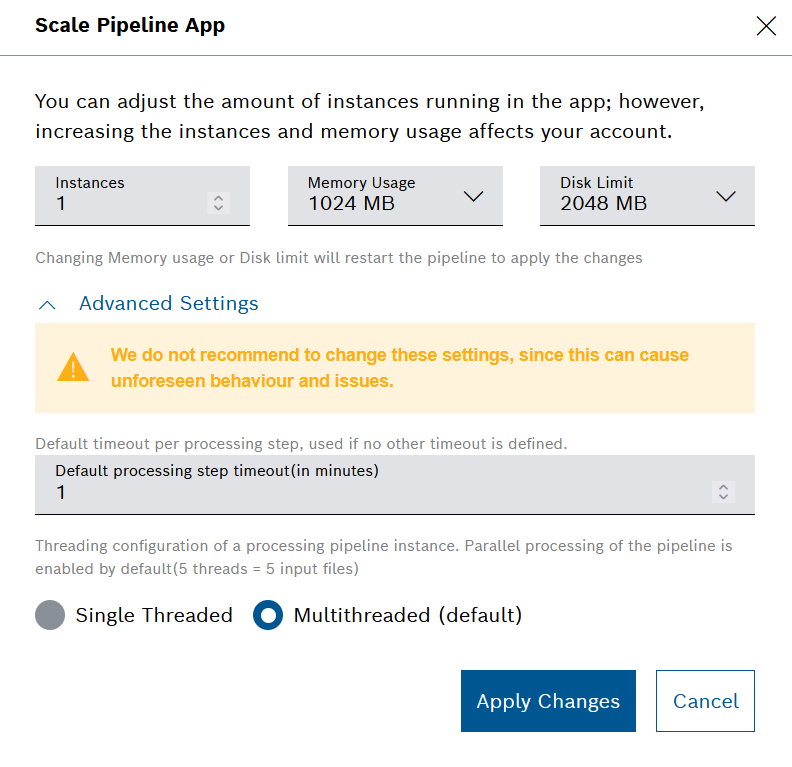
- In the Instances field, enter a number of instances you want to add.
In the Memory Usage drop-down list, select a value to adjust the memory usage.
In the Disk Limit drop-down list, select a value to adjust the disk limit.
- Click Advanced Settings to access the following additional configuration options:
- In the Default processing step timeout (in minutes) field, enter a value in minutes, which will be applied to the processing steps if no other timeout is defined.
The default value is one minute. The minimum value is also one minute, whereas the maximum value is 24 hours, defined in minutes. - In the Threading configuration area, choose between Single threaded or Multithreaded (default) processing.
The default number of threads is five, which equals five input files.Although these advanced configuration settings are allowed, it is not recommended to change them, as this could lead to unforeseen behavior and issues.
- In the Default processing step timeout (in minutes) field, enter a value in minutes, which will be applied to the processing steps if no other timeout is defined.
Click the Apply Changes button to save your changes.
→ The Pipeline App has been scaled.
→ The Advanced configuration settings for processing timeout and threading are applied.
→ A new pipeline version has been automatically created. Refer to Managing pipeline versions.
Adding environment variables
Environment variables behave like standard system variables. Using environment variables, you can set parameters in the User-Provided Environment Variables pane to have them available in your application code.
If you enter a valid environment variable, it is saved automatically to the backend.
Proceed as follows
- Click the Add Environment Variable button in the User-Provided Environment Variables pane.
→ A new line is added. - Enter a Name for the environment variable.
- Enter a Value for the environment variable.
→ The environment variable has been set. - Click the Save button.
→ A new pipeline version has been automatically created. Refer to Managing pipeline versions.
Example
In the following image, you see that the environment variable APP_ENVIRONMENT=DEV has been set. The SFDE_PIPELINE environment variable is set by default and cannot be changed.

Depending on the programming language you use, this environment variable can be used inside the application.
In a Java application, you can print the variable as follows:
System.out.println(System.getenv("APP_ENVIRONMENT")); // -> DEVIn a python script, you can print the variable as follows:
print(os.environ['APP_ENVIRONMENT']) // -> DEVConfiguring the pipeline steps
Each pipeline consists of three steps:
- Input trigger
The input trigger step is the first step of every pipeline. It can only exist once per pipeline. The defined query filters the incoming data for processing.By default, the filtering extends also to data which has been uploaded in the 7 days preceding the trigger event. In this way, we aim to minimize any gaps in the processing for the cases when a pipeline is temporarily stopped and then started again and there is data which has been uploaded in the meantime. If some of this data has already been processed, the system will start a reprocessing job on it. See also Reprocessing the input history.
You can adjust this default behavior:
- on pipeline level within the query of the respective input trigger, or
- on project level by means of a support request for the setting of a project-wide
noReprocessingBeforedate.
Be aware, that the behavior described above applies also to newly created pipelines which are started for the first time. For them, the filtering will extend to data uploaded in the 7-day period preceding the pipeline's first start.
- Parser
The parser is used to transform the input data. A default parser is available that automatically detects the file type of the input data and transforms the input data accordingly. Multiple parser steps can be added. - Output
The Output step is responsible for saving the pipeline result. A pipeline can contain one or more Output steps.
Each pipeline can be expanded by the following steps:
- Parser
See above. - Custom Event
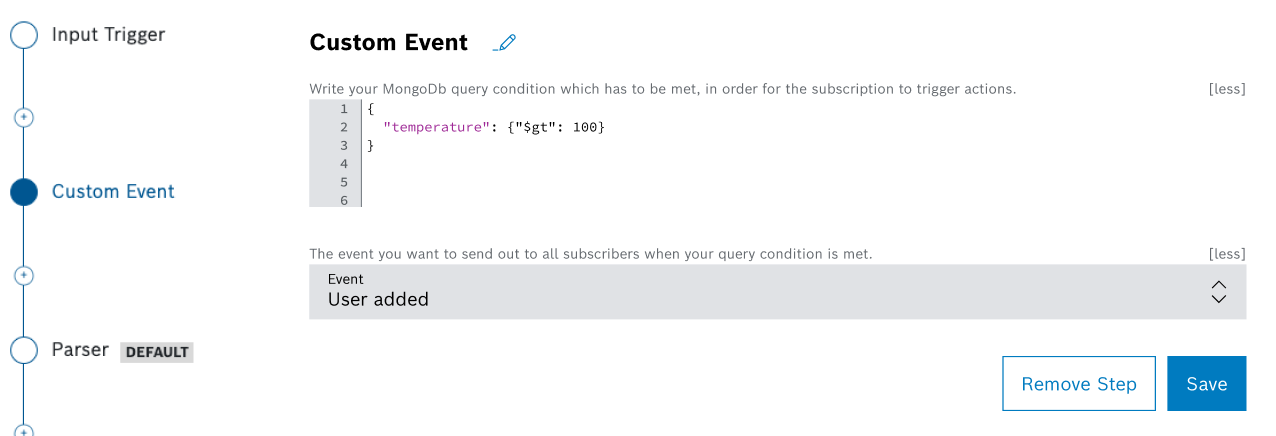
In the custom event step, you can write a query condition. If the condition is fulfilled, the incoming data to this step will be used to produce the configured custom event. Custom
In a custom step, you can upload your own code written in Python or Java to interact with and transform the input data. In this code, you can also produce custom events.
In the Examples chapter, you can find information on how to configure the custom step, refer to Pipelines: Configuring the custom step.The custom processing logic and its Intellectual Property (IP) belong to the project owner.
The project owner is liable for damages which are caused by the custom processing logic.
We advise you to perform security and validity scans (especially when using open source code).
We also advise you to verify open source license compliance of your custom processing logic.- Labeling
With the labeling step you can define a condition query in order to match documents and apply labels to them. The labels will be set in the documents' meta data. - Device Position
In a device position step, the GPS coordinates of a device are extracted and stored in its digital twin representation. If this digital twin contains a geofence information block, then the device position step will also produce geo events based on the conditions of the geofence. You can subscribe for such events as described in Event Service.
Proceed as follows
Open the Configuration tab and configure or update the relevant step.
When ready, click the Save button.
→ The configuration is saved.
→ A pipeline version is automatically created and can be tracked in the Change History tab. Refer to Managing pipeline versions.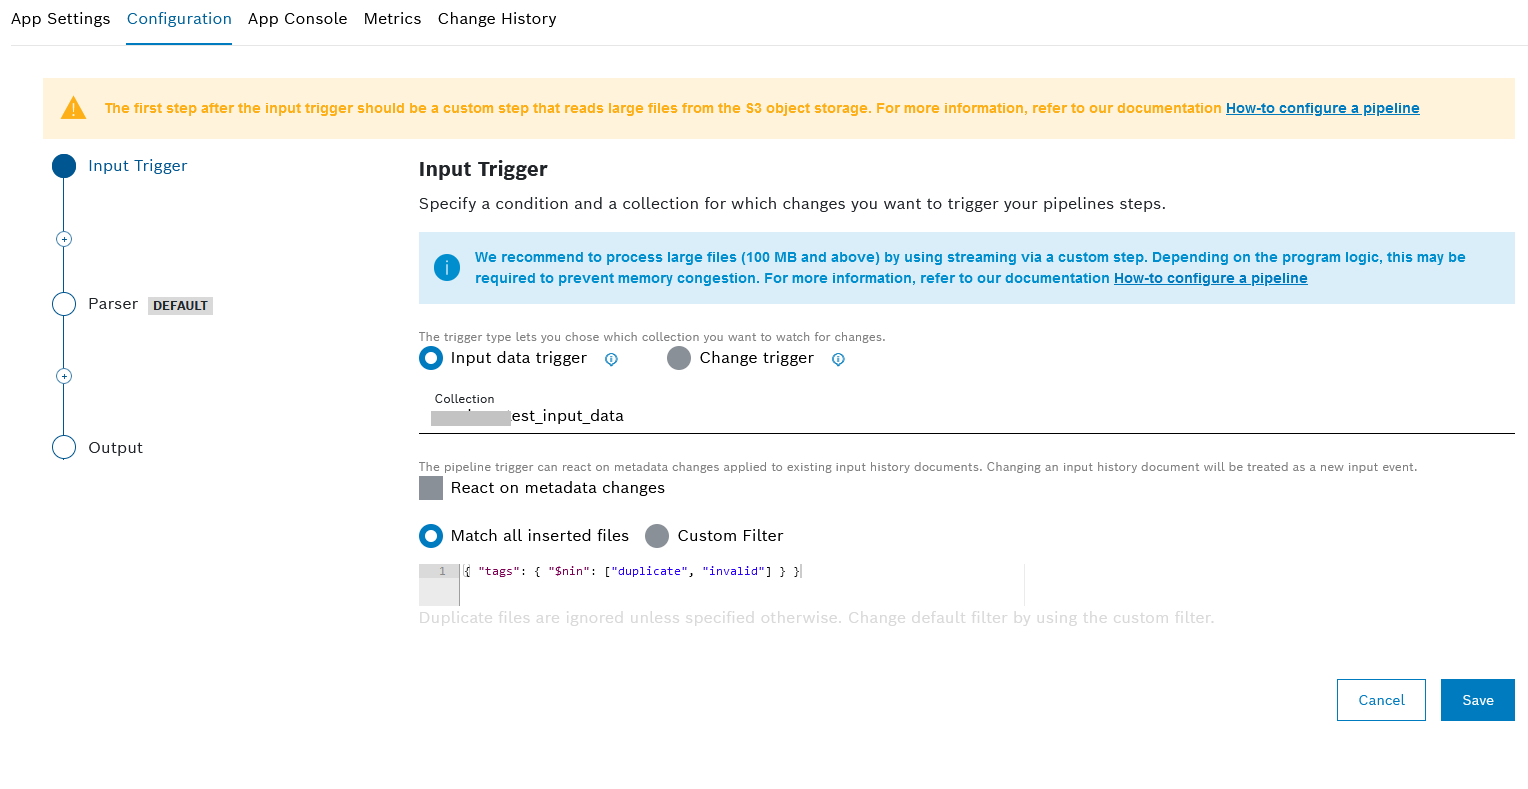
Configuring the input trigger
Proceed as follows
- In the Configuration tab, select the Input Trigger item in the sequence.
- Choose between Input data trigger and Change trigger.
Please, be aware that currently the Change trigger is only available for users with the SFDE admin role.
The Input data trigger will react on the entire input history in combination with the underlying object storage. You can filter the input history entries by means of a MongoDB query.
The Change trigger will react on changes of the selected type (Insert, Update, Replace, Delete) in the selected input history collection. Further, you can specify the format in which you want to see the change and optionally define a condition as a MongoDB query.
- If you choose Input data trigger:
- The Collection field is prefilled and cannot be changed.
- In the React on metadata changes checkbox, choose whether the pipeline trigger will react on metadata changes applied to existing input history documents. Changing an input history document will be treated as a new input event.
- Set a trigger for the pipeline:
- Activate the Match all inserted files radio button to process all files uploaded to the database.
Keep in mind that this will cover also files uploaded within the 7 days preceding the trigger event. This default behavior can be adjusted on pipeline level within the query of the input trigger, as well as on project level by means of a support request for the setting of a project-wide
noReprocessingBeforedate. - Activate the Custom Filter radio button to trigger the pipeline only if the input data matches specific requirements.
Insert a query into the code box.
The syntax is based on the MongoDB Query Language.
You can use the custom filter query to set the reprocessing time for the pipeline.
- Activate the Match all inserted files radio button to process all files uploaded to the database.
- If you choose Change trigger:
- In the Select collection field, use the drop-down list to select the relevant collection.
- Use the checkboxes to select one of the available events:
- Insert - an insert event occurs when an operation adds a document to a collection
- Update - an update event occurs when an operation updates a document in a collection
- Replace - a replace event occurs when an update operation removes a document from a collection and replaces it with a new one
- Delete - a delete event occurs when an operation removes a document from a collection
- Insert - an insert event occurs when an operation adds a document to a collection
- When you select Update, Replace, or Delete, an additional field appears above the checkboxes, namely the Change trigger type field.
Use the drop-down menu and choose between:- Full document - this is the default option and transmits the entire document that was changed, as it appears after the change.
Example query for full document:
{"name": "Alice"} - Change event - this option transmits the raw change event, allowing you to access specific fields without altering their paths.
Example query for change event:
{"fullDocument.name": "Alice"}{"updateDescription.updateFields.email": "alice@10gen.com"}For more details on MongoDB change events, please refer to the MongoDB Change Event Documentation.
- Full document - this is the default option and transmits the entire document that was changed, as it appears after the change.
- Optionally, fill in a MongoDB query, following the example provided in the code box.
- Click the Save button if you want to stop or go on with the next step.
Processing of duplicates
If you do not want to process duplicates, enter the following query:
{
    "tags": { "$not": { "$elemMatch": { "$eq": "duplicate" } } } ,
    "metaData.yourKey": "yourMatchText"
}
If you want to process duplicates, enter the following query:
{
    "metaData.yourKey": "yourMatchText"
}
Configuring the parser
Proceed as follows
- Select the Parser item in the sequence.
- Optionally, click the Edit icon
 to change the parser's name.
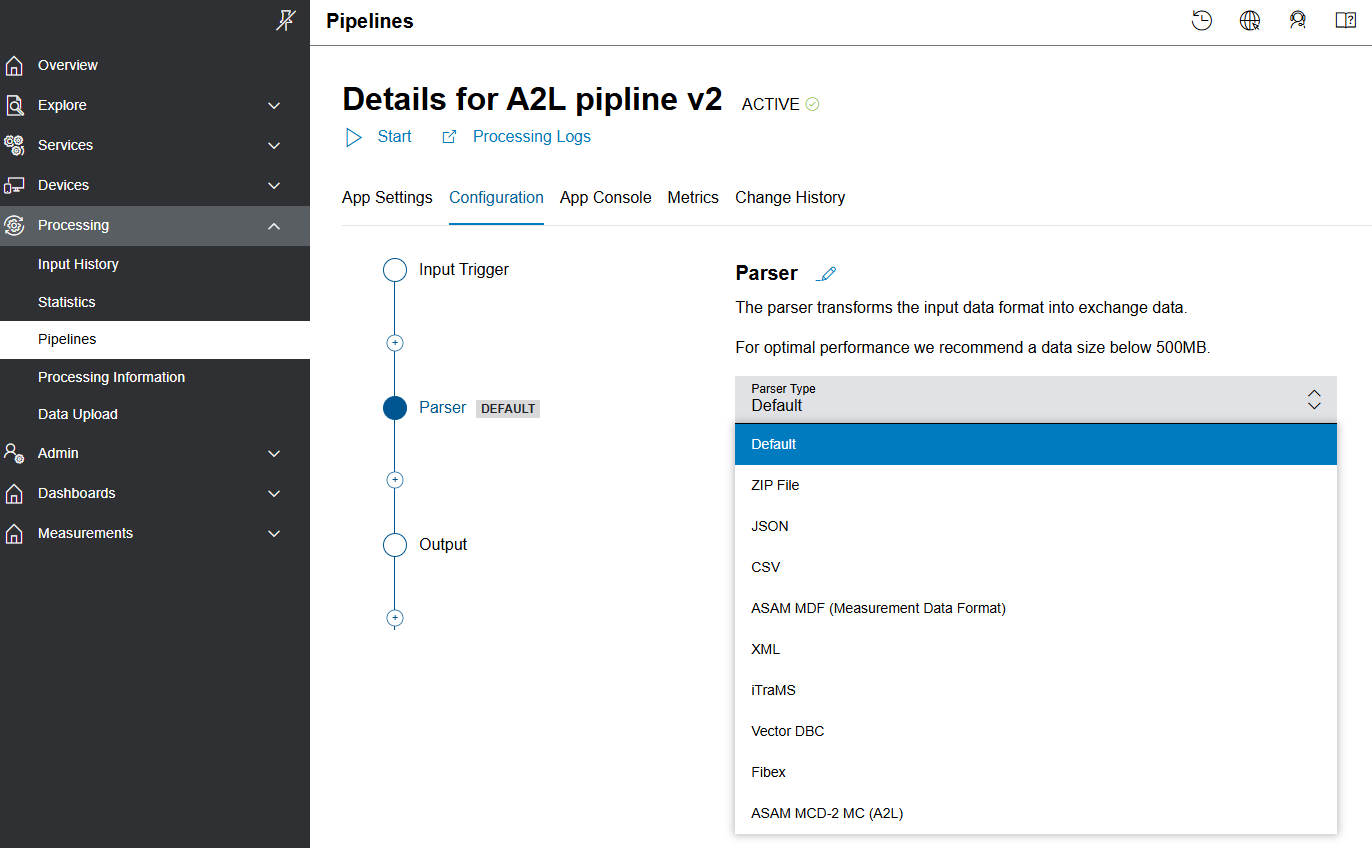
 In the Parser Type drop-down list, select a parser type, e.g. ZIP file, JSON, Vector DBC, etc.
Some parser types are described in detail in the following.
For optimal performance, we recommend a data size of less than 500 MB.
→ The output is a JSON file created from the content of the input data.
ASAM MDF decoder parser step
This parser is used for the Measurement Data Format and is best suited for a timeseries output collection.
Proceed as follows
- In the Parser Type drop-down list, select the ASAM MDF parser type.
- Add the environment setting
MDF_IGNORE_UNKOWN_BLOCKS=1to ignore unknown blocks inside the MDF file while parsing. With this setting, the decoder only displays a warning instead of stopping the parsing process, in case of special mdf blocks.
There exists a bunch of possible environment variable to control and influence the behaviour of the mdf parser.MDF_NO_MEASUREMENT_SPLITTING=1 This setting lets the mdf generator not split up measurement blocks if there size exceeds the predefined volume of 16Mb.
MDF_SIGNALS_FILTER=time,mysignal1,mysignal2,mysignal3 This setting allows to restrict the extracted mdf signals to a given list. The list can be a comma separated list containing the "exact casesenstive" signal name.
MDF_IGNORE_INVALIDATION_BIT=true This setting changes the behavior of the Bosch IoT Insights MDF Parser leading to decoding decodable data points, and still ignoring technical not decodable values. - Select a timeseries collection which should be configured accordingly:
- Time field must be the same as the time attribute of the MDF
- Meta field should be defined and will be set to
inputDataId
If a timeseries collection is selected the parser step output will be flattened and looks similar to the following:
[{ <TimeField>: '2020-01-05T10:00:01.000Z', 'dwordCounter': 10, 'PWMFiltered': 99, 'Triangle': 37, 'inputDataId': '5e1729cb84874f0015dd5014', 'fileName': 'Vector_MinimumFile.MF4', 'file': 'generic', 'Timeclass': 'LocalPCreferencetime', 'Startdistance': 0, 'processedAt': '2020-01-09T13:25:31.554Z', 'Starttime': '2011-08-24T13:53:19Z', 'DataGroupBlock': 1, 'receivedAt': '2020-01-09T13:25:31.483Z', 'Startangle': 0, 'Name': 'MinimumMDF4.1filederivedfromCANapefilebyremovingsomeblocks', <MetaField>: '5e1729cb84874f0015dd5014'},{ <TimeField>: '2020-01-05T10:00:02.000Z', 'dwordCounter': 124637, 'PWMFiltered': 110, 'Triangle': 47, 'inputDataId': '5e1729cb84874f0015dd5014', 'fileName': 'Vector_MinimumFile.MF4', 'file': 'generic', 'Timeclass': 'LocalPCreferencetime', 'Startdistance': 0, 'processedAt': '2020-01-09T13:25:31.554Z', 'Starttime': '2011-08-24T13:53:19Z', 'DataGroupBlock': 1, 'receivedAt': '2020-01-09T13:25:31.483Z', 'Startangle': 0, 'Name': 'MinimumMDF4.1filederivedfromCANapefilebyremovingsomeblocks', <MetaField>: '5e1729cb84874f0015dd5014'}] Vector DBC decoder parser step
To parse input data of the type DBC, the CAN configuration must be customized with a regular expression. In addition, metadata can be matched with expressions and labeled accordingly. There is also a built-in text editor to test these expressions against the input data.
Proceed as follows
- In the Parser Type drop-down list, select the Vector DBC parser type.
- Optionally, click the Edit icon to change the parser's name.
- In the attachment box, select or drop a ZIP file containing the input data of the type DBC.
- In the Vector DBC Parser Settings pane, enter a Regular Expression.
- Define the DeltaTime Group, CAN ID Group, and CAN Payload Group in the corresponding drop-down lists.
Activate the CAN v2.0 checkbox to enable the Message ID to be 29 bits long.
CAN v2.0 is activated by default. If you deactivate the checkbox, CAN v1.0 is used with a length of 11 bits.
Activate the HEX Encoded checkbox to use HEX values.
HEX Encoded is activated by default. If you deactivate the checkbox, integer values are used.
Optionally, in the Metadata Fields pane, click the Add Metadata button to add a Metadata trace selection.
→ A new line is added.You can add a maximum of 10 metadata parameters.
- In the CAN Trace Evaluation pane, click the Test Regex button to test your regular expressions and the metadata rules with an example CAN trace.
FIBEX decoder parser step
To parse input data of the type Fibex, the configuration must be customized with a regular expression. In addition, metadata can be matched with expressions and labeled accordingly. There is also a built-in text editor to test these expressions against the input data.
Proceed as follows
- In the Parser Type drop-down list, select the Fibex parser type.
- Optionally, click the Edit icon to change the parser's name.
- In the attachment box, select or drop a ZIP file containing the input data of the type Fibex(XML).
- In the FIBEX Parser Settings pane, enter a Regular Expression.
- Define the DeltaTime Group, PDU ID, and PDU ID Group in the corresponding drop-down lists.
Activate the HEX Encoded checkbox to use HEX values.
HEX Encoded is activated by default. If you deactivate the checkbox, integer values are used.
Optionally, in the Metadata Fields pane, click the Add Metadata button to add a Metadata trace selection.
→ A new line is added.You can add a maximum of 10 metadata parameters.
- In the Fibex Trace Evaluation pane, click the Test Regex button to test your regular expressions and the metadata rules with an example FIBEX trace.
iTraMS decoder parser step
Proceed as follows
- In the Parser Type drop-down list, select the iTraMS parser type.
- Optionally, click the Edit icon to change the parser's name.
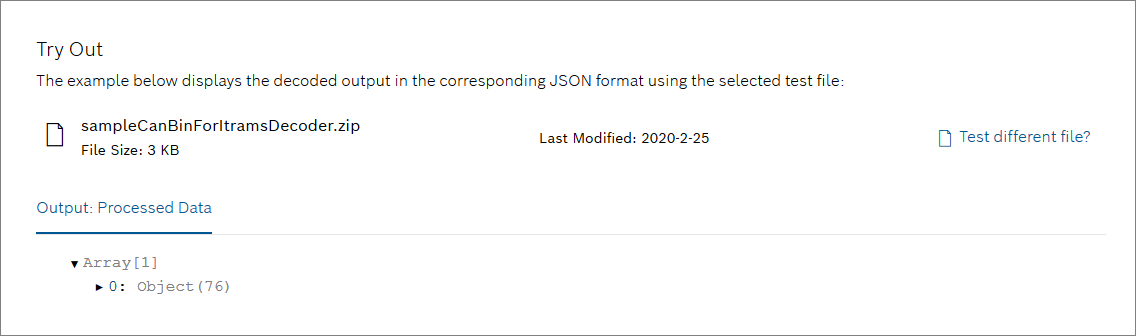
- In the attachment box, select or drop a ZIP file containing the iTraMS decoder specification.
- Optionally, test the iTrams decoder. Therefore, select or drop a bin file in the attachment box of the Try Out section. If the file was the decoded, the processed data is shown.
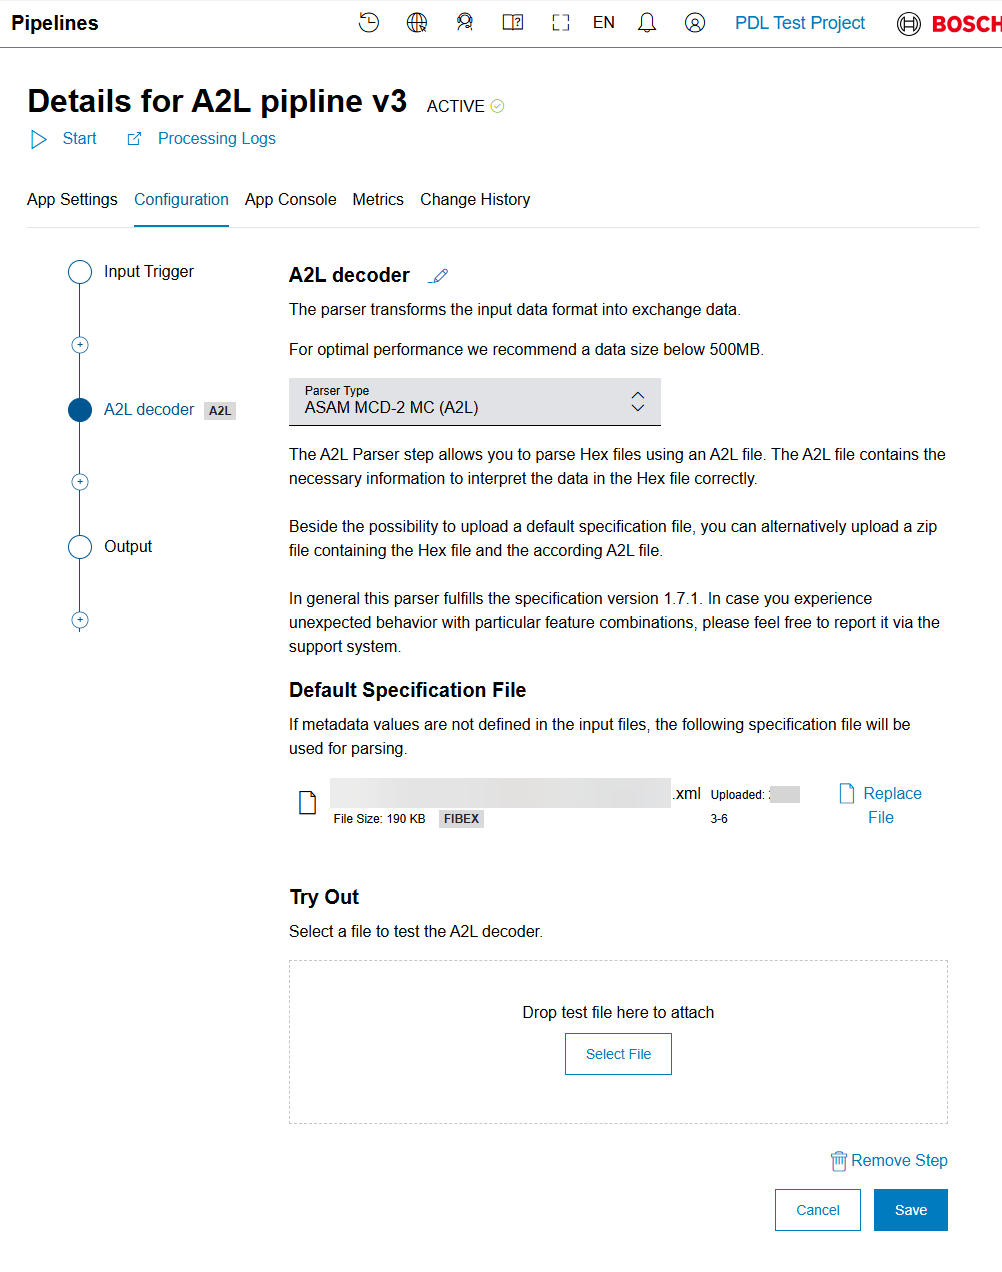
ASAM MCD-2 MC (A2L) decoder parser step
Proceed as follows
- In the Parser Type drop-down list, select the ASAM MCD-2 MC (A2L) parser type:
- Optionally, select the Edit icon to change the parser's name.
- Optionally, select Replace File to use another specification for parsing.
- Optionally, test the A2L decoder. Therefore, select or drop a file in the attachment box of the Try Out section. If the file was the decoded, the processed data is shown.
- When ready, select Save:
Configuring the output
Proceed as follows
- Select the Output item in the sequence.
In the Output Collection drop-down list, select a collection to which the results should be stored.
- Alternatively, click the
 New Collection button to create a new collection.
For details on how to create a new collection, refer to Creating a new collection.
- Activate the Produce output events checkbox if you want the output step to generate output events for each document. Then, you will be able to subscribe for such events in the Event Service menu.
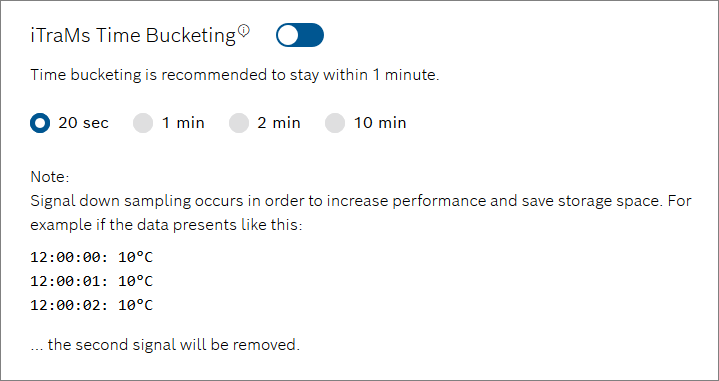
- In case of an existing iTraMS Parser, there is an iTraMS Time Bucketing section. Optionally, select a time bucket size or turn it off completely.
The output data may not exceed 16 MB per document. Otherwise the document cannot be saved to the database.
Configuring the Multi Output
Proceed as follows
- Select the Multi Output item in the sequence to allow the pipeline result to be written to one or more target collections based on configurable conditions.

- Optionally, click the Edit icon to change the Multi Output step name.
- From the Output Collection drop-down list, select a collection to which the results should be stored.
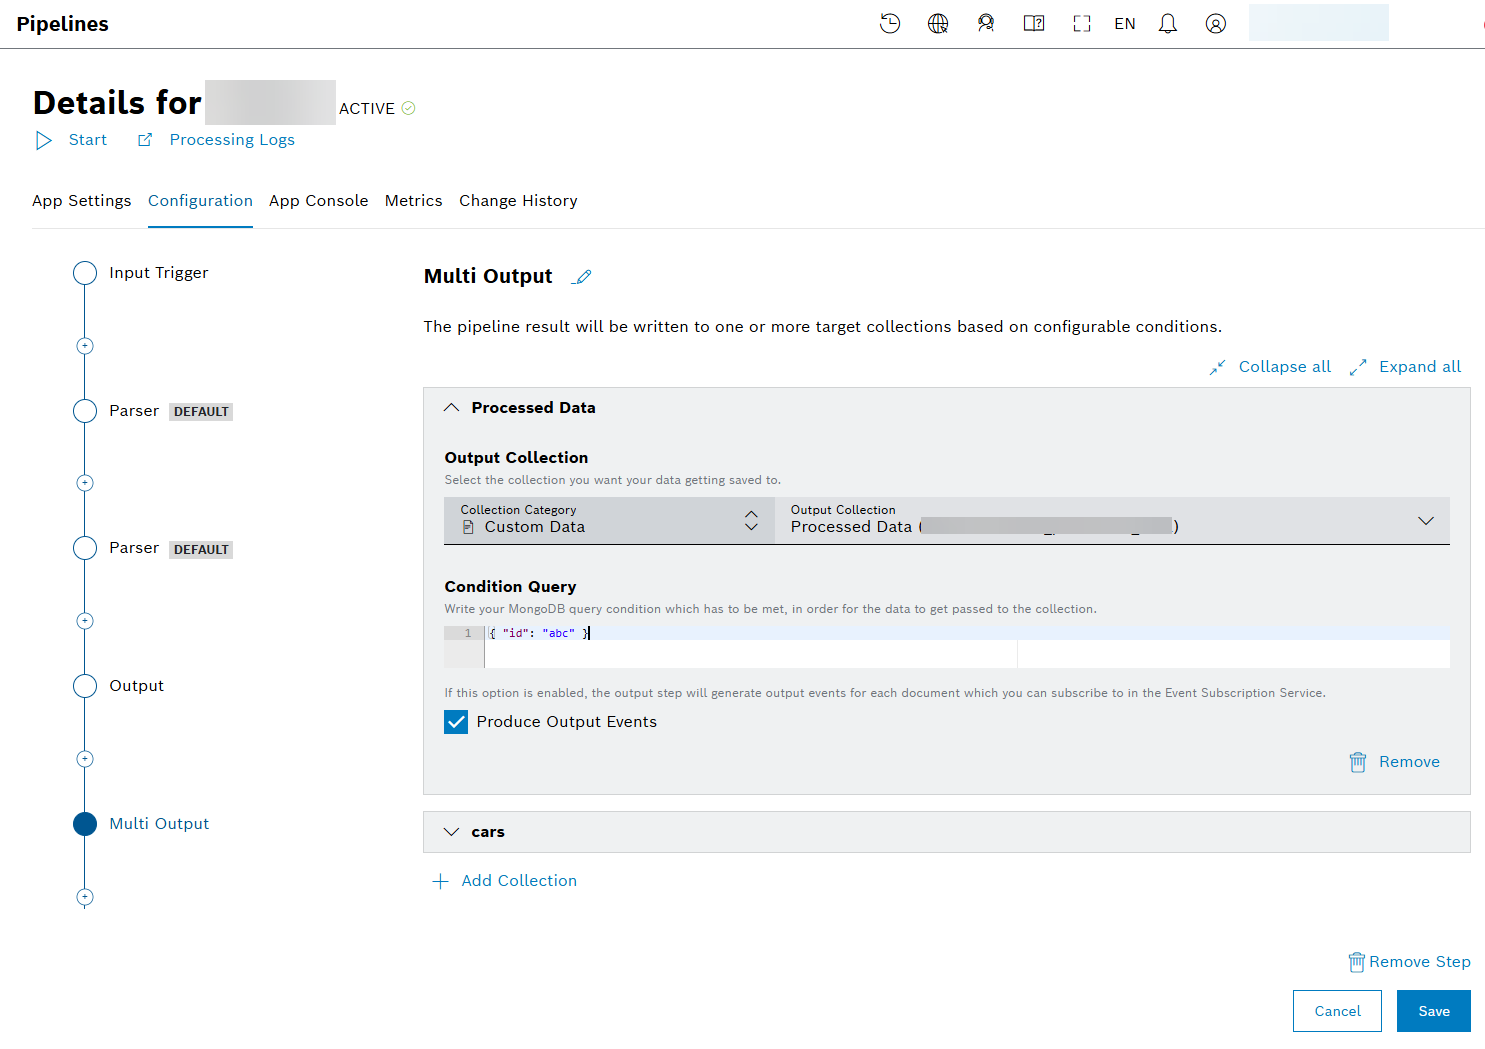
- In Condition Query field, provide your MongoDB query condition which has to be met so that the data get passed to the specific collection selected in step 3.
- Optionally, click the + Add Collection button to include another existing collection from the dropdown list in the Output Collection field:

Creating a new collection
There are two subtypes of collections:
- Standard
For regular use cases Time Series
To store sequences of measurementsWe recommend to use documents with a flat data structure. If a parser step is used in the pipeline, the flat data structure will be applied. The flat data structure is used to prevent the generation of the sub entries "metadata" and "payload", as these are currently generated by default. That means, that these two items are missing in the Output JSON.
Proceed as follows
- Click the New Collection button.
→ The Create New Collection dialog is displayed. - In the Technical Name field, enter a technical name for the collection.
- In the Label field, enter a label that will be displayed.
- In the SubType drop-down list, select the subtype of the new collection.
- If you selected Time Series, proceed as follows:
In the Time Field field, enter the field that contains the date in the time series document.
The time field must be on root level.
In the Meta Field field, enter a field name that contains metadata, e.g.
deviceId.Only top-level fields are allowed as metadata.
- In the Expire after days field, define the number of days after which the documents will be deleted.
- In the Granularity drop-down list, define the unit in which the time between individual sensor measurements passes.
- Click the Create button.
→ The new collection is created.
→ A new query template for this collection is created, refer to Default query template for time series collections.
Configuring the additional custom event, custom, labeling, parser, and device position steps
It is possible to add any number of additional steps to a pipeline.
Proceed as follows
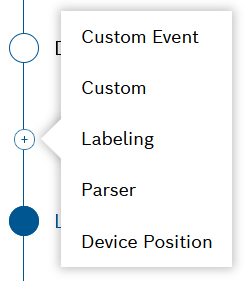
- On the list of steps on the left, hover over the Plus icon
 and click Add Step.
 - Select the relevant step out of the available options, namely Custom Event, Custom, Labeling, Parser, or Device Position.
- If you selected Custom Event, you can define a custom event to be triggered by the pipeline using an event step.
The Custom Event step allows you to produce events based on a simple condition – query on the step payload.
If this condition is met, the custom event is generated and the payload of the step is used as event payload.The pipeline step calls the condition checker. The condition checker sends a custom event to the event service, which executes the actions.
- If you selected Custom, proceed with the following steps:
- Optionally, click the Edit icon to change the step's name.
- In the attachment box, select or drop a ZIP file containing your own code written in Python or Java.
- Optionally, in the Step timeout (in minutes) field, add a value in minutes after which the processing will be aborted. This value should only need to be changed if timeouts occur caused by long processing, otherwise the default value should be kept.
- See also the Custom step code examples in Pipelines: Configuring the custom step to get an impression on how to configure the custom step.
- Optionally, click the Edit icon
- If you selected Labeling, proceed with the following steps:
- In the query field, enter a query to match documents that should be labeled.
- Add a Name and a Value of the label that you wish to be applied to the matching documents.
- Click Add Label to add more labels as needed.
- Click the
 Remove icon next to a label to remove it.
 - Click Remove Step on the bottom if you wish to remove the step completely.
- If you selected Parser, proceed as described in the Configuring the parser section.
- If you selected Device Position, proceed as described in the Configuring the device position step section.
Configuring the device position step
The supported format of the GPS coordinates is WGS-84. Incorrect GPS coordinates are filtered out.
Proceed as follows
- In the Meta Information pane, select the Device ID path in the Device ID field, e.g.
payload.id. - In the Timestamp field, select the timestamp path, e.g.
payload.timestamp. - In the Device type field, select the device type the new devices will be assigned to.
- In the GPS Coordinates pane, select the latitude path in the Latitude field.
- In the Longitude field, select the longitude path.
- In the Altitude field, select the altitude path.
- Open the Advanced Settings drop-down menu to configure options that affect the general processing behavior.
- Activate the Auto-create missing devices toggle to automatically create a device of which the identifier is not yet in Bosch IoT Insights.
→ The device is created based on the selected device type. - Activate the Fail on invalid data toggle to fail the processing of the data upload if mandatory fields are empty or invalid data is encountered. If the toggle is deactivated, the document with invalid data is skipped and the processing of subsequent documents continues.
- In the GPS jitter validation (ms) field, enter a value in milliseconds during which all input data (GPS values, timestamps, altitude) is averaged to prevent excessive device updates and entries in the database.
- In the Time range validation field, select a start date and an end date for which the timestamp values in the input documents are valid.
- Activate the Auto-create missing devices toggle to automatically create a device of which the identifier is not yet in Bosch IoT Insights.
- Open the Tour Generation Settings drop-down menu to decide whether a tour should be generated with the incoming data.
- Activate the Tour generation toggle to generate a tour of the given location information.
- In the Tour generation collection drop-down list, select a collection to store the tour.
- In the Speed validation (km/h) field, enter a value in km/h. Documents with a higher speed than configured will be skipped and not processed. These unrealistic data jumps may derive from the GPS signal.
- In the Tour time separator (min) field, enter a value in minutes after which a new tour document will be started.
- When this step has been configured, the pipeline will produce geo events whenever a device which has a geofence configuration moves in or out of the defined geofence boundaries.
- You can subscribe for such geo events events as described in Event Service.
Processing large files from raw data storage
We recommend to process large files (100 MB and above) by using streaming via a custom step. Depending on the program logic, this may be required to prevent memory congestion.
Therefore you need to create a custom step that can handle two types of input files. First you have to change the configuration in the manifest to get payload references for large files (>10 KB), small files are directly embedded in the injected data. Then configure the corresponding custom step, for more information on how to configure such a step refer to the code examples and the corresponding README files in the Pipelines: Configuring the custom step.
Configuring pipeline error handling
There are use cases, when event publishing can be a crucial part of the processing. For example, when it is used to forward data to an external system for further processing. In other use cases, event publishing may simply serve to notify project users without being an essential part of the data processing itself.
Custom Event, Devise Position, and Custom steps support an option with which you can decide whether the processing should fail on certain errors or not:
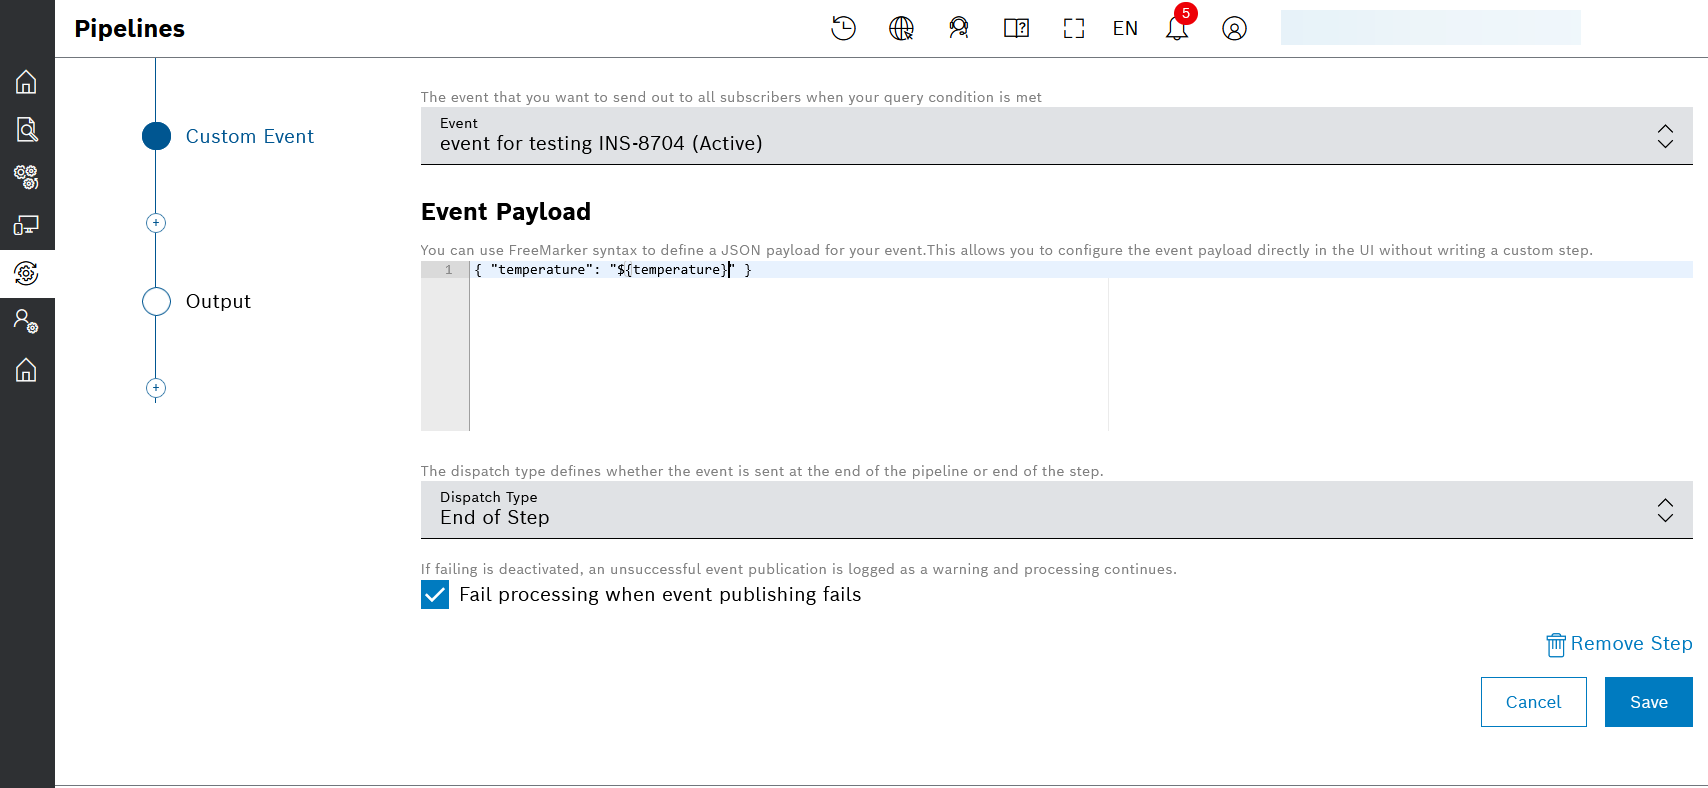
If the configuration option is selected to fail processing when event publishing fails, then processing stops at the given pipeline step and the processing is marked as failed. Otherwise, the processing will continue, and the failed event publishing will just be logged as a warning.
The processing information view will display a yellow warning icon if at least one warning was recorded during the data processing. Clicking on this status icon will open pop-up window, which displays an overview of recorded warnings:

Use the Custom Step to decide which errors should cause data processing to abort, and which should merely be treated as warnings. An example of this can be found under the custom step implementations provided with the Java- and Python-based code examples in Pipelines: Configuring the custom step. This approach is useful when you want to make specific errors visible in the frontend without halting data processing.
For instance, custom step logic could be used to verify that input data is in the correct format. Any discrepancies would be added to a list of warnings that is stored in the processing status and displayed in the frontend. The custom step example mentioned above expects incoming data to include a temperature value. If this value is not a number but a string, only a warning is recorded, while processing continues.