Already processed data can be reprocessed in case the pipeline which was used for processing the data in the first place has been changed.
Already processed data can be reprocessed also if it was uploaded within the 7-day period preceding a pipeline's trigger event and the pipeline's default behavior has not been adjusted.
Be aware that this 7-day period preceding the trigger event applies also to the first starting of a newly created pipeline. If you need to adjust this default behavior, refer to Configuring a pipeline.
Depending on the processing pipeline configuration, a change of the metadata attributes may trigger a new processing of the input document.
For projects without pipelines, the old processed data is deleted and then reprocessed. For projects with pipelines, the processed data is not deleted but only reprocessed.
![]()
Prerequisites
You are assigned to the Admin role.
Reprocessing the input history
All entries in the input history, except for archived ones, can be reprocessed.
For Non-Premium Plan Project, proceed as follows
- Optionally, set a filter to narrow down the list of input history entries.
- Click the
 Reprocess icon.
→ The Reprocess by filter dialog is displayed.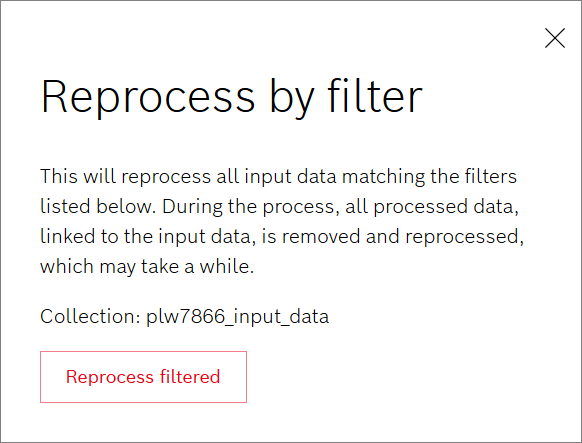
Click the Reprocess filtered button to reprocess all input history entries.
→ Whether the reprocessing has been successful or not is displayed in the Processing Information menu. The result in the form of the processed data can be seen in the Data Explorer which is linked in the Processing Information menu.
For Premium Plan Project, proceed as follows
- Optionally, set a filter to narrow down the list of input history entries.
- Click the Reprocess icon.
→ The Reprocessing dialog is displayed.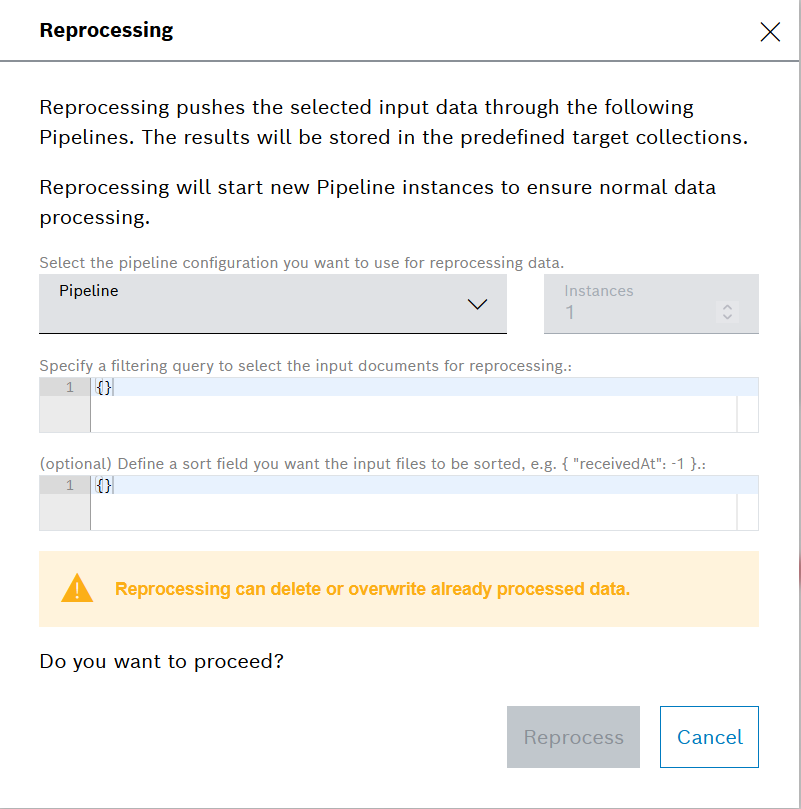
In the Processing Pipeline drop-down list, select the pipeline with which the data shall be reprocessed.
In the Instances field, select the number of instances that should be started to reprocess the data.
A higher number of instances would mean higher reprocessing performance but will also increase the RAM consumption.
Optionally, enter an Input Data Query to select which data should be reprocessed.
- Optionally, enter a query to sort the input files.
- Optionally, enablе the Emit an event checkbox to receive notifications when re-processing documents. By default, this option is disabled.
- In the Advanced Settings, you can select from the drop-down menus the memory and disk limits for the reprocessing pipeline. If left empty, the default values from the pipeline are used.
Click the Reprocess button to start the reprocessing.
→ You will automatically be forwarded to the Pipelines menu. Whether the reprocessing has been successful or not is displayed in the Processing Information menu. The result in form of the processed data can be seen in the Data Explorer which is linked in the Processing Information menu.
Reprocessing an input history entry
Individual input history entries can be reprocessed.
Proceed as follows
- Optionally, set a filter to narrow down the list of input history entries.
- Click the Reprocess icon in the line of the input history entry that shall be reprocessed.
→ The Reprocessing dialog is displayed. In the Processing Pipeline drop-down list, select the pipeline with which the data shall be reprocessed.
In the Instances field, select the number of instances that should be started to reprocess the data.
A higher number of instances would mean higher reprocessing performance but will also increase the RAM consumption.
Optionally, enter an Input Data Query to select which data should be reprocessed.
- Optionally, enter a query to sort the input files.
- Optionally, enablе the Emit an event checkbox to receive notifications when re-processing documents. By default, this option is disabled.
- In the Advanced Settings, you can select from the drop-down menus the memory and disk limits for the reprocessing pipeline. If left empty, the default values from the pipeline are used.
Click the Yes, reprocess button to start the reprocessing.
→ You will automatically be forwarded to the Pipelines menu. Whether the reprocessing has been successful or not is displayed in the Processing Information menu. The result in form of the processed data can be seen in the Data Explorer which is linked in the Processing Information menu.
Viewing the details of a reprocessing job
To view the details of a reprocessing job, refer to Managing reprocessing jobs.