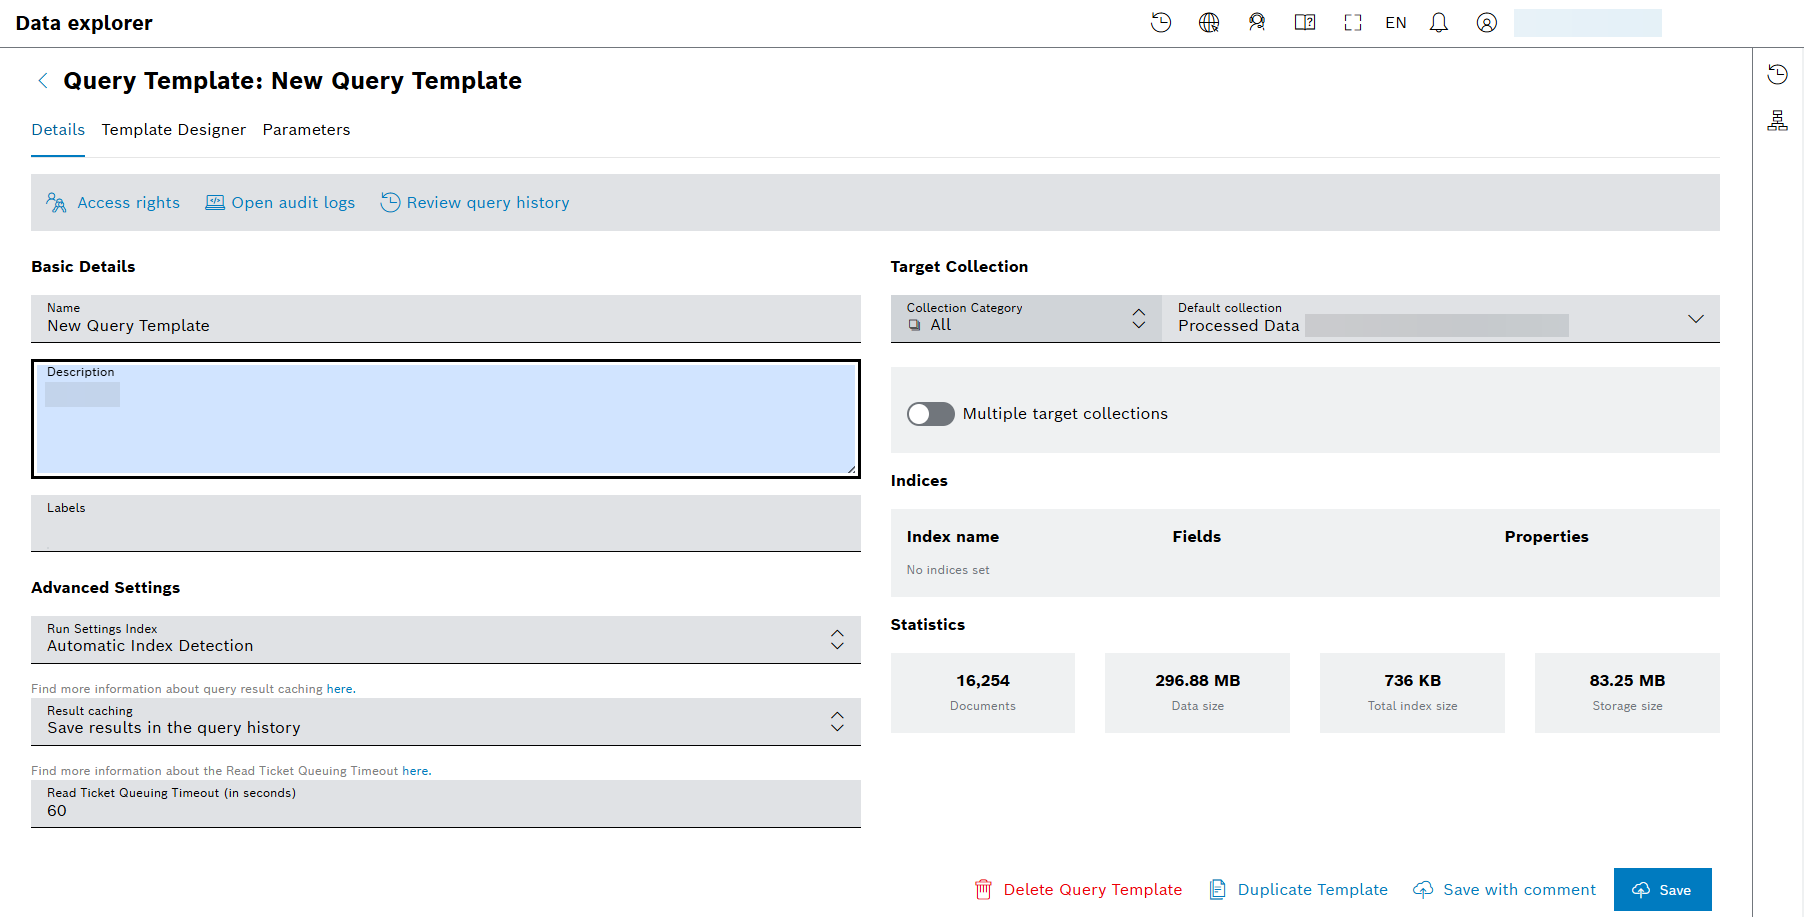
Query templates can be created in the Template Designer to query the data in the Data Explorer. A query template mainly consists of a MongoDB query and input parameters.
Also consult the official MongoDB documentation, e.g.:
Note that the above links to the MongoDB documentation point to the latest MongoDB version. Bosch IoT Insights always uses the version prior to the latest version.
Example MongoDB query templates are located in the Query templates chapter.
Also refer to the following subpages:
- Managing query template access rights
- Configuring a custom endpoint
- Reviewing the Query History
- Viewing the query references
Prerequisites
- You are assigned to the Admin role or have dedicated rights to create new query templates.
- MongoDB queries must comply with the MongoDB extended JSON format, refer to the MongoDB extended JSON chapter.
Proceed as follows
- Click the Add Query Template button.
→ The Details tab is displayed.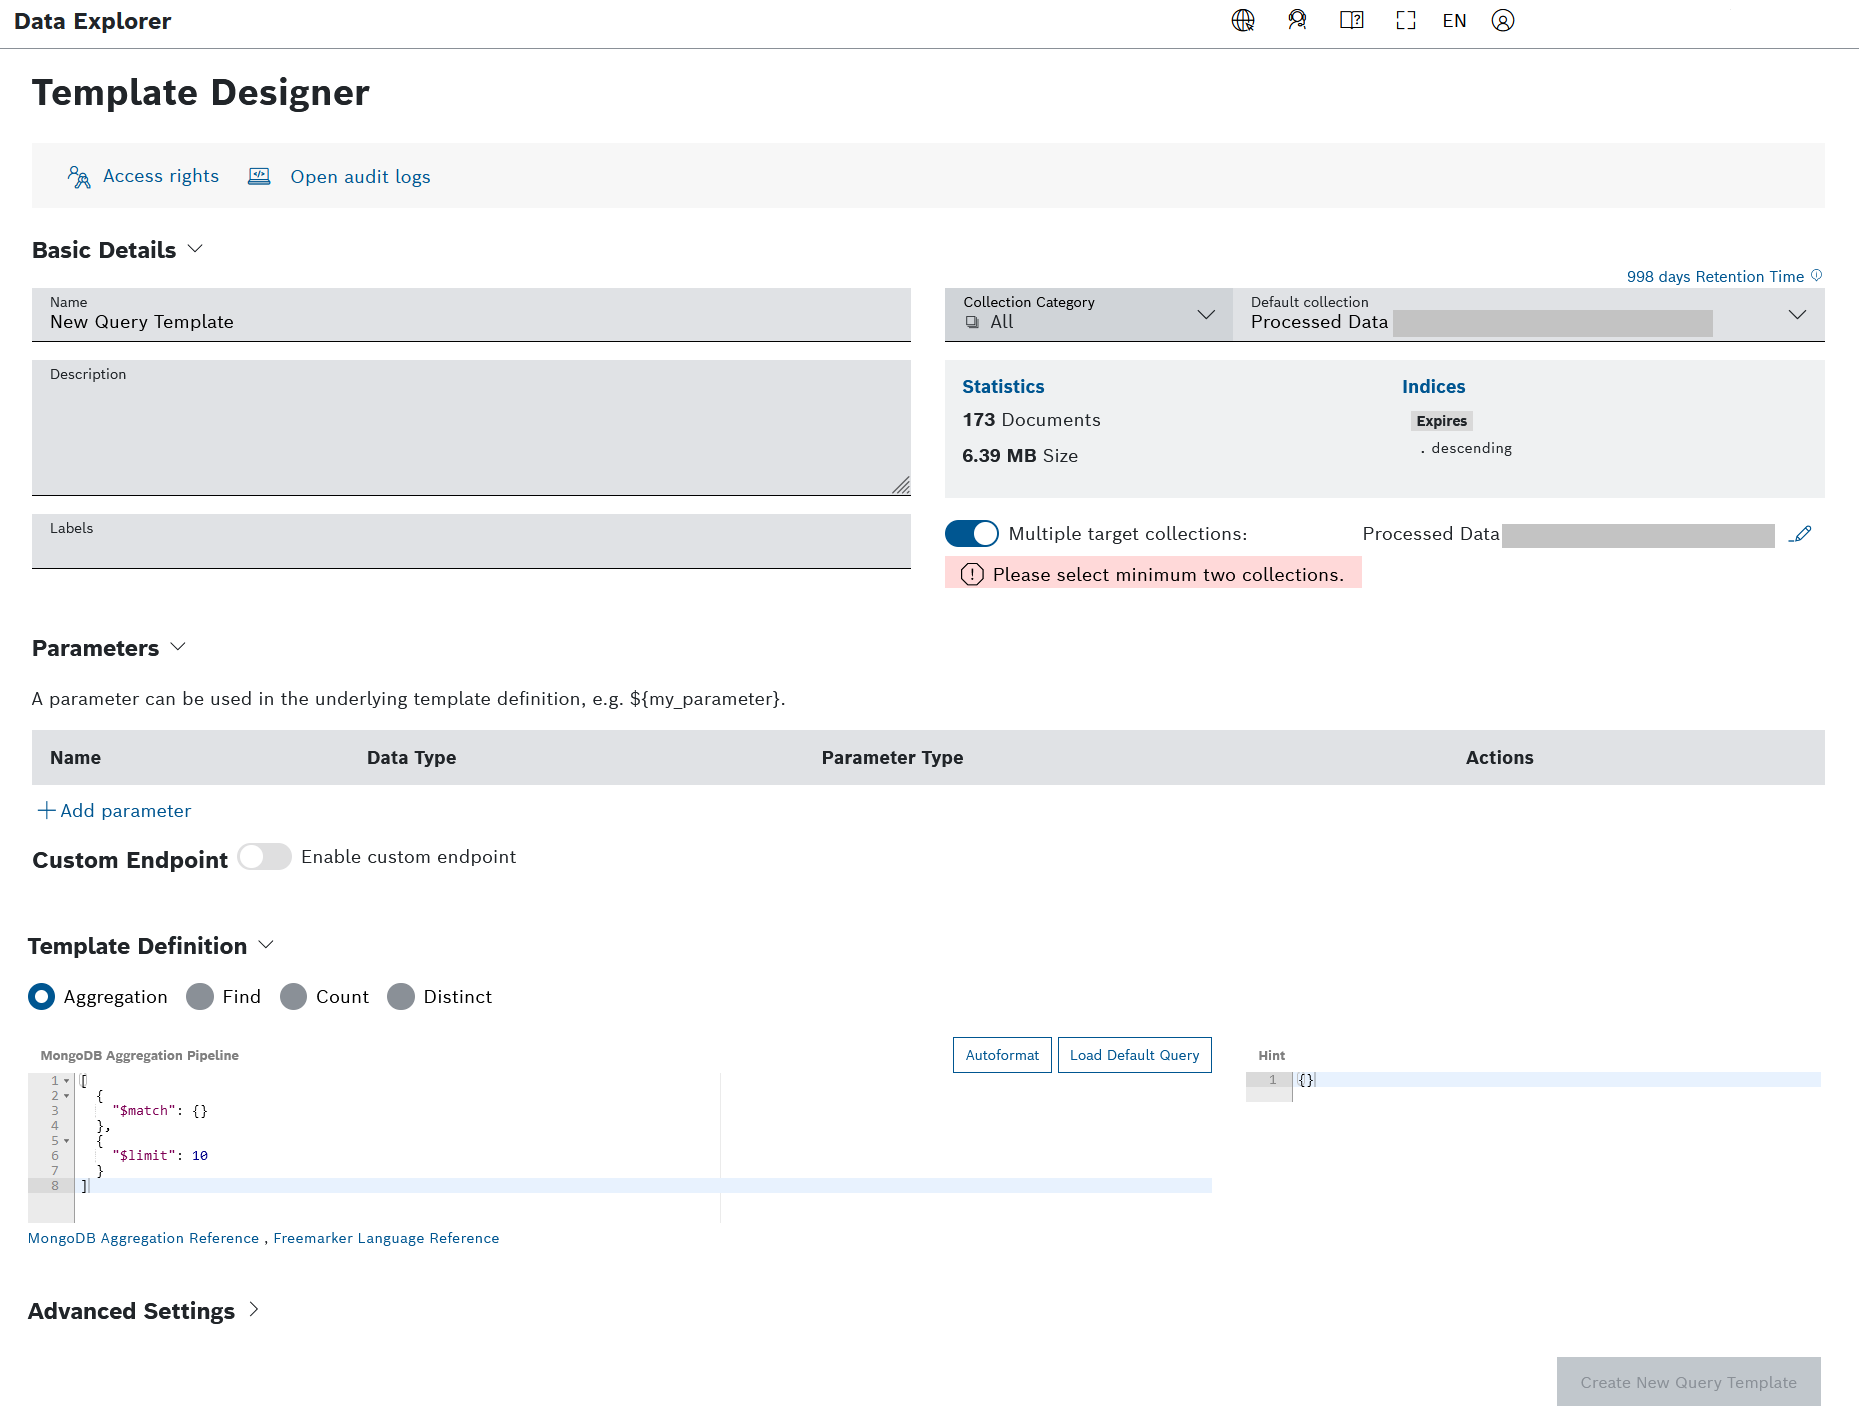
Click the Access rights button to define the access rights of the query template.
For more information on how to set access rights, refer to the Managing query template access rights chapter.
- In the Basic Details pane, provide general information on the query template.
- In the Name field, enter a name for the query template.
- In the Description field, add a description for the query template.
- In the Labels field, add a label which you can later use e.g. for filtering.
- In the Collection Category drop-down list, select a collection category from which you want to select the collection.
In the Default Collection drop-down list, select the default collection that shall be queried.
System collections are internal service collections which contain information and configurations around your subscription. The data structure and properties within this collection can change over time. There is no guarantee from product point of view for the stability on property names or structure within this data.
Therefore, querying these collections for productive use case scenarios should not be done.
- In the Multiple Target Collections toggle, choose whether this query template can be run against only one collection (toggle deactivated) or against multiple collections (toggle activated).If the toggle is activated, you must select minimum two collections, i.e. the default one plus at least one more. Until then, the Create New Query Template button on the bottom of the Template Designer will be disabled.
The multiple target collections option is useful when there are collections with a similar data structure. Thus you are able to run the same query template on the defined allowed collections, instead of creating a new query template for each collection.
To select the allowed target collections, proceed as follows:- Click the edit icon
 near the toggle (see the screenshot above); there is a tooltip saying Select allowed collections.
→ The Select target collections dialog is displayed. - In the dialog, expand the corresponding drop-down lists to select a Collection Category and the allowed Multiple Target Collections.
While there is only one selected collection, the Confirm button is disabled.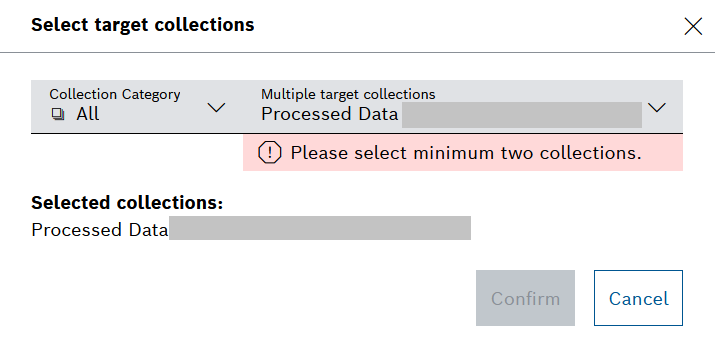
- Click Confirm.
→ The selected collections are listed next to the toggle and can be edited, if needed.
→ Each of these allowed collections can be later on selected as a data source in a widget and can be used as a reference. Refer to Widgets, e.g. Input Widget>Data Sources>Query Template.
→ Each of these allowed collections can be also selected in the Template runner. Refer to Executing a query template.
- Click the edit icon
- From the Parameters tab, optionally add parameters to receive data for a specific value with the query template.
- Click the Add parameter button.
→ The Edit Parameter dialog is displayed.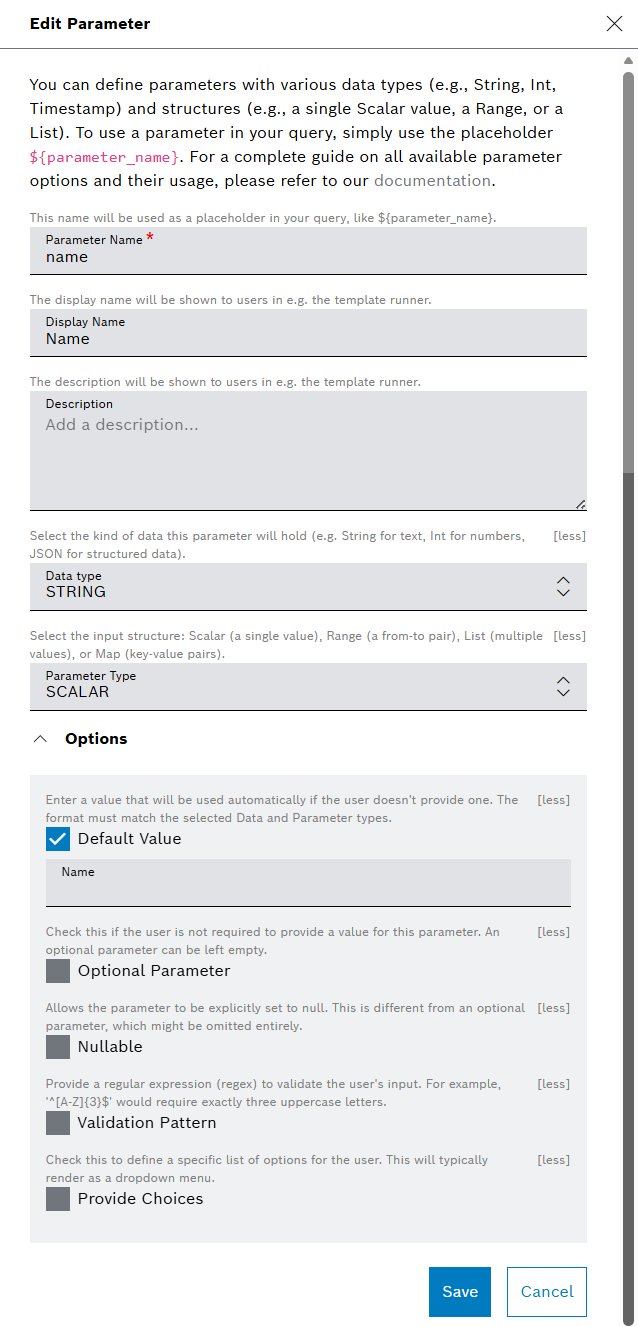
- In the Technical Name field, enter the technical name of the parameter.
- In the Data type drop-down list, select the data type of the parameter.
- STRING: a simple text value
- TIMESTAMP: an ISO 8601 string, for example 2017-07-08T12:00:00.000Z (in absolute time or relative time)
- BOOLEAN: adds a checkbox with the technical name of the parameter that can be activated or deactivated
- INT: an integer value
- FLOAT: a floating point value
- DEVICE: an already configured device
- JSON: lets you freely define custom properties for the Filter Panel widget
- In the Parameter Type drop-down list, select a parameter type.
- SCALAR: a single parameter value
- RANGE: a from-to value range
- LIST: a series of parameter values
- MAP: a key-value mapping while the key is always a string and the value is of the given data type
- Activate the Optional checkbox to define the parameter as optional.
- Activate the Nullable checkbox to search for null values.
- In the Display Name field, enter a name that shall be displayed in the parameter table instead of the technical name.
- In the Description box, enter a description for the parameter.
Activate the Define Default Value checkbox to set a default value.
The default value settings depend on the data type and parameter type you selected in steps c and d.
- SCALAR: Enter or select the value.
- RANGE: Enter a Start Value and an End Value.
- LIST: Enter an Entry 0. Click the Add New Entry button to add more entries.
- MAP: Add a key-value pair to create a mapping. Click the Add New Key-Value Pair button to add more key-value pairs.
- Activate the Define Validation Pattern checkbox to define a regular expression that validates the parameter.
- If you selected SCALAR as parameter type, activate the Provide Choices checkbox to add more values.
- Click the Add choice button to add a label and the value.
- Click the Save button to save the parameter.
- Click the Add parameter button.
In the Custom Endpoint pane, activate the Enable custom endpoint switch to execute the query template by calling the customized URL.
For more information on how to configure a custom endpoint, refer to the Configuring a custom endpoint and Data Explorer: Configuring a custom endpoint chapters.
- From the Template Definition tab, enter the query.
- Select the MongoDB operation:
Aggregation: Create a query with mathematical calculations. The aggregation is performed with the MongoDB aggregation pipeline which transforms and groups the data.
Hint: Enter an index into the Hint object if you want to give MongoDB a hint which index should be used for this query. The index has an own name which may differ from the field name.
Refer to the MongoDB Aggregation Reference chapter in the MongoDB documentation.
Find: Create a query to search for specific documents.
Projection: Enter a specific element into the Projection object to limit the result to given elements of a document.
Sort: Enter a sort query into the Sort object to sort the result ascending or descending.
Limit Results: Limit the number of query results to be displayed.
Hint: Enter an index into the Hint object if you want to give MongoDB a hint which index should be used for this query. The index has an own name which may differ from the field name.
Refer to the MongoDB Find Reference chapter in the MongoDB documentation.
Count: Create a query to count documents.
Hint: Enter an index into the Hint object if you want to give MongoDB a hint which index should be used for this query. The index has an own name which may differ from the field name.
Refer to the MongoDB Count Reference chapter in the MongoDB documentation.
Distinct: Create a query to find distinct values for a specific field.
Field: In the Field field, enter the document field name for which the distinct values shall be searched.
Refer to the MongoDB Distinct Reference chapter in the MongoDB documentation.
- Enter the query.
- Click the Autoformat button to automatically indent the formatting of the query.
Click the Load Default Query button to load the default query displayed below.
[{"$match": {}},{"$limit":10}]
- Select the MongoDB operation:
- In the Advanced Settings pane, define an index and the read ticket queuing timeout.
- In the Run Settings-Index drop-down list, select an index.
- Automatic Index Detection: indices stored in MongoDB are automatically selected
- Collection Scan Ascending: the collection is scanned from top to bottom
- Collection Scan Descending: the collection is scanned from bottom to top
In the Read Ticket Queuing Timeout field, enter or select the length of the timeout in minutes.
The default and minimum timeout is one minute, the maximum timeout is one hour (60 minutes).
In case of a dashboard containing several widgets that execute several queries, it is advisable to increase the value. Otherwise, depending on the current read ticket limit, the queries that end up in the queue, waiting for a ticket to become free, will be discarded because of the short default timeout. That would lead to several widgets without a query result.
In the Result caching drop-down list, select whether you want to store the query results in the Query History.
Caching allows you to store the results of the query you ran. That way, you and other project members can access the result for the next 7 days. This retention time cannot be adjusted. Caching also enables widgets on the dashboard to be loaded faster (see Query caching).
- In the Run Settings-Index drop-down list, select an index.
- Click the Create New Query Template button.
→ The query template has been created. - At this point, you can edit, delete, or duplicate the template. After editing, click the Save button to create a so called 'quick save' version, or Save with comments button to create a 'formal' version with a proper name (comments) and optionally - with tags. For details, refer to Versioning query template user guide.
→ The new query template has been saved.